Create a Payment Link
For prerequisites and additional information check the Pay by Link documentation.
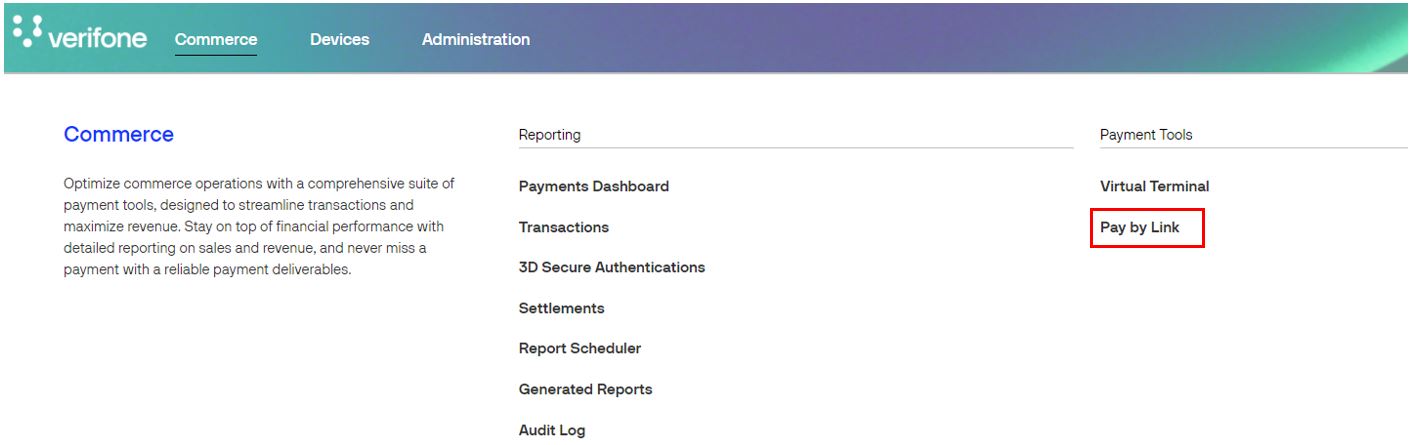
- Log into Verifone Central.
- Navigate to Commerce > Payment Tools > Pay by Link.
-
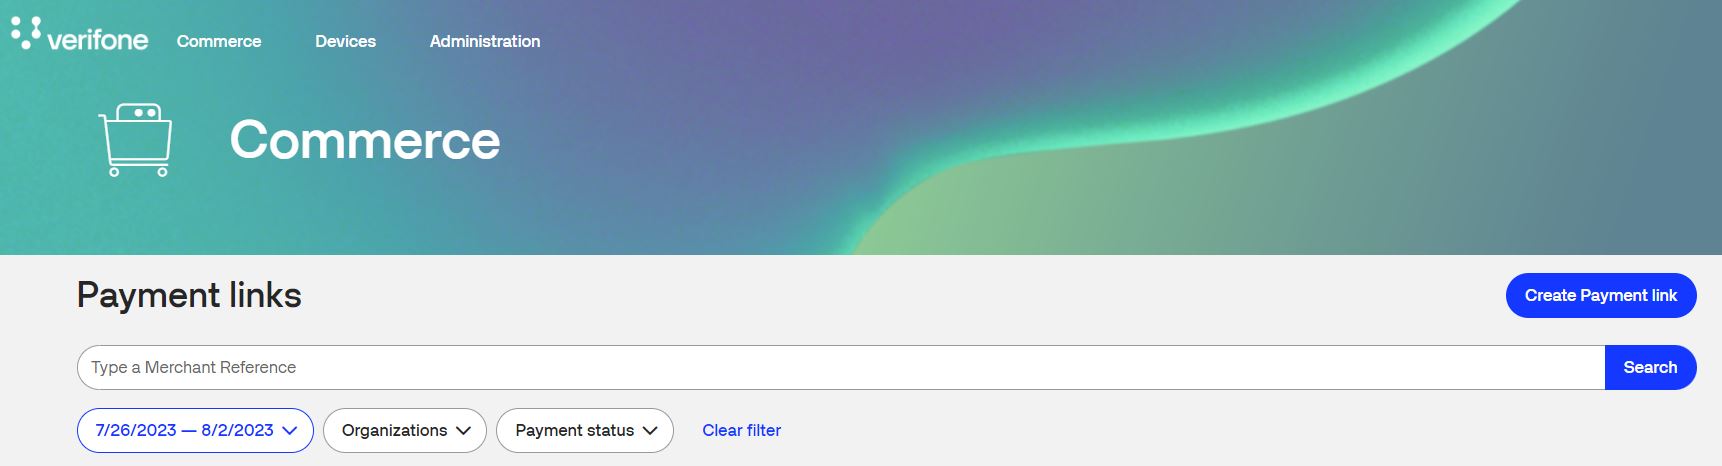
In the Payment Links page, click on the Create Payment Link button at the top of the page.
-
The Create Payment Link page will be displayed. You’ll now be prompted to enter the Payment Settings, such as the Amount, Payment Methods, and Customer information.
Payment settings
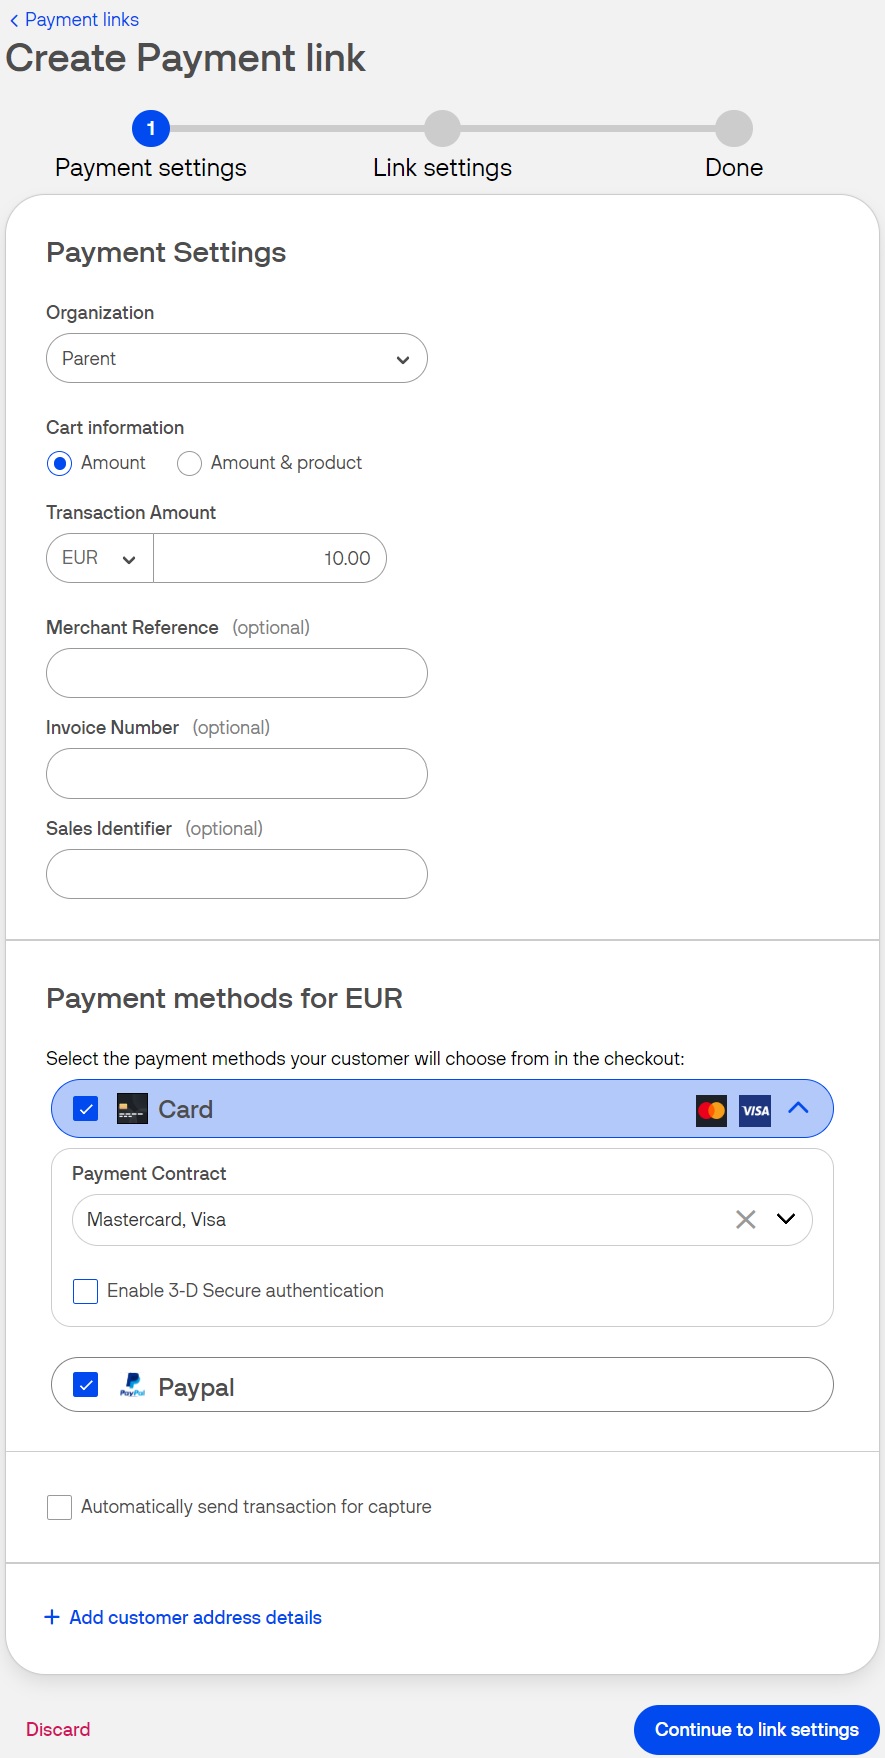
- Select the Organization to which the transaction belongs. If your account is associated with only one organization, this field will pre-populate, otherwise, if it is associated with multiple organizations, you will need to select one organization from the list.
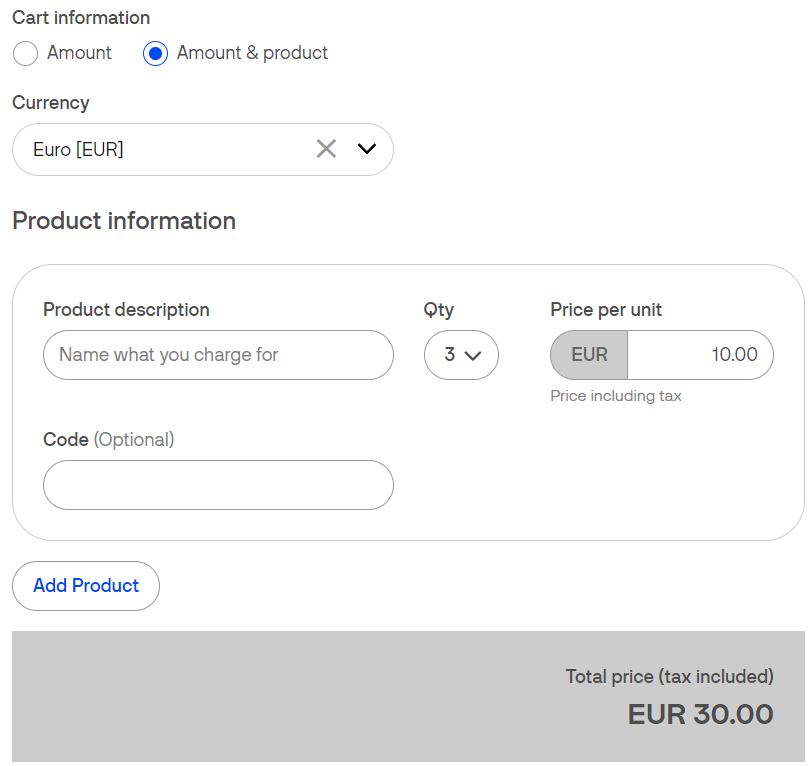
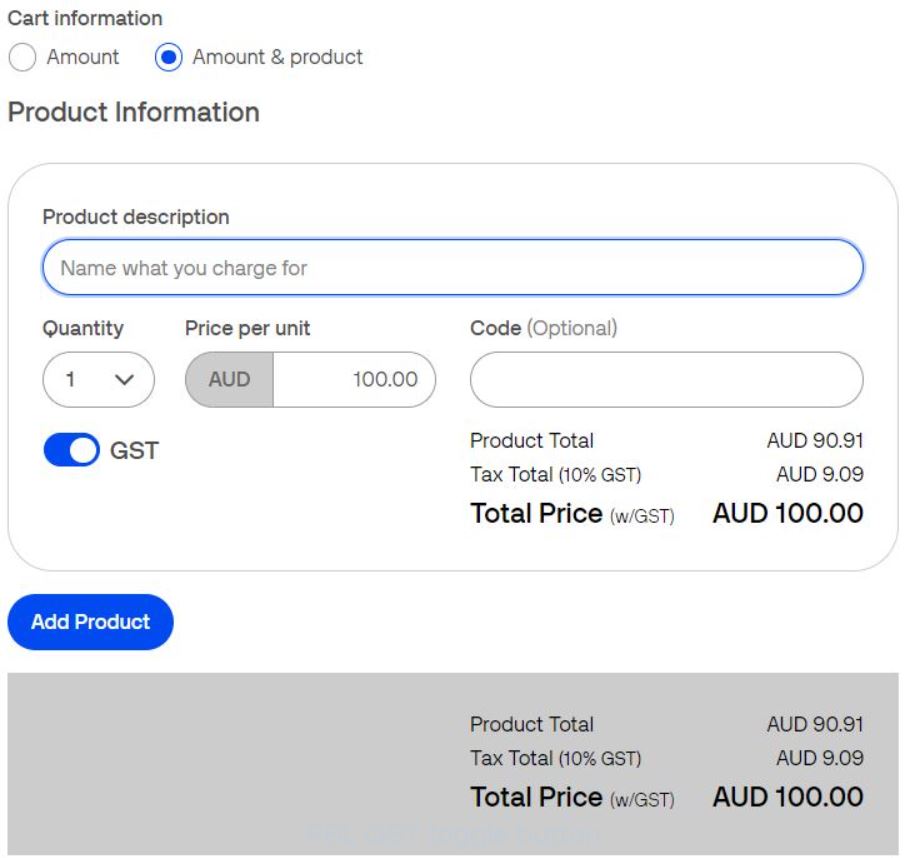
- If the default option for Cart information is selected:
- Use the left-hand side dropdown menu to select the Currency. If you only have one currency available, this will automatically be selected.
- The default currency field will pre-populate as per your Organization's setup.
- Enter the Amount in the righthand side field.
- Use the left-hand side dropdown menu to select the Currency. If you only have one currency available, this will automatically be selected.
- (Optional) (Wood Forest National Bank and Worldpay US merchants only), the following fields will be displayed:
- Amount is taxable: Click the checkbox to indicate the amount of the payment that is taxable.
- Tax Amount: The amount of tax to be paid on the purchase. Only displayed if the Amount is taxable checkbox is checked.
- PO Number (Purchase Order Number): The number of the purchase as assigned by you).
- (Recommended) Enter a Merchant Reference. Text or a number of your choosing to help you identify the payment and link this with your order system. Also used to search for this link within the Payment Links page.
- (Optional) Enter an Invoice Number. Text or a number to help you link the payment with your invoicing system.
- (Optional) Enter a Sales Identifier. Text or a number that some in-store devices also use during the transaction, allowing you to filter across your payment channels.
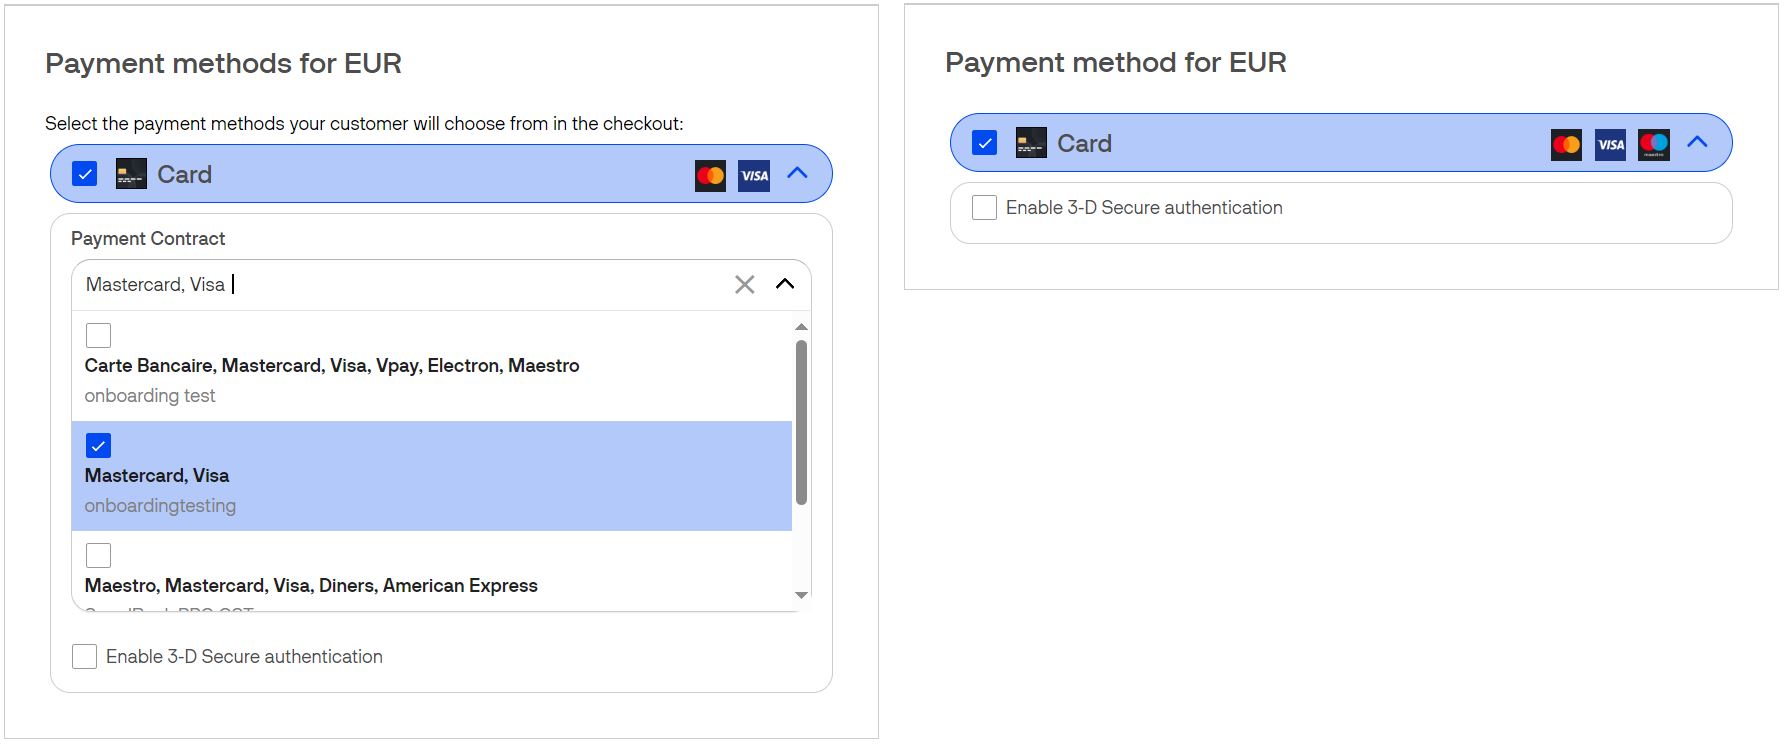
- Select from your available list of your Payment Methods. If you have only one available, this will be automatically selected for you. The payment method needs to be supported by your acquirer.
- (if applicable) The Payment Contract field will be displayed only if there will be more than one available PPC for the selected organization and currency.
- (For Israel) Select Authorization or PreAuthorization as Authorization Type.
- Authorization - An authorization transaction puts the customers funds on hold, which should be used for when the final amount charged is known.
- Preauthorization – Also puts the customers funds on hold but is used for when the final amount captured is not known and may be less than the initial amount
- (If applicable) Choose between Sale and Standard installment in the Credit term field.
- Sale - A standard payment. The sale transaction implies authorization (putting the funds on hold) and capture is done in one single step.
- Installments –Select the maximum number of payments needed.
- (If applicable) For each wallet, choose the SCA Compliance Type.
- None - No 3D Secure authentication will not be required.
- Wallet - 3D Secure authentication will be required at the Wallet providers discretion.
- Force_3DS - 3D Secure authentication will always be required.

- (if applicable) The Payment Contract field will be displayed only if there will be more than one available PPC for the selected organization and currency.
- Check the option for Enable 3D Secure authentication if required. Under the Strong Customer Authentication regulations, 3D Secure is required for all regions except the United States and Canada.
- If you want to perform a sale transaction (authorization + capture), check the Automatically send transaction for capture checkbox. If you leave the this checkbox unchecked, you will have to manually perform the capture after the customer has completed the payment link.
- Enter the Customer details. These are required for 3D Secure, Klarna, MobilePay and Vipps.
- Enter the First Name and Last Name.
- Enter the Phone Number. Use the dropdown menu to select the correct country code.
- The default country field selector will pre-populate as per your Organization's setup.
- Enter the Email Address.
- Enter the Identifier. An optional identifier of the document recipient.
- Personal ID (for individuals)
- Tax identification number (for business)
- Enter the Billing Address information
- (UK merchants only) Do not use the state/province field.
- The default country field selector will pre-populate as per your Organization's setup.
- (Optional) Uncheck The shipping address is the same as the billing address checkbox if you need to enter a different Shipping Address.
Once the payment settings are completed, click on Continue to link settings to proceed and customize the payment link experience for your customer.
Link settings
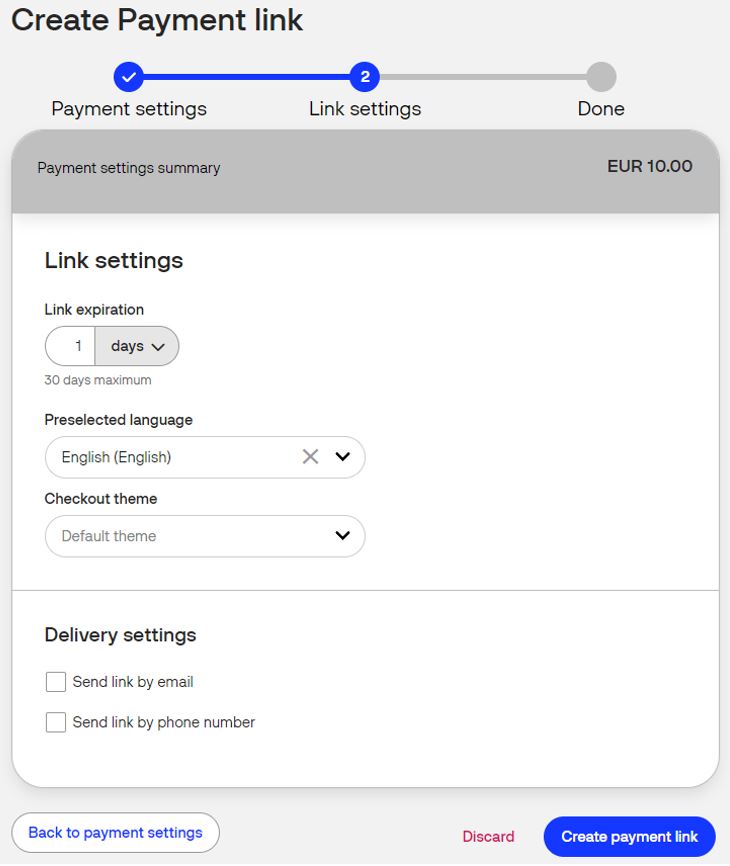
- (Optional) Use the Link Expiration setting to control how long the payment link should remain active. The maximum is 30 days from the time you created the link. Once it expires, the customer cannot access the payment link.
- (Optional) Choose the Preselected language to be used in the customers checkout page.
- (Optional) Set a Checkout theme of your choice to personalize the Pay by Link checkout page. You can choose the Default theme (the default template theme provided by Verifone) or a customized theme created via the Checkout Themes Editor.
- (Optional) Use the Delivery Settings to send the payment link directly to the customer. If you didn't use this option you can always send the payment link at a later time.
- Use Send link by email to send via email.
- Use Send link by phone number to send via SMS text message.
Once you have entered your desired settings, click on the Create payment link button to proceed.
Done page
A success page will be displayed confirming the Payment link was successfully created.
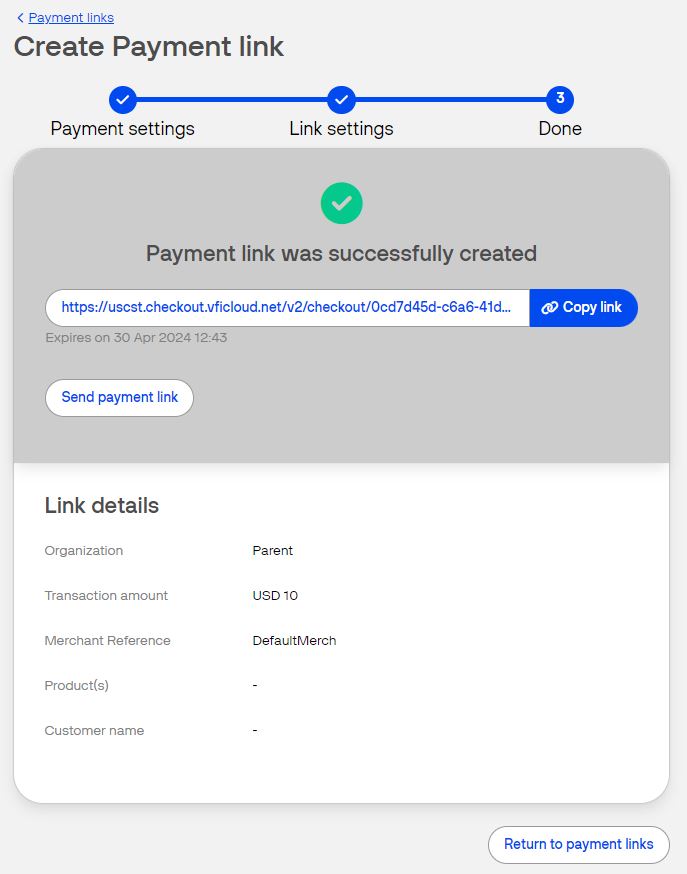
- (Optional) The payment link can be copied to a clipboard, by pressing the Copy link button, allowing you to share the payment link with the customer directly through your desired channel.
- (Optional) The Send payment link button can be used to send the link via an SMS text message or email to the customer.
-
Use the Return to Payment Links button to go back to the Payment Links page.
Payment Link details
-
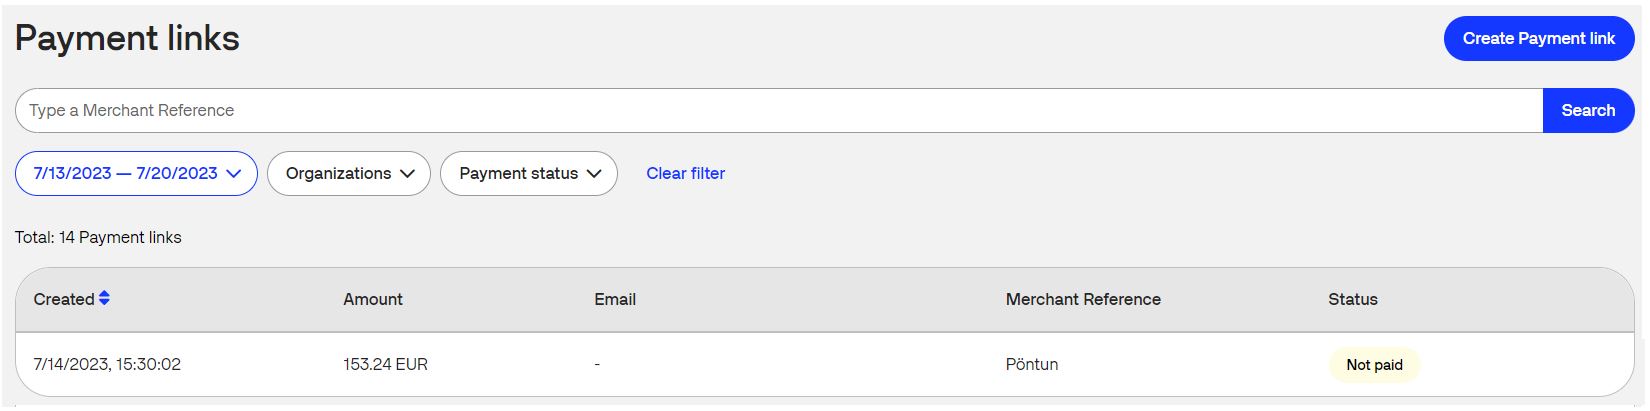
Navigate to the Payment Links page, and find the payment link you wish to send.
- The Created time, Email, Amount, Merchant Reference and Payment Status will be displayed to help you identify each payment link.
- To search for a specific payment link, enter the Merchant Reference in the search bar and click Search.
- You can also filter the displayed payment links by Date, Organizations and Payment status.
-
Confirm the details of the Payment Link and click anywhere on its row for the Payment Link Details to appear.
Confirmation of payment
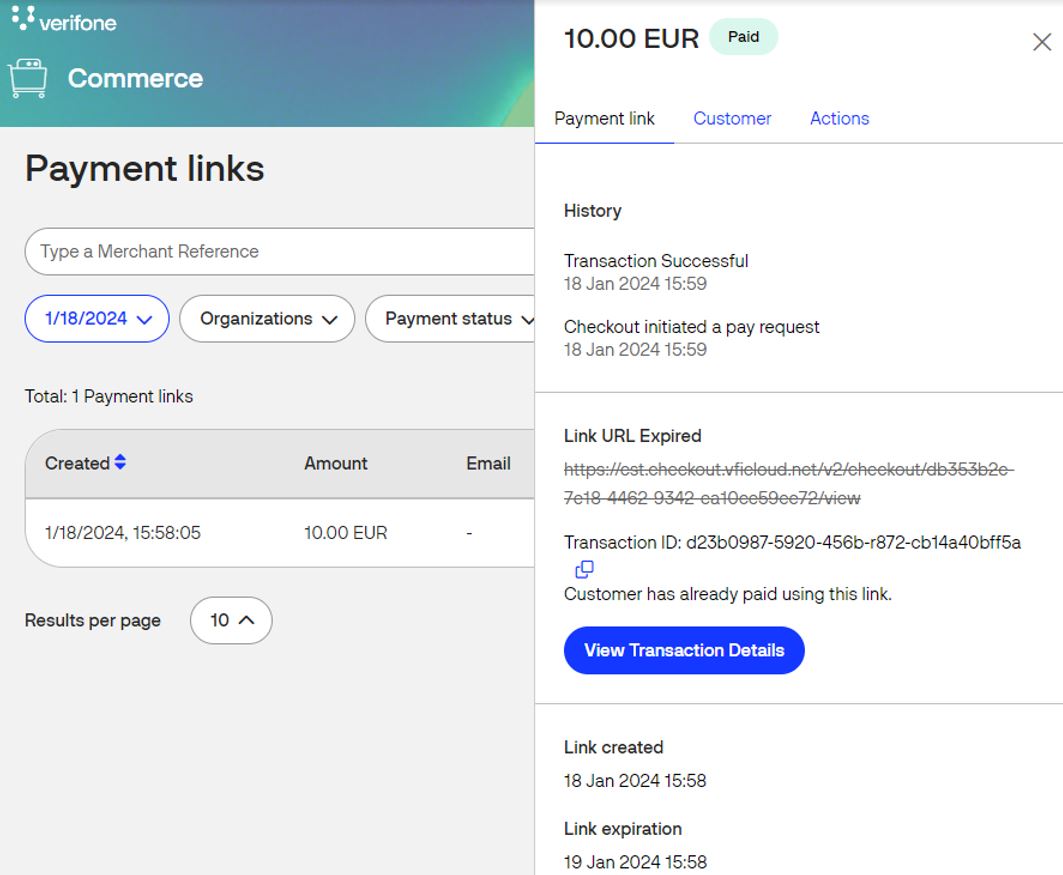
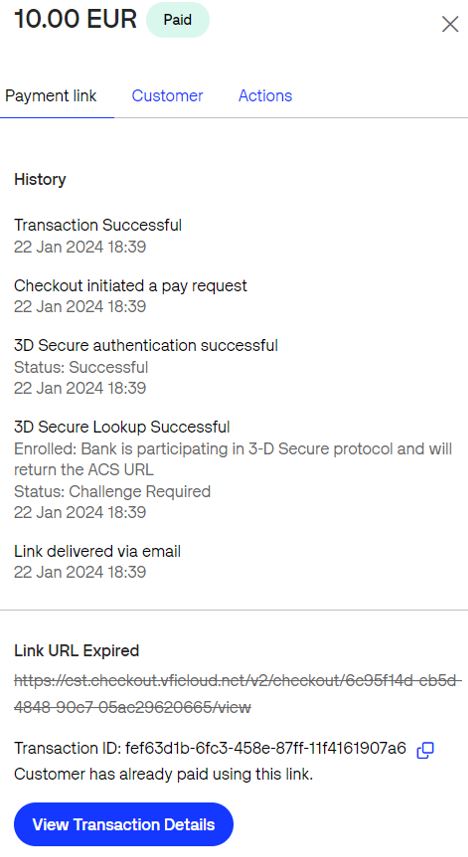
Navigate to the Payment links page and select the desired payment link to view the Payment Link Details.
- The transaction can be considered successful when marked with the Paid Payment Link Status.
- The history will display the Transaction Successful event.
- The View Transaction Details button can be used to be transferred to the Transaction Reports page to view more detailed information about the transaction itself.
Using Pay by Link via the API
Required fields
To configure Checkout for accepting Pay by Link, the following fields are required:
entity_id- This value can be found in the portal or provided to you by a Verifone employee. The Entity ID can be found in Verifone Central under Administration → Organizations. The 'Organization ID' listed is the Entity ID.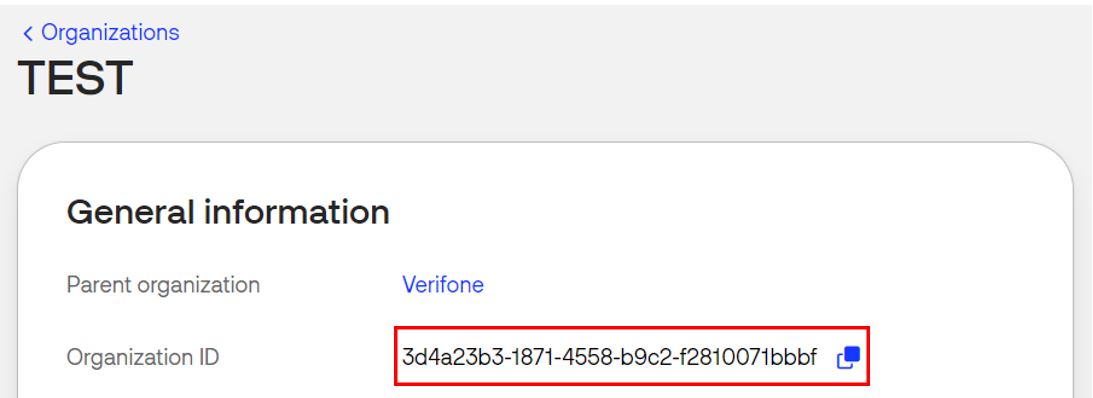
currency_code- Currency codeamount- Transaction amount. Transaction with zero amount value will be considered as account verification and by default implicitly capture will be set to false for an account validation transaction.configurations- Object with one or more payment method configurationsinteraction type- Type of checkout. Allows for distinguishing payments accepted via different channels.
If the link will be sent via email or SMS, then an additional field is required.
notification_methods- The link can be sent automatically using one of the two options (email or SMS) or both of them in conjunction
Here is an example body for creating a Pay by Link:
{
    "amount": 100,
    "currency_code": "NZD",
    "entity_id": "entity_id",
    "customer_details": {
        "billing": {
            "address_1": "Your_Address",
            "first_name": "First_Name",
            "last_name": "Last_Name",
            "country_code": "NZ",
            "city": "Your_City"
        },
        "entity_id": "entity_id",

"email_address": "test@gmail.com"
        },

    "configurations": {
        "card": {
            "payment_contract_id": "payment_contract_id",
            "threed_secure": {
                "enabled": true,
                "threeds_contract_id": "threeds_contract_id",
                "total_items": "01",
                "transaction_mode": "S"
            }
        }
    },
    "interaction_type": "PAYMENT_LINK",
    "notification_methods": {
        "email": {
            "email_address": "test@gmail.com"
        },
        "sms": {
            "phone_number": "+64111111111"
        }
    }

}
The response for creating the Payment Link will look like this:
{ "id": "string", "url": "string"}APIs used to update the transaction status
- Actions that can be performed on a transaction after it was initiated are listed in the Verifone eCommerce API.