3D Secure
Overview
The term 3D means 3-domain: issuer domain, acquirer domain, and interoperability domain (the schemes). The protocol was initially developed by Visa Inc. and adapted later by other card schemes.
Each card issuer has a different name for 3D Secure (3DS), although the flows are the same. The only differences are the exact data exchanged, and the algorithms used to guarantee the authenticity and integrity of the 3DS operation.
Visa’s 3DS product was initially called Verified by Visa (now Visa Secure), Mastercard's is called Identity Check with enhanced functionalities, American Express has SafeKey, Discover/Diners calls 3DS ProtectBuy, etc.
Why 3D Secure?
The purpose of 3D Secure is to add an extra security level to all online payments by applying an additional authentication step for the cardholder before sending an authorization request to the card issuer (Visa, Mastercard, JCB, Amex, etc.). Before 3DS was introduced, the only authentication for online payments was on the CVV2/CVC2/CID, which stands for Card Verification Value 2, Card Validation Code 2, or Card Identification Number.
With the evolution of card-present payments, especially with the introduction of EMV, fraud attempts in the payment industry have been shifted to the more vulnerable channel: online card-not-present (CNP) payments. As you can imagine, hacking or brute-force-attacking a CVV2 is not the most difficult thing. Therefore, schemes had to make the effort to secure the online channel as well. This is the key driver for the introduction of 3D Secure 1.0.
Benefits
- For Card Schemes: offering 3DS to cardholders reduces the dispute handling efforts of both the cardholders and the scheme and increases the acceptance through better merchant confidence.
- For Acquirers and Merchants: 3DS helps reducing the chargeback rates, hence providing better protection to merchants. At the same time, it also helps increase sales due to the improved confidence of the cardholders.
- For Issuers: 3DS adds value to existing product offerings and gives cardholders confidence when shopping online.
- For Cardholders: 3DS improves confidence when shopping online.
Glossary
Before diving into the 3D Secure flows, a few roles and terminologies need to be explained.
As mentioned earlier, 3D means the three domains that are involved in securing online payments: issuer domain, acquirer domain, and interoperability domain.
- Issuer Domain: responsible for managing the enrolment of their cards for 3DS service and authenticating the cardholders during the 3DS authentication.
- Acquirer Domain: responsible for onboarding the merchants and requesting 3DS authentication during online payments. By requesting 3DS operation, the liability of the acquirer is shifted to the issuer for online CNP transactions.
- Interoperability Domain: responsible for facilitating the exchange of requests/responses between the issuer and the acquirer domains.
Each domain, therefore, would need a technical component to facilitate the 3DS flow:
- MPI (Merchant Plug-in): the acquirer domain component, which creates and processes payment authentication messages. This functionality may be performed by the acquirer or a third party.
- DS (Directory Server): the interoperability domain component, which is responsible to facilitate the message exchanges between MPI and ACS, as well as determining whether card/acquirer/merchant is participating in the 3DS services.
- ACS (Access Control Server): the issuer domain component, which mainly performs two tasks:
- Verify if the given card number is enrolled for 3DS service.
- Authenticate the cardholder for a specific transaction. This service can be either hosted by the issuer or third-party providers.
How does 3D Secure work?
A typical process flow of a card payment transaction with 3DS authentication is shown below.
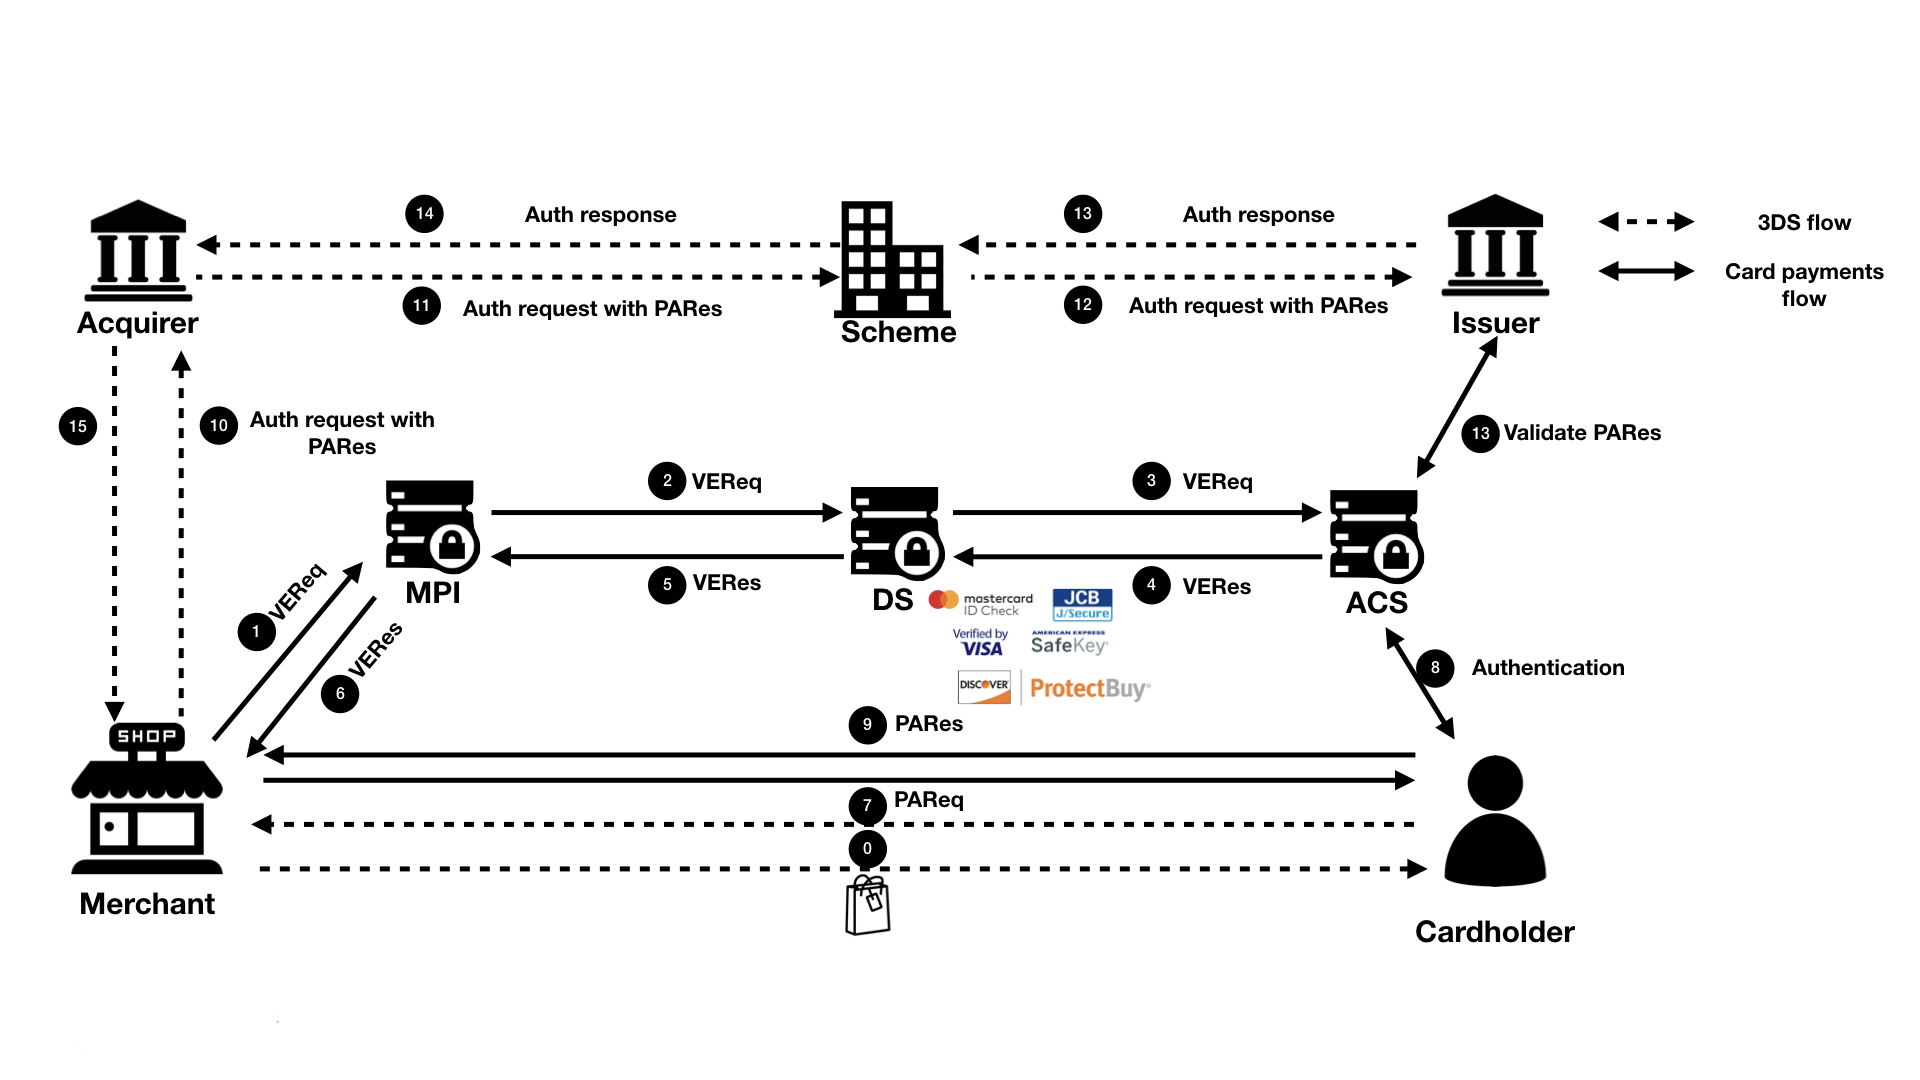
Simply put, a complete 3DS operation consists of two steps:
- Merchant “ASKS” the issuer: "Can this card do 3DS?” If the issuer’s answer is NO, the flow ends.
- If the answer to question one is YES, then the merchant redirects the cardholder to the issuer’s authentication site to complete the authentication.
In short, 3DS is a separate flow, which happens before an authorization request is sent. The flow is handled by a web-based system that consists of MPI, DS and ACS. The communication between these systems is completely decoupled from the traditional card payment processing rail. Why?
- It is difficult to embed such flow into the card payment rail, which is built on top of ISO 8583 that does not have such a concept
- It is easy for acquirers, issuers, schemes to implement the support without interrupting the normal card payments processing
- It is based on more advanced technology, which is easier to integrate (compared to the ISO), and does not require special hardware
Step-by-step 3D Secure Flow
The detailed processing flow is explained as below:
- Step 0: The cardholder requested to pay for a purchase online.
- Step 1: The merchant decides to use 3DS to authenticate the cardholder before sending an authorization. So, the merchant sends a Verification request (VEReq) to the MPI, which then routes the request to scheme DS. At a minimum, the following data are included in a VEReq: card PAN, expiry dates, transaction amount, currency, transactions date.
- Step 2: Scheme DS, when receiving the VEReq from MPI, checks if the combination of the merchant, acquirer and card number that is making the request has been enabled at scheme side. If not, such request will be directly rejected. Otherwise, DS will route the VEReq to ACS.
- Step 3: When receiving the VEReq, the issuer ACS will check the internal registration record to determine if the card has been enrolled for 3DS service.
- Step 4: The issuer responds to the VEReq with a VERes message. Depending on if the card has been enrolled at the issuer, the following responses can happen in the VERes:
- Status = Y (card enrolled), hence a redirect URL is included for cardholder authentication later
- Status = N (card not enrolled), hence a redirect URL is not included
- Status = U (unable to verify). This can happen when the issuer’s ACS server is down. In this case, a redirect URL is not included.
Why this step? Because the merchant needs to first query the issuer to see if the card can be used for 3DS authentication.
Step 5 - 6: Issuer’s response, VERes, is returned to the merchant. Hence, the merchant can decide based on the enrollment status of the card and its own risk policy, e.g., continue with the authentication (in case of Y), continue with authorization without 3DS (in case of N and U), or decline (in case of N and U).
Step 7: In case the enrollment status of the card is Y, and a redirect URL is returned in the VERes message, MPI sends a Payment authentication request (PAReq) message to the ACS via the cardholder's browser. At the same time, the cardholder is redirected to the issuer’s redirect URL for authentication.
- At a minimum, the following data need to be sent in the PAReq: merchant ID, merchant name, merchant country, merchant URL, transaction date & time, transaction amount, currency, card PAN, order description, a unique transaction identifier determined by the merchant/MPI (also called XID).
Step 8: The cardholder interacts with the issuer’s authentication server to authenticate himself. The exact mechanism and authentication method is proprietary to the issuer (e.g., via a static password that was configured at the moment of the enrollment to the service, or a dynamic authentication method that is shared with issuer’s online banking, etc.). Once the cardholder successfully authenticated himself, the issuer’s ACS responds with a Payment Authentication Response (PARes) message, indicating the results of the cardholder authentication.
- PARes is a base64 encoded form of a few data. At a minimum, the following data are included in a PARes: 1. Data from the PAReq message: Merchant ID, merchant name, transaction date & time, transaction amount, currency, card PAN, card expiry, XID; 2. Data from the ACS: authentication result codes, hash of the order description, ECI (Electronic Commerce Indicator) and most importantly a “cryptogram” of the authentication action (in Visa terminology, it is called CAVV, Cardholder Authentication Validation Value. In Mastercard terminology, it is called AAV, Accountholder Authentication Value).
- Note: CAVV/AAV is a cryptogram generated using card PAN, expiry date, a unique number per transaction, and the authentication result code. Why these values? At a minimum, CAVV/AAV should serve the purpose to guarantee the integrity of the card used for the payments, the result of the 3DS authentication, and to make sure that a replay attack is not possible (hence the unique number, e.g., XID).
- Depending on the outcome of the 3DS authentication, the following authentication result codes may be returned:
- Y: Authentication is successful
- N: Authentication fails
- A: Authentication attempted (see the next sections for details)
- U: Unable to authenticate (e.g., Issuer’s ACS is down)
- The ECI value will be set corresponding to the 3DS authentication result.
Note: PARes will always be returned irrespective of the authentication result, so does the CAVV/AAV.
Step 9: The merchant receives back PARes. Based on the result of the authentication (Y, N, A or U), merchant makes decision on whether to decline the transaction (e.g., in case the result is N), proceed the transaction with 3DS (e.g., in case the result is Y or A) or proceed the transaction without 3DS (e.g., in case the result is U). This depends completely on the risk policy of each individual merchant.
Step 10 - 12: The merchant decides to proceed with authorization with 3DS (either fully authenticated or attempted), an authorization message is sent with the PARes data (most of the time, only ECI, CAVV and XID) to the acquirer, which routes the transaction to issuer via the relevant scheme.
Step 13: The issuer, when receiving an authorization request that includes 3DS data, validates the data with its ACS server. (e.g., validates if the CAVV/AVV is valid, and if yes, validates if the requested transaction amount, currency, etc. matches with the data when 3DS was requested.)
Step 14 - 16: The issuer responds to the acquirer (hence the merchant) the decision on the transaction authorization (either approve or decline), including the result of the 3DS data validation (Note: a failed 3DS validation does not necessarily lead to a decline of authorization, but does lead to an indication that the transaction has been DOWNGRADED to non-3DS)
Attempted authentication
When do we get an attempted authentication? Stand-in or attempted service? The attempted service will be hosted either by the card issuer or the scheme. Now, the scheme-hosted solution is most used.
To encourage the merchant to do 3DS even if a card is not enrolled for the service or if issuer ACS is temporarily unavailable, a stand-in mechanism is introduced. To put it simple: this is a service to provide a “proof” that the merchant did make the effort to try 3DS, even though the card was not enrolled, or the issuer ACS was unable to reach. However, the fact that the merchant made the try will be “incentified” by shifting their liability.
As mentioned, there will be two scenarios when the attempted service will be called.
Scenario 1: Card is not enrolled for 3DS. If this is the case, and the card issuer has enabled attempted service, the VEReq message (to check if the card is enrolled) will get a YES response from the attempted service and a redirect URL from the attempted service (rather than the ACS). When the merchant tries to redirect the cardholder to this URL, it immediately gets redirected back to the merchant again, with a PARes which stated the authentication status as A (attempted).
Scenario 2: Card is enrolled for 3DS; however, the issuer’s ACS is unavailable. Hence, the attempted (or stand-in) service is triggered, which again returns a YES response to the VEReq, together with a redirect URL. When merchant tries to redirect the cardholder to this URL, it immediately gets redirected back to the merchant again, with a PARes which stated the authentication status as A (attempted).
Note: Currently, more and more issuers are subscribed to scheme’s stand-in service. Hence, you would notice that more than 80% of the 3DS VEReq messages got a response of Y. It does not mean that more than 80% of the cards have enrolled for 3DS. It only indicates that more and more issuers are participating in stand-in services. As a result of it, you would also notice that a lot of 3DS authentications have an A (Attempted) status. Stand-in is the reason.
Introduction to EMV 3D Secure
EMV® 3D Secure (2.0)
3D Secure 1.0 has faced challenges both on technical and the user experience level. On one hand, the initial protocol added an extra step in the checkout journey (redirection page), which led to reduced conversion rates. As a result, adoption by merchants was very low, as they were seeing more and more customers to abandon during the authentication flow. On the other hand, 3DS 1.0 faced similar challenges when the smartphone era begun. 3DS 1.0 was not designed with the capability of supporting native mobile applications. Merchants who operate their own mobile applications must break the customer journey and use a webview version of the 3DS redirection to the Issuer's website.
Due to the above reasons, the 3DS protocol had to be reviewed and updated as technology and e-commerce market evolve. With the contribution of EMVCo® and their technical associates, EMV® 3D Secure became reality. The latest protocol specification was a collaborative effort of all the global payment networks apparting EMVCo® and is expected to be supported by local schemes as well. With the introduction of EMV® 3D Secure (known as 3DS 2.0), authentication in card-not-present transactions offer better user experience, more capabilities in a more secure manner. The new 3D Secure authentication protocol supports Payment and Non-Payment use cases in App-based, Browser-based and Initiated by the Requestor transactions. In addition, new data elements were added to ensure that a larger piece of information will flow to the Issuers.
The usage of 3D Secure can provide benefits in terms of increased security and the shift of chargeback liability to issuers.
3D Secure is available for card payments, Google Pay, Apple Pay, Vipps and Mobile Pay.
It is not available for Advanced Payment Methods (APM), only for card transactions.
EMV® 3D Secure enhancements
The introduction of the EMV® 3D Secure brought many changes on the way that Cardholder is authenticated. EMV® 3D Secure supports different device channels, new flows, new messages and message categories, and additional data element to be included in the messages.
Device channels
EMV® 3D Secure supports three device channels: App-based (APP), Browser-based (BRW) and 3DS Requestor Initiated (3RI).
The App-based flow will support authentication flows, which take place through a merchant’s application (APK). To support the APP flow, an integration to the 3DS SDK is needed.
The Browser flow in EMV® 3D Secure is an enhanced flow compared to its predecessor. During a Browser flow, the 3DS Method is used to allow the ACS to obtain additional browser information before the authentication is started.
The 3DS Requestor Initiated is used to confirm account information when the cardholder is not directly involved (e.g., confirm that an account is still valid in a subscription).
New flows
During the authentication in 3D Secure 1.0.2, the Cardholder was challenged (step-up authentication) by the issuer. EMV® 3D Secure allows a frictionless authentication (no step-up) based on a risk analysis that the issuer performs. A typical frictionless (left) and challenge (right) flow are presented below.
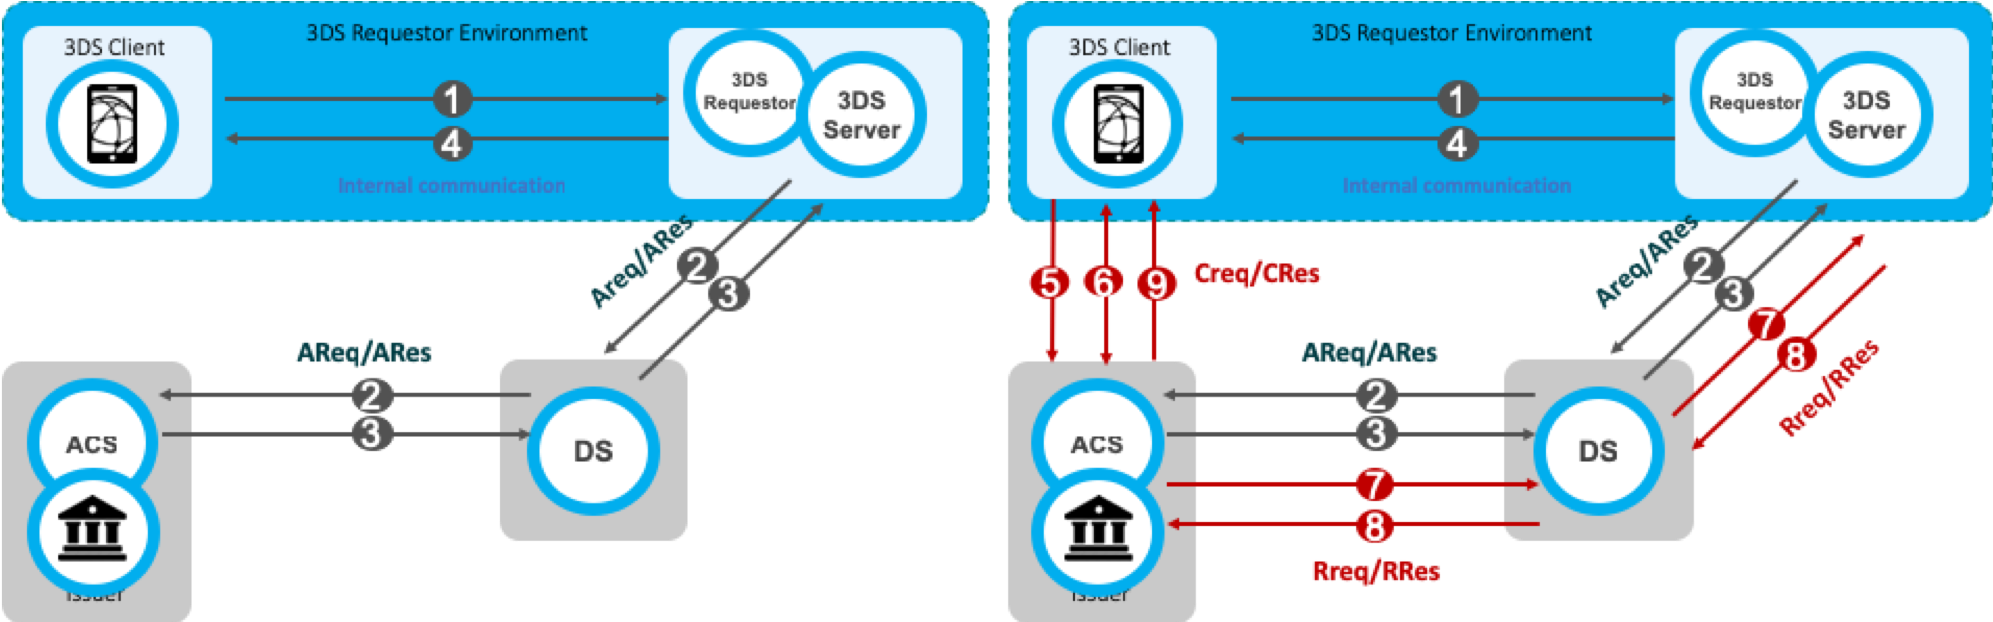
The frictionless flow begins with the initiation of the 3D Secure transaction (step 1) and is completed with communicating the result of the risk analysis to the Browser/SDK. The challenge flow begins with step 1 (lookup request) and continues beyond step 4 to challenge the cardholder (steps 5, 6 and 9) and communicate the result of the authentication back to the 3DS Server (step 7 and 8).
In detail:
Step 1: The cardholder initiates a 3D Secure transaction, and the relevant information is sent to the 3DS Server.
Step 2: The 3DS Server sends the Authentication Request (AReq) to the payment network (DS) and finally reaches the Issuer (ACS).
Step 3: The Issuer at this point decides whether to continue with frictionless or challenge flow and returns the result within the Authentication Response (ARes).
Step 4: The 3DS Server informs the Browser or the SDK regarding the Issuer's decision. If the Issuer has decided to frictionlessly authenticate the cardholder, then the transaction has been completed. However, if the Issuer decided to challenge the cardholder, then the transaction continues with the next step.
Step 5: The Browser/SDK sends the Challenge Request (CReq), which initiates Cardholder interaction with the issuer and can be used to carry authentication data from the Cardholder.
Step 6: The Challenge Response (CRes) is the issuer’s (ACS) response to the CReq message. It can indicate the result of the Cardholder authentication or, in the case of an App-based model, also signal that further Cardholder interaction is needed.
Step 7: Once the challenge has successfully completed, the issuer sends the Result Request (RReq) to communicate the results of the authentication.
Step 8: The Result Response (RRes) is sent by the 3DS Server and acknowledges receipt of the RReq message.
Step 9: After receiving confirmation that the RReq is received, the ACS sends the Final Challenge Response to inform that the authentication has been completed.
In addition to Frictionless and Challenge flows, Out-of-Band (OOB) flow has been introduced. Out-of-Band flow is the same flow to the standard Challenge flow with the only difference that between Step 5 and Step 6 the challenge (step up) takes place outside the 3D Secure protocol. During the OOB authentication, the Cardholder authenticates to the Issuer while interacting with the ACS outside the scope of the EMV® 3D Secure specification. For example, an OOB authentication could take place using a push notification to a banking app that completes authentication and then sends the results to the ACS.
New messages and data elements
Besides new device channels, the new version of 3DS introduces new messages and data elements. The table presents the new messages compared its predecessor.
| Flow | 3D Secure 1.0 | EMV® 3D Secure 2.0 |
|---|---|---|
| Preparation | Preparation Request/Response (PReq/PRes) | |
| Authentication | Verification Request/Response (VEReq/VERes) | Authentication Request/Response (AReq/ARes) |
| Challenge | Payer Authentication Request/Response (PAReq/PARes) | Challenge Request/Response (CReq/CRes) |
| Results | Results Request/Response (RReq/RRes) |
The new messages also carry new, additional data elements. The messages have been enriched to carry much more information regarding the transaction and the Cardholder to the Issuer. The new data elements refer to Cardholder information, device/browser Information, 3DS Requestor Information and they facilitate the Issuer on the authentication decision. Not all the data elements are required to initiate a 3DS transaction, however, the more information the Issuer has for the Cardholder and the merchant, the higher possibilities for a frictionless flow are.
Available integrations
The new solution of 3D Secure is available for these integrations:
Automatic fallback to 3DS 1.0 if the issuer does not support EMV® 3DS 2.0
When using Verifone's 3DS solution, the 3DS Server will always try to route the transaction through EMV® 3D Secure (2.0) rails. If the issuer does not support or the card is not enrolled for the latest version of 3D Secure, an automatic fallback to 3DS 1.0 takes place. In such a way, if the enrollment response is not positive, there is no need to initiate a new 3D Secure 1.0 transaction.
Demo
Interested to get a first taste of how the checkout will look like?
Please follow the below steps for Direct Integration.
Browser flow using the 3DS JavaScript and API
For directly using our API to perform 3DS transactions, you need to integrate on your website a JavaScript that handles the step-up interaction with Cardholder and gathers the browser information. The figure below presents the complete flow when a browser is used by the cardholder to purchase a good. The payment flow consists of four parts: the setup, the actions before the customer initiates the purchase (clicks buy button), the Authentication, and the Authorisation.
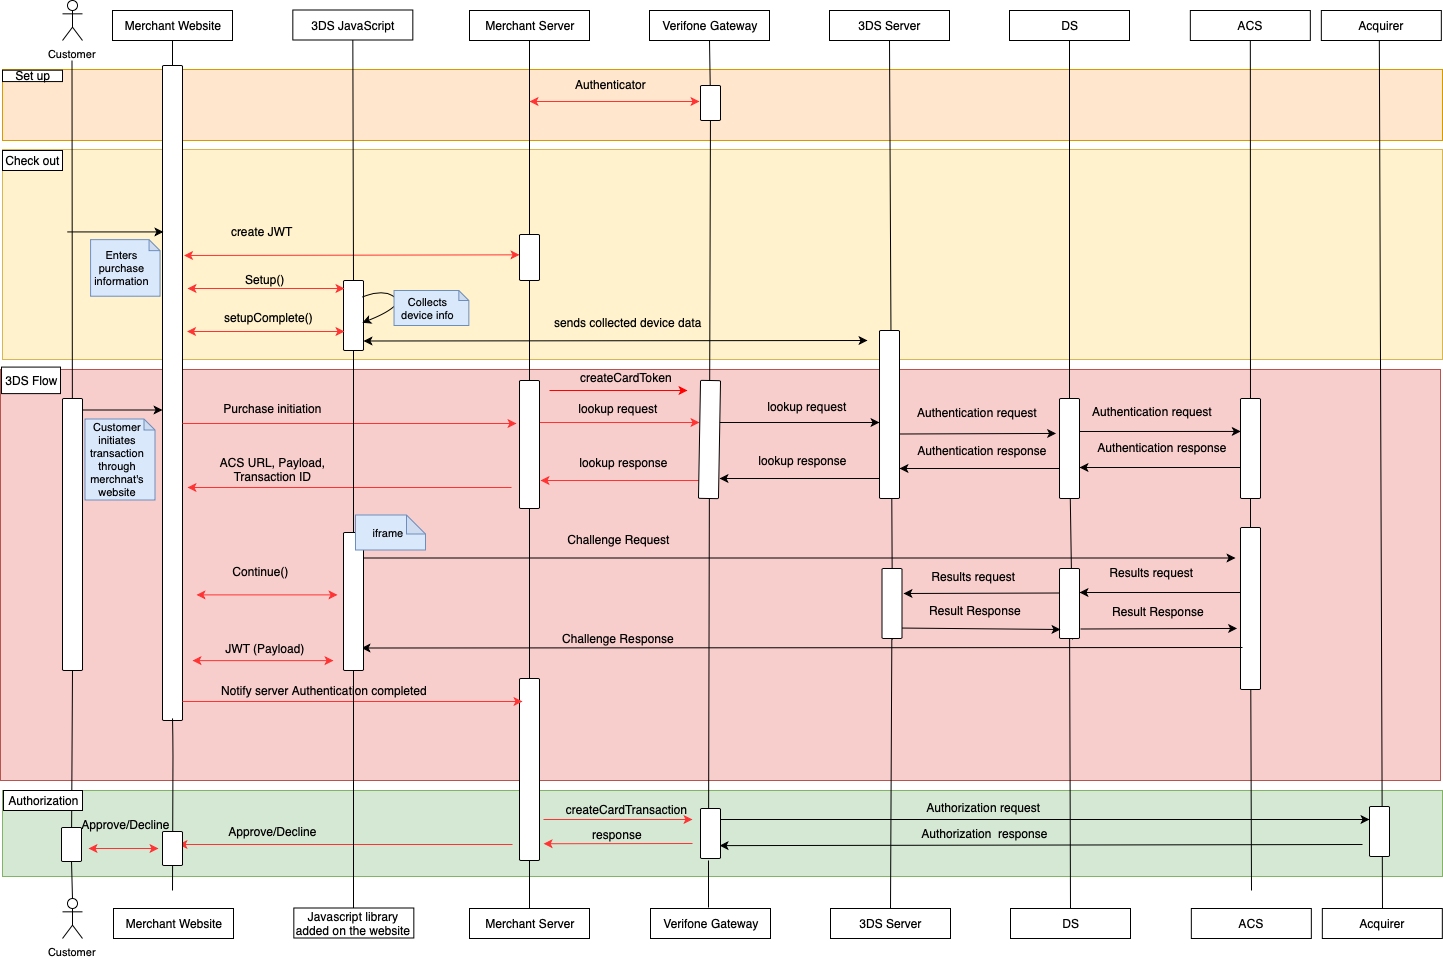
Set up
During the set-up part, the merchants will receive their credentials and assistance how to set an authenticator and 3DS account details.
Checkout
The checkout section takes place when the cardholder fills in the payment details. The following steps shall be completed prior to the cardholder initiating the transaction (clicks ‘Buy/Order’).
Create a JWT in the backend server as described here.
Include the JavaScript on the website as described here.
a. Configure it (optional)
b. Listen for events
c. Initialize the Songbird
d. Use the BIN detection to successful complete the 3DS Method
e. When 'payments.setupComplete' event is returned the set up step has been completed
3DS flow
The Authentication flow begins when the Cardholder initiates the transaction (clicks ‘Buy/Order’).
- The Cardholder has initiated the transaction send the lookup request using the lookup API and in response receive the lookup response
- In the lookup response, the Issuer has defined whether the Cardholder is required to continue with the challenge flow (step up). If the Issuer requests a challenge to happen, send the Cardinal. Continue as described in section 1.5.
- When "payments.validated” is event returned (see payments.validated), send the JWT to the backend and validate it (see JWT Validation)
- Use the payment details to authorise the payment.
Processing the lookup response
After the ‘Lookup Response’ is returned, the merchant shall analyze the result of ‘enrolled’ and ‘pares_status’ to verify that the transaction is eligible for Authentication. A transaction is eligible to continue the Authentication when the data element ‘enrolled’ contains a ’Y’ value.
- If the data element ‘enrolled’ contains a ’Y’ value and the ‘pares_status’ contains the value ‘Y’ then the authentication was successfully completed in a frictionless way (frictionless flow).
- If the data element ‘enrolled’ contains a ’Y’ value and the ‘pares_status’ contains ‘C’, then get the acs_url (AcsURL), payload (Payload), and transaction_id (TransactionId) and include them in the Cardinal.continue function in order to proceed with the authentication session. The Cardinal.continue will display a modal window and automatically post the consumer's session over to the acs url for authentication (section 1.5 Cardinal.Continue).
- If the data element ‘enrolled’ contains a ’Y’ value and the ‘pares_status’ contains the value ‘R’, then the issuer is rejecting authentication/verification and request that authorisation should not be attempted.
3DS JS
1.0 Setting up the 3DS JavaScript
The JavaScript used in the browser flow performs most of the heavy lifting on behalf of the merchants. The JavaScript collects all the device data of the user’s browser, communicates directly with the 3DS Server, and handles the user experience of the cardholder during the challenge.
| Merchant’s back-end | Merchant’s front-end | Payment Brand |
|---|---|---|
| 1. Create Request JWT | ||
| 2. Payments.setupComplete | ||
| 3. Start payment | 4. Interaction with the Payment Brand | |
| 5. Payments.validated | ||
| 6. Validate Response JWT |
1.1 Add the JavaScript on website
The JavaScript can be added to your site as any other client-side script, through a script tag. It is suggested to add the script after all your content, before closing the HTML body tag.
| Include the script: |
|---|
Based on the environment, please include one of the following scripts in your site:
| Environment | 3DS JS URL |
|---|---|
| Sandbox | https://songbirdstag.cardinalcommerce.com/cardinalcruise/v1/songbird.js |
| Production | https://you.will.receive.this.url.during.onboarding.js |
1.2 Configure the JavaScript
Cardinal.configure is an optional function that allows to pass configuration object into the JavaScript. Not using this function to your integration will result to use the default configuration options. It is advised to call this function only once per page load and should be called before Cardinal.setup.
Root Level Configuration
| Field | Type | Default | Description |
|---|---|---|---|
| timeout | int | 8000 | The time in milliseconds to wait before a request to Centinel API is considered a timeout |
| maxRequestRetries | int | 1 | How many times a request should be retried before giving up as a failure |
| logging | object | ||
| button | object | ||
| payment | object |
Logging
| Field | Type | Default | Description |
|---|---|---|---|
| level | string | off |
The level of logging to the browser console. Enable this feature to help debug and implement Songbird. Possible Values: off - No logging to console enabled. This is the setting to use for production systems. on - Similar to info level logging, this value will provide some information about what is occurring during a transaction. This setting is recommended for merchants implementing Songbird. verbose - All logs are output to console. This method can be thought of as debug level logging and will be very loud when implementing Songbird, but is the level needed when getting support from the Cardinal team. |
Button
| Field | Type | Default | Description |
|---|---|---|---|
| containerId | string | Cardinal-Payments | The HTML ID value of the container to inject all payment buttons into |
Payment
| Field | Type | Default | Description |
|---|---|---|---|
| view | string | modal |
What type of UI experience to use when Songbird injects payment brand UI elements into the page. Possible Values: modal - Render as a modal window. This view type renders the payment brand over your page, making it feel separate from your page. inline - Render inline to the page. This view type embeds the payment brand into the page making it feel like its a part of your website. |
| framework | string | cardinal |
What kind of view framework should be used to render the payment brand. If your site is using a supported framework and you have custom styles applied to it, we will use that framework to keep the consistent look and feel of your site. When using any other frameworks than 'cardinal', your site is responsible for including the framework assets including CSS, JavaScript, and any other additional files needed. Possible Values: cardinal - Use the custom Cardinal view framework built and maintained by CardinalCommerce. Songbird will handle all UI rendering and styles, no additional work is needed. bootstrap3 - Use bootstrap 3 modal to render the UI elements. |
| displayLoading | boolean | false | A flag to enable / disable a loading screen while requests are being made to 3DS Server API services. This can provide feedback to the end user that processing is taking place and they should not try to reload the page or navigate away. |
For example, to control the logging volume from the library, use the Cardinal.configure function, as seen below:
Cardinal.configure example:
Cardinal.configure({
    logging: {
        level: "on"
    }
});
Example of using all configuration option possible:
{
    timeout: 8000,
    maxRequestRetries: 2,
    button:{
        containerId: 'Cardinal-Payments'
    },
    logging:{
        level: 'on'
    },
    payment:{
        view: 'modal',
        framework: 'bootstrap3',
        displayLoading: false
    }
}
1.3 Listen for events
This function sets up an event subscription with the JavaScript to trigger a callback function when the event is triggered by the JavaScript. A valid event subscription requires a namespace and a callback function to be run when the event is triggered. Calling this function with the same namespace multiple times will result in callback being triggered multiple times.
| The syntax of the function is: |
|---|
| Cardinal.on(EVENT_NAME_SPACE, CALLBACK_FUNCTION); |
The following sections discuss the events that a merchant can listen to.
1.3.1 payments.setupComplete
payments.setupComplete() is an optional event which should be called after the Cardinal.setup() function.
To listen the payments.setupComplete event:
Cardinal.on('payments.setupComplete', function(setupCompleteData){
    // Do something
});
If an error has happened during the Cardinal.setup() function, then the payments.setupComplete() will not be triggered. If your callback gets executed, you know that the JavaScript is available to run transactions. This function will receive two arguments that describe the loaded state of the JavaScript and the current session identifier.
The following object is returned to the merchant on the payments.setupComplete event as the first argument.
| Key | Type | Description |
|---|---|---|
| sessionId | String | Merchant Consumer Session ID - This is the consumer's session ID assigned to this user by 3DS Server API |
| modules | Array of Module State Objects | An array of modules that were attempted to be loaded and their status. You can determine which payment brands were loaded successfully and which may have been configured on the merchant account but failed to load properly. For 3DS, ‘cca’ will be returned. |
Module State
| Key | Type | Description |
|---|---|---|
| loaded | String | Merchant Consumer Session ID - This is the consumer's session ID assigned to this user by 3DS Server API. |
| modules | Array of Module State Objects | An array of modules that were attempted to be loaded and their status. You can determine which payment brands were loaded successfully and which may have been configured on the merchant account but failed to load properly. For 3DS, ‘cca’ will be returned. |
Example of payments.setupComplete data object:
{
  "sessionId": "0_4f85c155-6604-4056-8957-7090412af179",
  "modules": [{
    "module": "CCA",
    "loaded": true
  }]
}
1.3.2 payments.validated
payments.validated event is triggered when the transaction has been finished and the control is given back to the merchant page. It includes data on how the transaction attempt ended, that should be used in the logic for reviewing the results and decision making, how to proceed with the transaction.
If the payments.validated is successful ("ActionCode": "SUCCESS"), then the data needed to proceed with the payment Authorisation (CAVV, ECIFlag, XID, Enrolled, PAResStatus, SignatureVerification) will be included in the "Payment" object.
To listen the payments.validated event:
Cardinal.on('payments.validated', function(decodedResponseData, responseJWT){
    // Do something
});
The payments.validated event consists of the Response Data and the Response JWT.
| Field | Type | Required | Desc |
|---|---|---|---|
| Response Data | JSON object | R | The decoded Payload claim from the response JWT. This is a convenience value that is passed back to the merchant for client-side logic decision making. This object should not be used to send data to third parties, as its validity cannot be confirmed. |
| Response JWT | String | O | Response JWT from 3DS Server API service. This is where the data field came from, except in edge cases where a JWT was not returned due to an error. The merchant should use the data within this value when sending any data to third parties, since the validity of this data can be confirmed server side by verifying the JWT signature. |
The payments.validated can result into three different cases:
| Type | Response Data | Response JWT | Description |
|---|---|---|---|
| Normal Processing | Present | Present | No issues encountered |
| Api Error | Present | Present | An error occurred, but 3DS Server API was able to generate a response JWT. You can validate these error responses by validating the JWT as you would in a successful transaction |
| Service Error | Present | Absent |
An error was encountered, but a response JWT was not generated. This could be many things including: · Request to 3DS Server API timed out · Request JWT failed authentication at 3DS Server API · 3DS Server API is unavailable to receive transactions · JavaScript encountered an unrecoverable error |
Response Data
At minimum, the response data will include a base object as seen below. However, depending on what occurred in the response, additional fields may be present.
| Type | Description |
|---|---|
| ActionCode |
The resulting state of the transaction. Possible values: SUCCESS - The transaction resulted in success for the payment type used. This would indicate the user has successfully completed authentication. NOACTION - The transaction was successful but requires in no additional action. This would indicate that the user is not currently enrolled in 3D Secure, but the API calls were successful. FAILURE - The transaction resulted in an error. For example, with a 3DS transaction this would indicate that the user failed authentication or an error was encountered while processing the transaction. ERROR - A service level error was encountered. These are generally reserved for connectivity or API authentication issues. For example, if your JWT was incorrectly signed, or Cardinal services are currently unreachable. |
| Validated | This value represents whether the transaction was successfully or not |
| ErrorNumber | Application error number. A non-zero value represents the error encountered while attempting to process the message request. |
| ErrorDescription | Application error description for the associated error number |
| Payment | Payment Object |
The payment object for the 3DS transactions is:
| Field Name | Description | Required/ Optional/ Conditional | Field Definition |
|---|---|---|---|
| Enrolled |
Status of Authentication eligibility. Possible Values: Y = Yes - Bank is participating in 3D Secure protocol and will return the ACSUrl N = No - Bank is not participating in 3D Secure protocol U = Unavailable - The DS or ACS is not available for authentication at the time of the request B = Bypass - Merchant authentication rule is triggered to bypass authentication in this use case Note: If the Enrolled value is NOT Y, then the Consumer is NOT eligible for Authentication. |
String (1) | |
| CAVV | Cardholder Authentication Verification Value (CAVV) Authentication Verification Value (AVV) Universal Cardholder Authentication Field (UCAF). This value should be appended to the authorization message signifying that the transaction has been successfully authenticated. This value will be encoded according to the merchant's configuration in either Base64 encoding or Hex encoding. A Base64 encoding merchant configuration will produce values of 28 or 32 characters. A Hex encoding merchant configuration will produce values of 40 or 48 characters. When decoded, the value will either be 20 bytes for CAVV or 20 or 24 bytes if the value is AAV (MasterCard UCAF). | O | String (40) |
| ECIFlag | Electronic Commerce Indicator (ECI). The ECI value is part of the two data elements that indicate the transaction was processed electronically. This should be passed on the authorization transaction to the gateway/processor. | O | String (40) |
| PAResStatus |
Transaction status result identifier. Possible Values: Y – Successful Authentication N – Failed Authentication U – Unable to Complete Authentication A – Successful Attempts Transaction |
O | String (1) |
| SignatureVerification |
Transaction Signature status identifier. Possible Values: Y - Indicates that the signature of the PARes has been validated successfully and the message contents can be trusted. N - Indicates that the PARes could not be validated. This result could be for a variety of reasons; tampering, certificate expiration, etc., and the result should not be trusted. |
O | String (1) |
| XID |
Transaction identifier resulting from authentication processing. Note: Gateway/Processor API specification may require this value to be appended to the authorization message. This value will be encoded according to the merchant's configuration in either Base64 encoding or Hex encoding. A Base64 encoding merchant configuration will produce values of 28 characters. A Hex encoding merchant configuration will produce values of 40 characters. |
O | String (40) |
| UCAFIndicator |
Universal Cardholder Authentication Field (UCAF) Indicator value provided by the issuer. Possible Values: 0 - Non-SecureCode transaction, bypassed by the Merchant 1 - Merchant-Only SecureCode transaction 2 - Fully authenticated SecureCode transaction Note: This field is only returned for MasterCard transactions. |
String (1) | |
| ACSTransactionId | Unique transaction identifier assigned by the ACS to identify a single transaction | C | String (36) |
| ThreeDSServerTransactionId | Unique transaction identifier assigned by the 3DS Server to identify a single transaction | C | String (36) |
| DSTransactionId |
Unique transaction identifier assigned by the Directory Server (DS) to identify a single transaction. Note: Required for Mastercard Identity Check transaction in Authorization |
C | String (36) |
Some samples of different values returned to the payments.validated event are presented below. These JSON objects would be the first argument and the Payload claim of the response JWT where a response JWT was returned.
Successful Response example:
{
   "Validated": true,
    "Payment": {
        "Type": "CCA",
        "ProcessorTransactionId": "uAthLfEYg83iEverTlk0",
        "ExtendedData": {
            "CAVV": "AAABAWFlmQAAAABjRWWZEEFgFz+=",
            "ECIFlag": "05",
            "XID": "dUF0aExmRVlnODNpRXZlclRsazA=",
            "Enrolled": "Y",
            "PAResStatus": "Y",
            "SignatureVerification": "Y"
        }
    },
    "ActionCode": "SUCCESS",
    "ErrorNumber": 0,
    "ErrorDescription": "Success"
}
API Level Error (will include a Response JWT to be validated):
{
    "Validated": false,
    "ErrorNumber": 4000,
    "ErrorDescription": "Validation Error A valid merchant consumer session ID is required.",
    "ActionCode": "ERROR",
    "Payment": {}
}
Service Level Error (will not include a Response JWT):
{
    "Validated": false,
    "ErrorNumber": 1000,
    "ErrorDescription": "Error processing request. We have encountered an unexpected error.",
    "ActionCode": "ERROR",
    "Payment": {}
}
1.4 Initialize JavaScript
To initiate the communication with the server, call the Cardinal.setup() function. All the necessary pre-processing steps should have been completed by the time the consumer is ready to checkout. Listen for the payments.setupComplete event to get notified when the JavaScript has finished initializing (Section 5.4.1).
1.4.1 Set up the JavaScript
Cardinal.setup function informs the JavaScript what type of event you are planning to complete on the page it is running on and what files it needs to bootstrap to facilitate that event.
| Field | Type | Required/ Optional | Description |
|---|---|---|---|
| Initialization Type | String | R | Tells Songbird.js which flow you are setting up |
| Initialization Data | JSON object | R | An object used to pass any additional required data to properly complete Songbird initialization. This object will differ from an initialization type to another. |
Initialization types
| Key | Description |
|---|---|
| init | Set up the necessary files to run the authentication. You should use this initialization type anytime you want to complete payer authentication flows. This type would typically be used on a cart page, or payment details collection page. |
| complete | Set up the necessary files to return the authorization result to Cardinal. You should use this initialization type if you only plan on returning the authorization / authentication results to Cardinal. This type would typically be used on an order complete page that renders an 'Order was successfully submitted' message. |
Example of Cardinal.setup:
Cardinal.setup("init", {
    jwt: document.getElementById("JWTContainer").value
});
A common way to pass your JWT into the JavaScript is to place its value into a hidden input on page load. Using Cardinal.setup() function, you can look for that element and select its value.
Example of placing a JWT into a hidden input:
<input type="hidden" id="JWTContainer" value="[Insert your JWT here]" />
1.5 Cardinal continue
After the Lookup Response is returned, pass the ACSUrl (acs_url), Payload (payload), and TransactionId (transaction_id) and include them in the Cardinal.continue function in order to proceed with the authentication session. The Cardinal.continue will display a modal window and automatically post the consumer's session over to the Issuer’s URL (acs_url) for authentication.
The syntax for Cardinal.continue:
Cardinal.continue(PAYMENT_BRAND, CONTINUE_DATA, ORDER_OBJECT, NEW_JWT)
| Field | Type | Required/ Optional | Description |
|---|---|---|---|
| Payment Brand | String | R | The payment brand to continue. For 3DS, the value ‘cca’ should be passed. |
| Continue Object | JSON object | R | A JSON object containing all the necessary data to complete a 3DS post to an ACS to complete a 3DS transaction |
| Order Object | JSON object | O |
As Order Object pass the following object replacing the ‘authentication_id’ with the value received in the lookup response. Example: {"OrderDetails":{ "TransactionId" :"transaction_id"}} |
| JWT | String | O | An updated JWT to use while processing the transaction. This allows the merchant to switch JWT between init and continue events. |
Continue Object
| Field | Type | Required/ Optional | Description |
|---|---|---|---|
| AcsUrl | String | R | The acs_url returned in the lookup response |
| Payload | String | R | The ‘payload’ field returned on the lookup response |
Cardinal.continue will only work after the payments.setupComplete event has been triggered. Cardinal.continue is suggested to be run later in the flow if payments.setupComplete is not triggered yet.
Example of Cardinal.continue:
Cardinal.continue('cca',
{
    "AcsUrl":"https://testcustomer34.cardinalcommerce.com/merchantacsfrontend/pareq.jsp?vaa=b&gold=AAAAAAAA...AAAAAAA",
    "Payload":"eNpVUk1zgjAQvedXME7PJEFBVdKt1CECeDkVCk2PcfcnNjv8Kr+7tx4nlbGOcz/se6G1uMENPTPeeIz1G37WGEUth7YnpO21TfTvF3wDCBqspQ=="
 },
 {
    "OrderDetails":{
         "TransactionId" :"123456abc"

                       }
        }
);
1.6 BIN detection
To successfully complete the 3DS Method, the Issuing bank should be contacted to receive the browser information before the authentication is started. Therefore, the BIN is required to be communicated to the JavaScript before sending the lookup request.
There are two ways to implement the BIN Detection to a merchant’s web application:
1) Field Decorator
This implementation is the simplest and recommended approach when the full PAN is available. A merchant may directly start the JavaScript, provide the PAN and allow for payments.setupComplete event to complete. A new attribute to the input field to identify which field it maps to within the Order Object needs to be added. The credit card number is mapped to the AccountNumber field, therefore for the BIN Detection the AccountNumber will be passed to the attribute ‘data-cardinal-field’.
Field Decorator Example:
<input type="text" data-cardinal-field="AccountNumber" id="creditCardNumber" name="creditCardNumber" />The field decorator will attach an event listener to the element that will update the BIN as the cardholder types it in. The BIN value will be updated automatically if the cardholder changes cards or needs to correct an entry.
2) Event Based
The bin.process event is the recommended event base profiling the merchant uses a card that is stored on file. The merchant will need to provide a minimum of the first six digits (e.g., BIN) up to the full card number of the consumer (e.g., max of 19 digits). The more digits of the card number provided, the better chances of matching if there is a corresponding EMV 3DS Method URL.
Bin.process example:
Cardinal.trigger("bin.process", '1234567894561237');1.7 Cardinal.trigger
Cardinal.trigger function triggers an event within Songbird. This is a way to actively send Songbird data instead of waiting passively for events to occur.
Cardinal.trigger syntax:
Cardinal.trigger("EVENT_NAME_SPACE", 'DATA');1.7.1 bin.process
For bin.process event described in BIN Detection.
Cardinal.trigger implementation example:
Cardinal.trigger("bin.process", '1234567894561237')
  .then(function(results){
    if(results.Status) {
        // Bin profiling was successful. Some merchants may want to only move forward with CCA if profiling was successful
    } else {
        // Bin profiling failed
    }

    // Bin profiling, if this is the card the end user is paying with you may start the CCA flow at this point or send the lookup request
    Cardinal.start('cca', myOrderObject);
  })
  .catch(function(error){
    // An error occurred during profiling
  })
1.7.2 jwt.update
jwt.update is an event to allow the merchant to change the JWT at any point. This event will update the local cached order object within the JavaScript, but it will not push anything to the Cardinal infrastructure. This removed the need to pass in a new JWT into an event such as Cardinal.start or Cardinal.continue.
Cardinal.trigger implementation example:
Cardinal.trigger('jwt.update', 'my_new_jwt_value');JWT for authentication
The integration uses JWT as a method of authentication between the merchant and the 3DS Server. In this section, the generation and validation of a JWT are discussed.
1. Create JWT to initialize the JavaScript
To initialize the JavaScript, a valid JWT is required. Any library supporting Jason Web Signature can be used. The JWT uses as signature a SHA-256 HMAC hash algorithm and must be created on the server side for security reasons. During the onboarding to the 3DS service, a merchant will receive three values used for authentication.
| Claim | Description |
|---|---|
| API identifier | A non-secure value that should be passed within the JWT under the ‘iss’ (Issuer) claim |
| Org Unit Id | A non-secure value that should be passed within the JWT under the OrgUnitId claim |
| API Key | A secure value that should never be rendered or displayed anywhere your users could find it. The API Key should only be used to sign the JWT and to verify a JWT signature from the JavaScript. It should never be included within the JWT itself. |
Required claims
| Claim name | Description |
|---|---|
| jti | A unique identifier for this JWT. This field should change each time a JWT is generated. |
| iat | The epoch time in seconds of when the JWT was generated. This allows us to determine how long a JWT has been around and whether we consider it expired or not. |
| iss | An identifier of who is issuing the JWT. We use this value to contain the API Key identifier or name. |
| OrgUnitId | The merchant SSO OrgUnitId |
| Payload | The JSON data object being sent to the JavaScript. This object is usually an Order object. |
| ReferenceId | This is a merchant supplied identifier that can be used to match up data collected from the 3DS Server. 3DS Server can then use data collected to enable rules or enhance the authentication request. This value should be parshed as ‘device_info_id’ in the lookup request. |
Optional claims
| Claim name | Description |
|---|---|
| ObjectifyPayload | A boolean flag that indicates how 3DS Server API should consume the Payload claim. When set to true, this tells 3DS Server the Payload claim is an object. When set to false, the Payload claim is a stringified object. Some JWT libraries do not support passing objects as claims, this allows those who only allow strings to use their libraries without customization. |
| exp | Expiration - The numeric epoch time that the JWT should be consider expired. This value is ignored if its larger than 4 hrs. By default, we will not consider any JWT older than 4 hrs. |
Other claims
| Claim name | Description |
|---|---|
| ConfirmUrl | The merchant endpoint that will receive the post back from the payment brand that contains the 3DS Server API response JWT describing the result of redirecting to the payment brand. |
JWT example
{
    "jti": "a5a59bfb-ac06-4c5f-be5c-351b64ae608e",
    "iat": 1448997865,
    "iss": "56560a358b946e0c8452365ds",
    "OrgUnitId": "565607c18b946e058463ds8r",
    "Payload": {
        "OrderDetails": {
            "OrderNumber": "0e5c5bf2-ea64-42e8-9ee1-71fff6522e15",
            "Amount": "1500",
            "CurrencyCode": "840"
        }
    },
    "ObjectifyPayload": true,
    "ReferenceId": "c88b20c0-5047-11e6-8c35-8789b865ff15",
    "exp": 1449001465,
    "ConfirmUrl": 'https://mywebsite.com/confirmHandler'
}
2. JWT validation
When the JWT is received in the payments.validated event, the Response JWT shall be sent to the merchant’s backend to verify and obtain the results.
| Claim | Description |
|---|---|
| aud | Merchant jti Id - This is the 'jti' field from your request JWT echoed back. This field allows you to match up your request JWT with Cardinals response JWT. |
| jti | JWT Id - A unique identifier for this response JWT. This value is generated by Cardinal. |
| iat | Issued At Time - This is a timestamp of when the JWT was created. |
| iss | Issuer - The request JWT's iss field echoed back. |
| ConsumerSessionId | The unique session Id for the current user |
| Payload | The response object for your request. This field will contain any actual state information on the transaction. This is the decoded data object that is passed into the payments.validated event as the first argument. |
Example of JWT Payload:
  {
    "iss": "56560a358b946e0c8452365ds",
    "iat": 1471014492,
    "exp": 1471021692,
    "jti": "8af34811-f97d-495a-ad19-ec2f68004f28",
    "ConsumerSessionId": "0e1ae450-df2b-4872-94f7-f129a2ddab18",
    "Payload": {
        "Validated": true,
        "Payment": {
            "Type": "CCA",
            "ExtendedData": {
                "CAVV": "AAABAWFlmQAAAABjRWWZEEFgFz+=",
                "ECIFlag": "05",
                "PAResStatus": "Y",
                "SignatureVerification": "Y",
                "XID": "MHEyQjFRQkttemdpaFlRdHowWTA=",
                "Enrolled": "Y"
            }
        },
        "ActionCode": "SUCCESS",
        "ErrorNumber": 0,
        "ErrorDescription": "Success"
    }
}
Stringified JWT Sample:
 {
    "iss": "56560a358b946e0c8452365ds",
    "iat": 1471015342,
    "exp": 1471022542,
    "jti": "55ebfa2a-665f-4d6b-81ea-37d1d4d12d9e",
    "ConsumerSessionId": "fb3a97a3-0344-4d3d-93ea-6482d866ec97",
    "Payload": "{\"Validated\":true,\"Payment\":{\"Type\":\"CCA\",\"ExtendedData\":{\"CAVV\":\"AAABAWFlmQAAAABjRWWZEEFgFz+\\u003d\",\"ECIFlag\":\"05\",\"PAResStatus\":\"Y\",\"SignatureVerification\":\"Y\",\"XID\":\"MFpjUVpwb0FXcHdwMWJBdldwNDA\\u003d\",\"Enrolled\":\"Y\"}},\"ActionCode\":\"SUCCESS\",\"ErrorNumber\":0,\"ErrorDescription\":\"Success\"}"
}