Verifone Central
Accessing Verifone Central for the first time
You will receive an email from your region at ‘no-reply@vficonnect’ confirming your Verifone Cloud Services account has been set up, followed by another email with a link to set your password.
Follow the instructions to complete your Merchant Portal account set up. Check your junk or spam folders if you do not receive the emails.
Note: For your security, Verifone Cloud Services logs you out of the Portal after 30 minutes of inactivity.
Navigating Verifone Central

When you log into Verifone Central you are taken to the Transactions dashboard on the Reports tab. Use the navigation bar on the left to access different tabs.
Reports tab
Transactions Dashboard
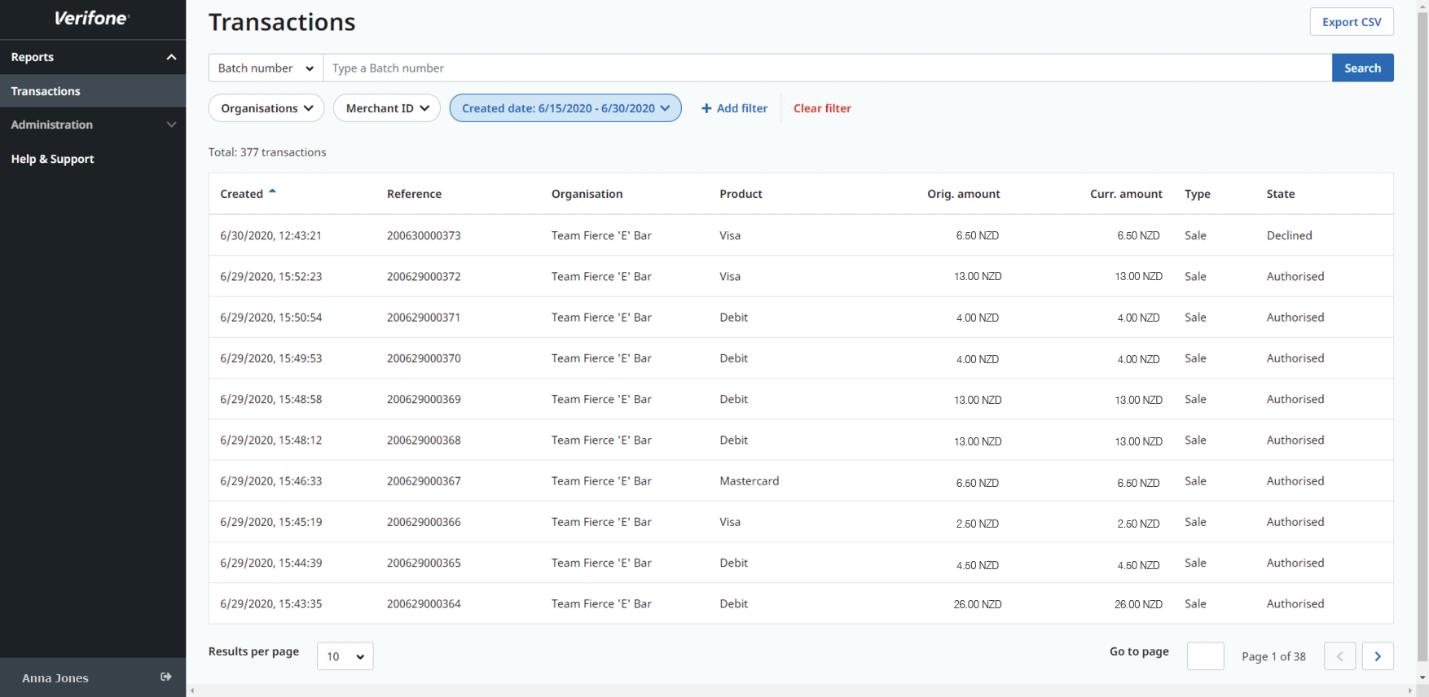
On the Reports tab you can access the main Transactions report where you can search and filter your organisation’s transactions and export reports. Your transaction report includes all transactions from all your Payment Channels, including refunds and pre-authorisations.
In addition to filtering your transactions by organisation and Merchant ID, you can also apply the following filters to your transactions:
- Transaction or settlement date
- Transaction details
- Transaction identifiers
Filter by transaction or settlement date

Click Created date or Settled date to filter transactions based on a date range.
- If ‘Created date’ is selected, the filter will include transactions initiated during the selected date range
- If ‘Settled date’ is selected, the filter will include transactions settled during the selected date range
Filter by transaction details

Select + Add Filter to filter transactions based on the following transaction details:
- Channel: Where the sale originated e.g. from terminal or online. (Note: For New Zealand, the ‘POS’ means the transaction was processed on an EFTPOS terminal in-store).
- Currency: Currency in which the transaction was tendered e.g. New Zealand Dollar (NZD)
- Product: The card type used by the cardholder
- Transaction type: The type of transaction e.g. sale or refund
- Transaction status: The status of the transaction e.g. approved or declined
Filter by transaction identifiers

You can search for transactions based on transaction identifiers (see below). Select a transaction identifier from the dropdown menu, enter the correct value for the transaction/s you are searching for into the search bar and then click Search.
You can find some of these identifiers on your terminal receipts.
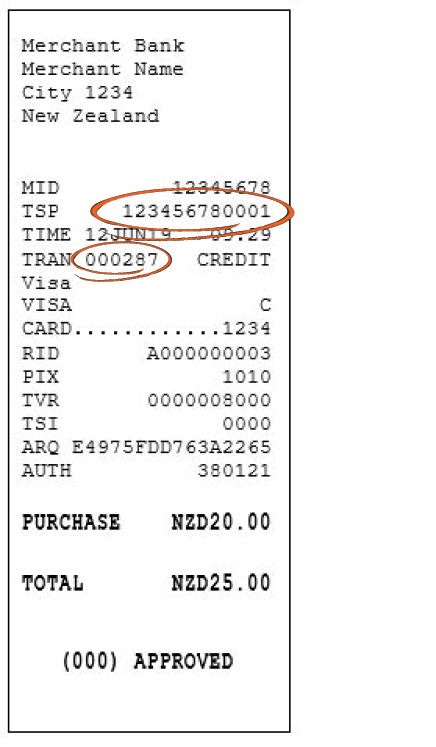
- Terminal ID: You can find this on all of your receipts. It is the last four digits of the ‘TSP’ number.
- Stan (System Trace Audit Number): The 6-digit number incremented for each transaction the terminal sends.
- Note: New Zealand users can find this on your EFTPOS receipt as the ‘Tran’ number. Example: 000287
- RRN (Reference Retrieval Number): Only available on some merchant EFTPOS receipts. Made up of the date the transaction was processed and the transaction stan number (System Trace Audit Number). Example: 200807030680
- Batch Number: This is the settlement date of the transaction in the format YYDDMM
- Reference: For transactions processed on an EFTPOS terminal in-store this is the RRN
- Settlement ID: Not applicable for New Zealand
- Transaction ID: For New Zealand transactions processed on an EFTPOS terminal in-store this is the RRN
Transaction detail
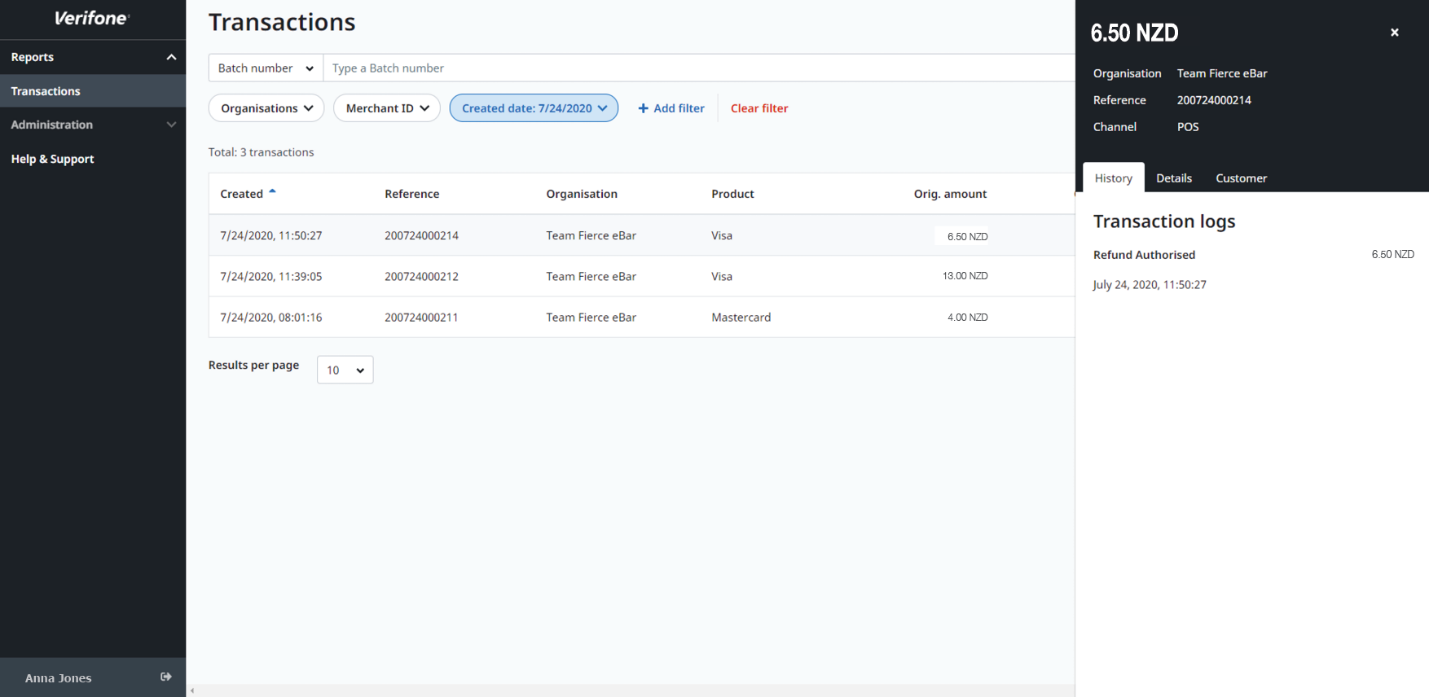
Click a particular transaction to see additional details about the transaction:
- Organisation: The organisation associated with this transaction
- Reference: The transaction reference number. For New Zealand in-store EFTPOS terminals, this is the RRN
- Channel: Where the sale originated i.e. on a terminal or online. If the channel is given as ‘POS’, this means the transaction was processed on a terminal in-store
- Click on the tabs to see more information about the transaction:
- History: All events that happened on a transaction are logged
- Details: See the below ‘Report columns’ section for definitions of these transaction properties
- Customer: For e-commerce we will also display actual customer information like name, billing- & shipping address
- Documents: Here, Merchants in eligible regions can generate Cardholder Copy and Merchant Copy Payment Documents (Transaction Receipts or Vouchers) for eligible Transaction Types and Statuses.
Exporting reports

Once you’ve applied filters to display the transactions you want to export, click Export CSV to generate a transaction report for download.
1. Select the report type:
- ‘Basic report’ will contain the same columns as the transaction table in Verifone Central.
- ‘Full report’ will export all transaction detail fields
2.Click Download CSV - See report columns section for definitions of all transaction detail fields.
Report columns
Below are definitions for all of the transaction detail fields included on full reports.
| Field name | Definition | Region |
|
Created_at_date |
Date of transaction | |
|
Created_at_time |
Time of the transaction | |
|
Created_at_timezone |
Time zone of transaction | |
|
Created_at_utc |
Consolidated date, time and time zone |
|
|
Reference |
NZ: For EFTPOS terminal-initiated transactions this is the RRN |
|
|
Entity |
Trading name of the site that processed the transaction |
|
|
Product |
Card used for payment |
|
|
Orig.amount |
Sales transaction amount |
|
|
Original amount currency code |
Currency in which the transaction was tendered |
|
|
Curr.amount |
Currency code (e.g., Euro EUR |
|
|
Curr.amount currency code |
The actual amount the merchant will get paid. In case of a refund the current amount might be lower than the original amount. In case of a top-up it will be higher. |
|
|
Status |
Transaction status, e.g. Sale Authorised or Sale Declined |
|
|
Merchant_id |
Merchant ID comes from the PPC, not the POI. The POI will return the Terminal ID. |
|
|
Organisation_id |
N/A for New Zealand | |
|
Arn |
N/A for New Zealand | |
|
Batch_id |
This is the settlement date of the transaction in the format YYDDMM |
|
|
Card.bin |
The Bank Identification Number of the card (usually the first 6 digits of the card number) |
|
|
Card.last_four |
Last four digits of the card |
|
|
Card.issuer_country |
The country where the card was issued |
|
|
_Id |
Unique identifier of the transaction in the Portal |
|
|
RRN: (Reference Retrieval Number) |
Made up of today’s date and the transaction STAN (System Trace Audit Number) |
|
|
Settlement_date |
The date the funds settled in your merchant account |
|
|
Settlement_Id |
Not applicable to NZ |
Administration tab
Organisations
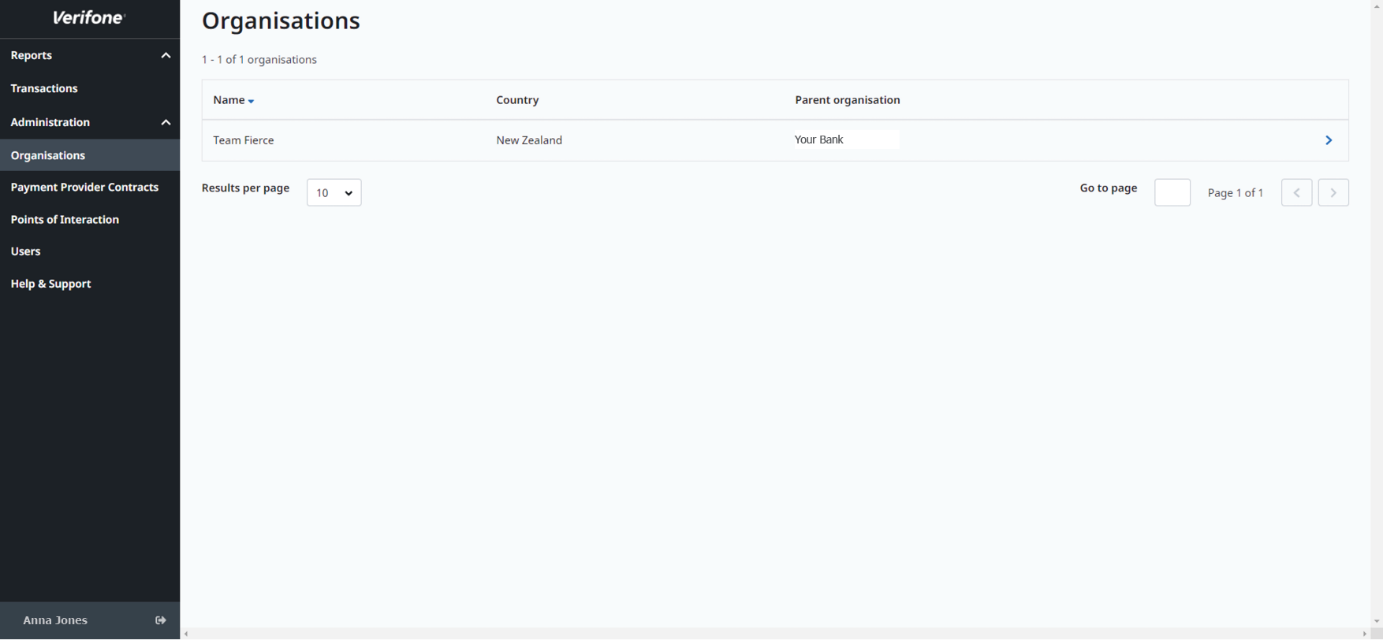
The Organisations tab displays all of the organisations you have access to.
Depending on the structure and size of your business (and your access level) your organisation might be a single business with one store, a single business with multiple stores, or have multiple stores across multiple businesses.

Click on the blue arrow on an organisation record to view organisation details.
The initial structure of your organisation is based on your Eftpos NZ account structure. If you need to make changes to your organisation, call our Technical Helpdesk on 0800 338 767.
Coming Soon: Payment Provider Contracts
On the Payment Provider Contracts (PPC) tab you will be able to view contracts and agreements with your payment solution providers. The PPC tab will provide a list of all your current Merchant Facilities with useful information such as your Merchant IDs and supported features and payment types for each facility.
Points of Interaction
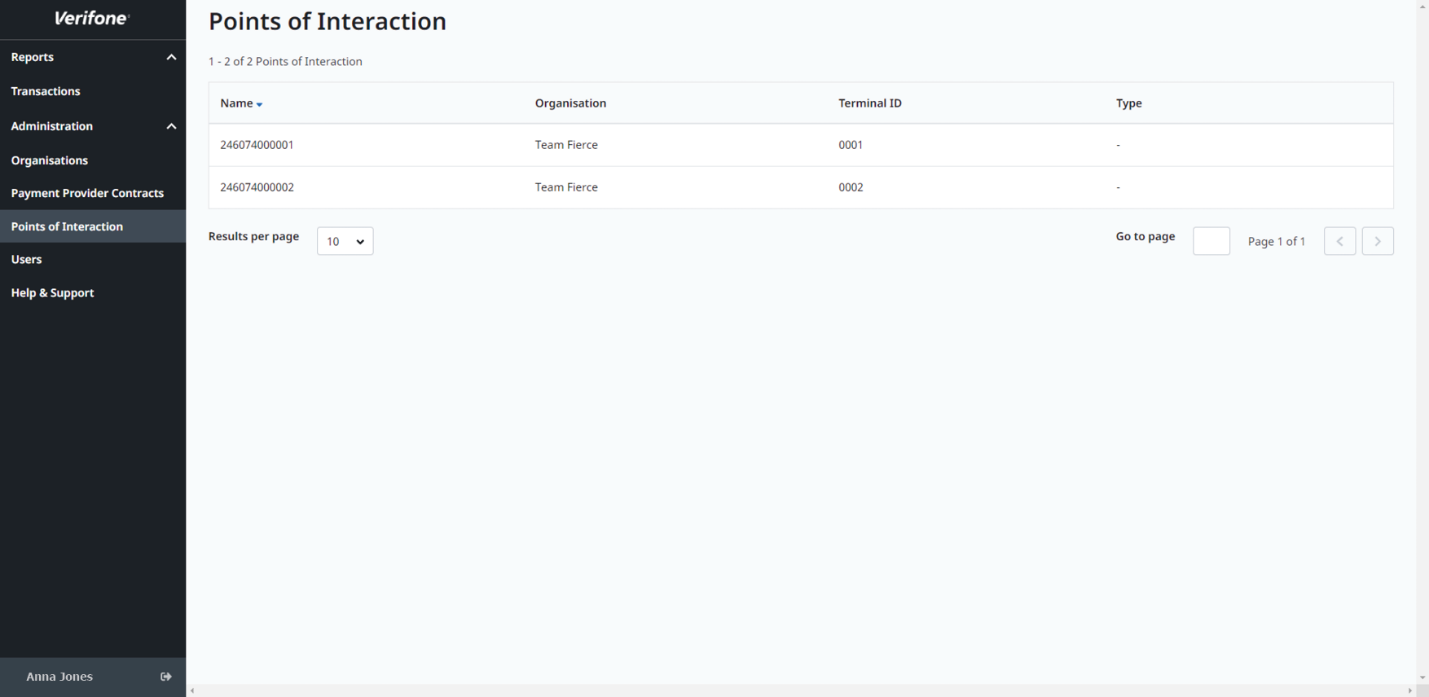
The Points of Interaction (POI) tab lists the points of interaction that populate your Transactions dashboard. This tab currently only lists your in-store terminals, but may include additional payment services as we roll out new products and features.
- Name: Currently this is the unique four-digit number at the end of your Terminal ID which identifies which terminal this POI is
- Organisation: The organisation associated with the POI
- Terminal ID: Currently the same as the name column
- Type: Displays the POI type. This field will be populated with ‘Point of Sale’ if the POI is an in-store terminal
Users
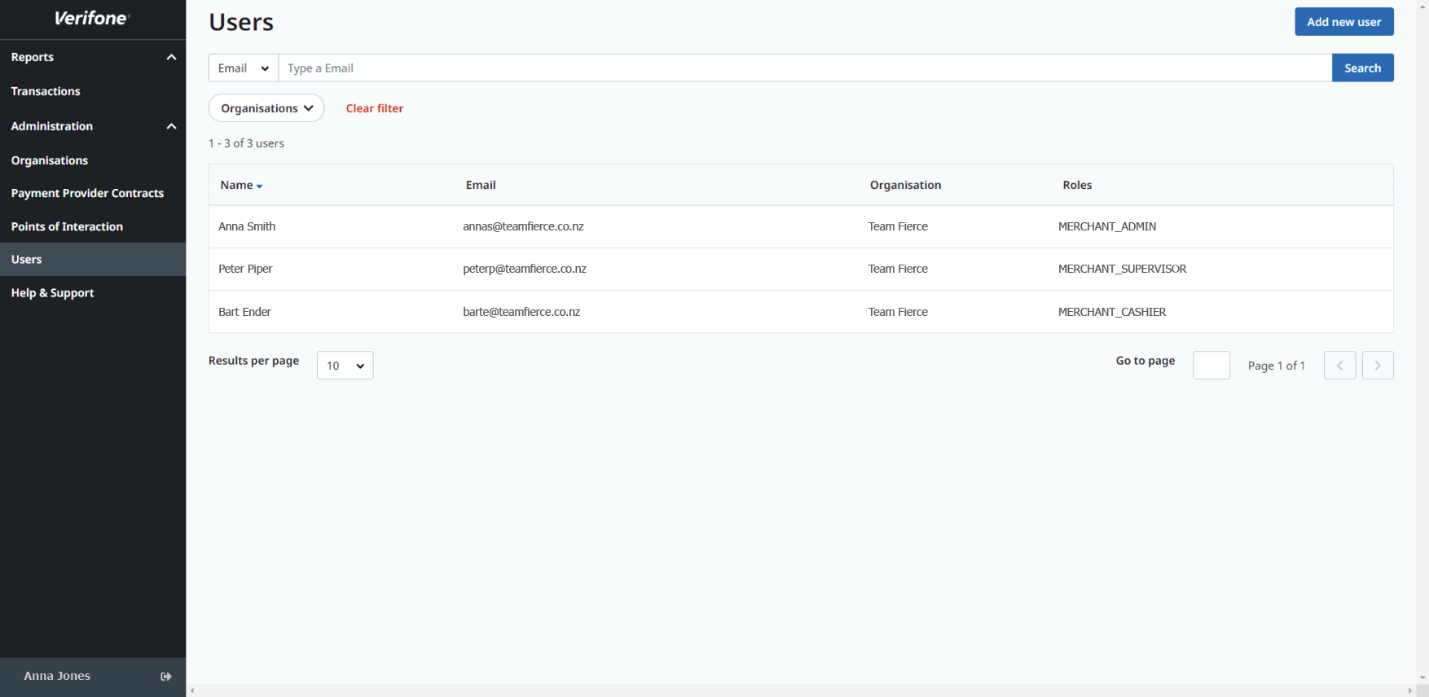
You can view and search for users in your organisation by name or email address on the Users tab, depending on your access level. Merchant admins can also add new users on the Users tab.
Creating new users

Only users with ‘Merchant Admin’ access can set up new users.
- Select Administration > Users.
- Click Add New User
- Complete the following fields:
- Full name
- Email address
- Access rights - determines the level of access needed for transaction tasks. See merchant roles section below.
- Organisation
The new user will receive an email inviting them to set up a password to activate their account.
Merchant roles

- Merchant Admin – The Verifone Cloud Services account contact person who provides employees within your organisation Portal access. An organisation can have more than one Merchant Admin.
- Merchant Supervisor- Usually reserved for managers. Has read access for the Transaction dashboard, Organisations list and Points of Interaction list.
- Merchant Reviewer- Read access for all dashboards on Verifone Central.
- Merchant Cashier – Read access for the Transaction dashboard, Organisation list and POI list.
- Merchant User - Ideal for call centre support staff. Read access for the Transaction dashboard, Organisation list and POI list.
Help & Support

Access the user guide for Verifone Central and find out where to get further support on the Help & Support tab.
Account settings
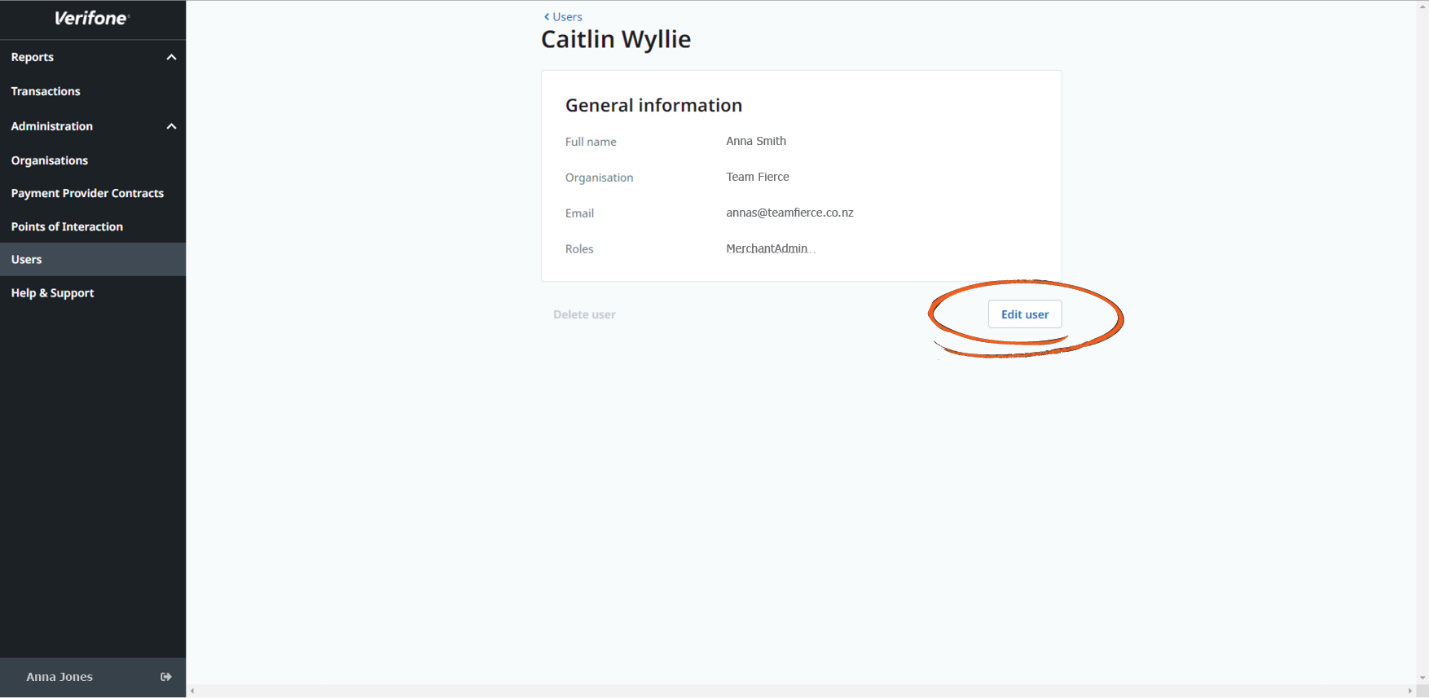
Click on your account name at the bottom of the navigation bar to access your account settings. Click Edit user to change your account name, change your password, set language preferences, and view access rights.
FAQs
Q: How long does Verifone Central keep a user logged in without activity?
A: Users are logged out automatically after 30 minutes of inactivity.
Q: How many users can a Merchant Admin add?
A: There is no limit on the number of users you can add.
Q: What transaction data is available on Verifone Central?
A: The Transaction dashboard currently shows all transactions made using a payment card in-store, including cancelled and declined transactions. Some ‘comms error’ transactions won’t appear if the terminal could not connect to the network to process the transaction and offline mode transactions won’t appear until the terminal can reconnect to the network.
Q: How far back does the transaction history go?
A: Transaction history is from the date a merchant is onboarded onto the platform. Previous transactions are not available currently.
Q: How do I change the date and time format on Verifone Central?
A: Your date and time format on Verifone Central is set by your browser settings. To change the date or time format, update your browser settings or contact your IT support.
