IP over USB POS and Host Communication
For merchants having limited network port availability, Verifone recommends using IP delivered over USB from POS terminal (henceforth referred to as ECR) to payment device connectivity. Most common POS operating systems, including versions of Microsoft Windows and Linux, support this capability using standard OS drivers. For Windows ECRs, Microsoft provides a standard Driver – Remote Network Driver Interface Specification (RNDIS). SCA IP over USB POS connection is supported in the following devices: e280, e285, M400, P200, P400, V200, V400c and V400m.
Configuring Payment Device to Support RNDIS
This section describes the process to configure a PIN Pad to work with a Windows-based ECR. The same concepts apply for other operating systems those support the RNDIS standard and should be applied accordingly. Though the ECR configuration may differ. It is to be assumed that merchants will be using static IP addressing between the PED and the ECR. DHCP is supported too.
The PIN Pad needs to be configured to support RNDIS.
- Turn on the PIN Pad, by plugging the device in to a power source.
- Go to ADK MAC menu, Desktop.
- Enter the system menu password and, from the system menu follow the navigation as: Supervisor > Administration > Communications > USB Gadget Settings > Set - USB Gadget: Ethernet and USB Protocol: RNDIS
- Rebooted the PIN Pad for the settings to take effect.
- The PIN Pad needs to be configured to select correct default communications protocol on start up. Navigate to System Menu again as follows: Supervisor > Administration > Communications > Ethernet > miniUSB0
- Set the following fields: Mode, Speed, AutoStart, IP address, Broadcast, Mask, Gateway, DNS 1, DNS 2, Interface, MAC Address and MTU.
- Exit the settings and ensure to save the configuration, and then reboot the device again.
Configuring the ECR (MS Windows)
Two pieces of configuration is required for the ECR to enable POS application to communicate with the PIN Pad, and to allow the PIN Pad to access the host server/VHQ over internet. These are configuring a network adaptor to support RNDIS and setting the network adaptor managing LAN/WAN connectivity to share the internet connection.
Communications between the ECR and the PIN Pad
SCA application on PIN Pad terminal should be able to establish a connection to the POS/ECR. Following parameters need to set to use the predefined USB connections.
- PRIMINTERFACETYPE as preconfigured
- PRIMINTERFACEDEVICENAME as usb0
Configuration of the ECR and the PIN Pad is now complete. By default, the PIN Pad terminal will use the ethernet adaptor in the ECR to access the Internet and establish connectivity with VHQ or payment gateway services for transaction processing and estate management. The merchant should ensure that networking equipment and firewall settings are configured appropriately. The PIN Pad will always be responsible for establishing outbound connections, for all interactions.
Setting up IP Over USB (e280 SV2, M424, M440)
This section is to provide guidelines for setting up IP over USB mode of communication between Verifone Terminals (e280 SV2, M424, M440) and Windows POS with Internet sharing.
System Requirements/Prerequisites
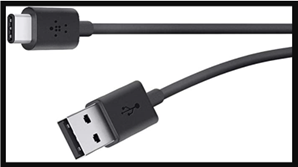
- E280SV2 - Cable for E280SV2 - USB Cable - type A-Male to USB type C that comes along with box
- M424/M440 - Cable for M424/M440 - USB Cable - type A Male to RJ 45
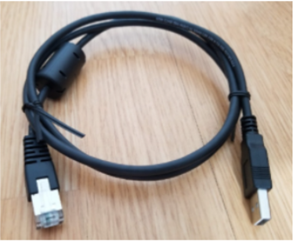
- USB ice cube (P/N - 445-103-01-A Rev A00) for M424/M440

- RNDIS Driver for Windows -
UNIFIEDUSBDRV-05.00.05.02-B3.zip(10.6 MB)
Settings on Windows POS/ECR
- Connect the Terminal using USB cable to PC and Navigate to the Device Manager and under the Network Adaptor settings, check for a new Network adaptor. The device needs to use the standard Microsoft RNDIS driver.
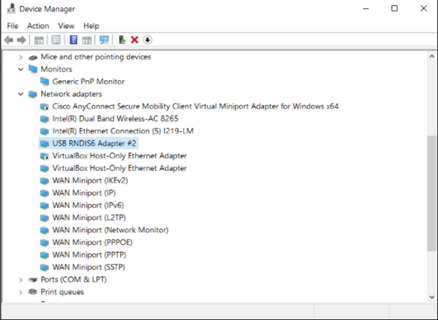
- RNDIS Driver (which is the part of OS) must be installed on Windows to detect the hardware for IP over USB communication.
- Ensure that the driver is listed out (detected) correctly without any exclamation mark against the same (as shown below) in the Device Manager under the “Network Adaptors” list.
-
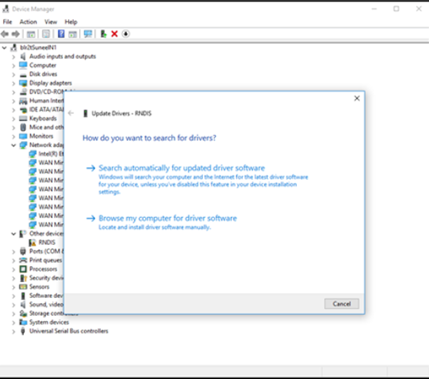
- If the driver is listed with an exclamation mark/under Other devices, then update the Driver by following the below steps:
-
- Select ‘Update Driver Software..’
- Click ‘Browse my computer for driver software’ and select from a list of device drivers on My Computer.
- If a Window with “Select your device’s type from the list below” is prompted, select “Network adapters”. (As RNDIS emulates a network connection).
- Uncheck “Show compatible hardware”.
-
- After the above step, user can choose from the below options:
-
- Select ‘Microsoft’ under the Manufacturer section. This will display the Microsoft provided drivers. Under the right window pane select “USB RNDIS6 Adapter” and click Next.
- If the Verifone Unified USB driver is installed on the PC, then the same can be selected by selecting “Verifone RNDIS Driver” under the Manufacturer section. Under right window panel select “Verifone RNDIS 6.0” and click Next.
- Click Yes to confirm your actions and continue.
- Wait for few seconds and Microsoft will successfully install the network adapter drivers.
- Once the driver has been successfully updated/installed, similar entry as below will be listed under the “Network Adaptors” section.
- Setting up Static IP Network for RNDIS Network Adaptor/Interface
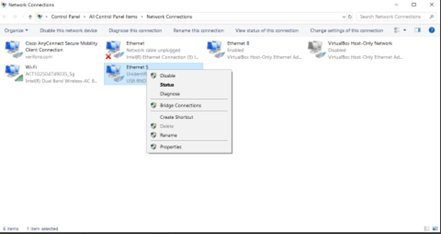
- Open Control Panel → Network and Sharing Center → Change adapter settings, there should appear RNDIS network adapter.
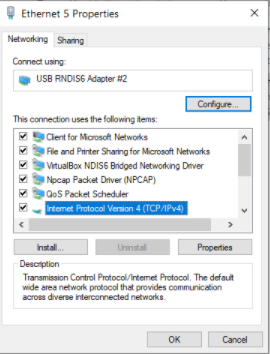
- Right Click on the adaptor → Select Properties → Internet Protocol Version4(TCP/IPv4).
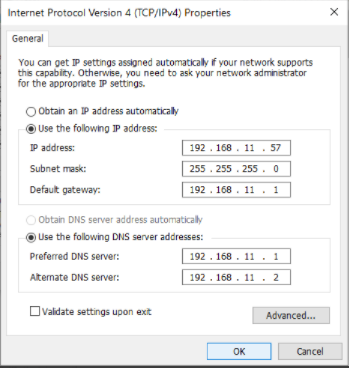
- Update the IP address by selecting “Use the following IP addresses” and “Use the following DNS addresses”. Enter the desired IP addresses for communicating with the Device.
- Click “OK” to apply the settings
- Enable Internet sharing on Windows POS/ECR - For the device to be able to use internet connectivity via IP over USB, the PC/POS needs to share the network/interface i.e. ethernet (LAN) or WIFI with the RNDIS network.
- Open Control Panel → Network and Sharing Center → Change adapter settings.
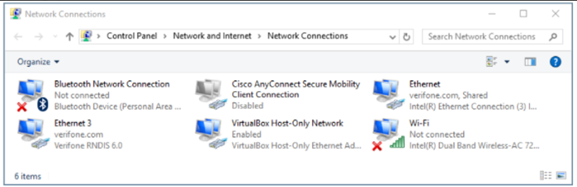
- Right click on the network to be shared i.e. ethernet (LAN) or Wi-Fi
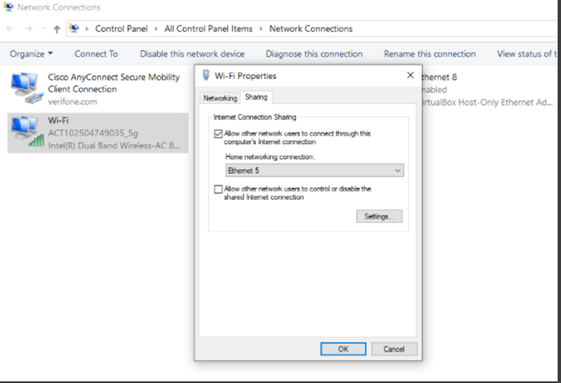
- Select Properties → Navigate to the Sharing Tab.
- Select the first check box “Allow other network users to connect through this computer’s Internet connection”.
- Select the required network (from the drop down list if there are multiple other networks) and click OK
- POS side IP configuration
- IP Address - 192.168.137.1
- Subnet MASK - 255.255.255.0
- After enabling the internet sharing option, if terminal is not able to access internet, then perform the below operation.
-
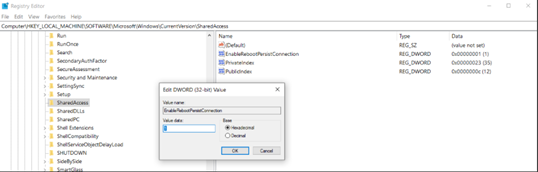
Open Registry Editor.
-
Navigate to HKEY_LOCAL_MACHINESOFTWAREMicrosoftWindowsCurrentVersionSharedAccess.
-
Add a DWORD field for the below entry
- Value Name - EnableRebootPersistConnection
- Base - Hexadecimal
- Value Data - 1
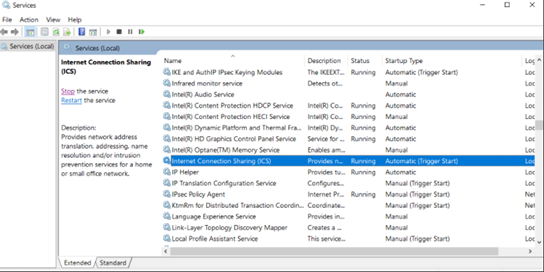
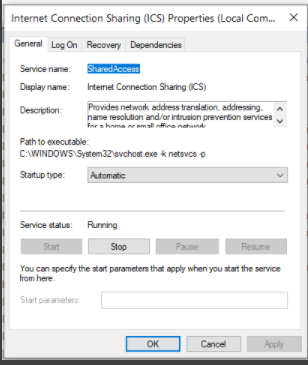
- Open the Services configuration.
- Search for Internet Connection Sharing (ICS) Service. Double click on the same.
- Change the Startup Type to “Automatic” if not already set.
- Start the service if the same is not running and Click on “OK”.
Settings on Terminal
E280SV2 - There is no manual setting needed, all required settings are part of the packages delivered by Verifone.
M424/M440
-
- Set the USB2 mode to “Peripheral”.
-
- Access Systemmode → Administration → USB → USB2 (Peripheral)
-
- Set the USB Gadget mode.
-
- Access systemmode → Administration → Communication → USB Gadget Mode
- Enable ACM and RNDIS modes. Rest of the modes should be disabled.
- Reboot the device
- Accessing System mode on M424/M440
Connectivity Check
E280SV2 - Connectivity can be checked by using the ping functionality under the Com Control Panel (CCP).
- On Idle Screen of the application screen, Press 1+5+9 Together.
- It shows the MAC Desktop, there Select Com Control → More → Diagnostic → Ping → Enter the IP address to be pinged (for example 8.8.8.8/the PC address) → Click on single → Check the fields Success (Value should be 1/1) and Packet Loss (Value should be 0 %)
M424/M440 - Connectivity can be checked by using the ping functionality under the system mode.
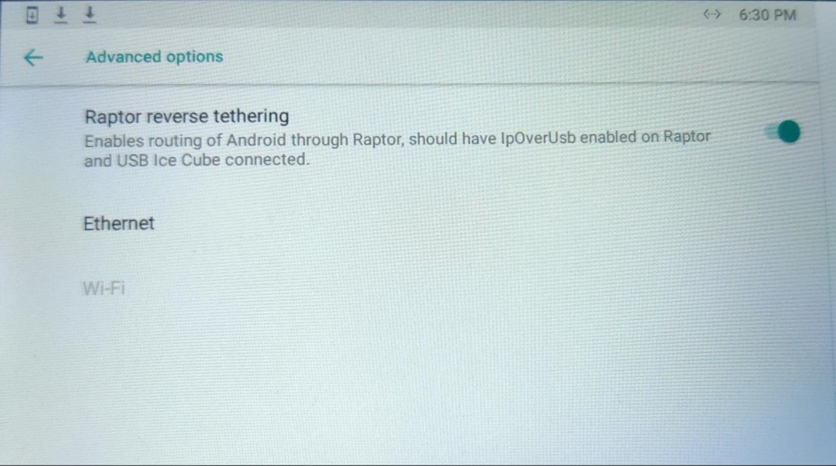
Enabling Internet Sharing for Android Processor
For the device (M424) to be able to use the internet connectivity via IP over USB for Android processor, follow the below navigation.
From Android Settings → Network & Internet → Advance Options and enable Raptor Reverse Tethering.