Packman Tool
Table of Contents
- Packman tool
- Introduction
- Installation
- Launch
- Command line interface
- Launch
- Help
- Windows force permissions (vos3)
- doc command
- config command
- build command
- extract command (all)
- db_add command (vos3)
- gen_diff command (vos3)
- list command
- gen_removal command (vos3)
- merge command (vos1, vos2, vos3)
- sign command (all)
- sign_retrieve command (vos3, titus)
- validate command (all)
- cpapp_convert command (vos3)
- gen_activation command (vos3)
- upwd_build command (vos3, vaos)
- uvrk_build command (vos2, vos3, vaos, titus)
- pre_signingportal command (vos2)
- post_signingportal command (vos2)
- zip_create command (vos3)
- sponsor_change_create command (vos3)
- sponsor_change_merge command (vos3)
- zip_sign command (vos3)
- zip_apply command (vos3)
- stat command (all)
- ui command
- Bundle filters (vos3)
- Signers
- User interface
- Automatic fixes
- Device mode validation (vos3)
This page contains information about the Packman tool usage and design.
Introduction
On vos1 and vos2 platforms, the packaging is using three levels of archives.
- Dlfile
- Bundle(s)
- Package(s)
- Bundle(s)
Please refer to Secure Installer for complete description of these archives.
On vos3 platform, the packaging is using two levels of archives.
- Dlfile
- Bundle csd(s)
- Bundle inf(s)
Please refer to VOS3_Installer for complete description of these archives.
On titus platform, the packaging is using one level archive.
- TitusDl
The Packman tool is providing three facilities to manage the creation, modification and signing of archives:
- Command line interface
- UI interface
- Python library with APIs
Installation
Pre-requisites
Packman tool has following pre-requisites:
- Host OS: Windows or Linux.
- HTML5 CSS3 Javascript browser (only if UI interface is used)
Windows
- Install python 3.8+ for windows
- choose 'Customize Installation'
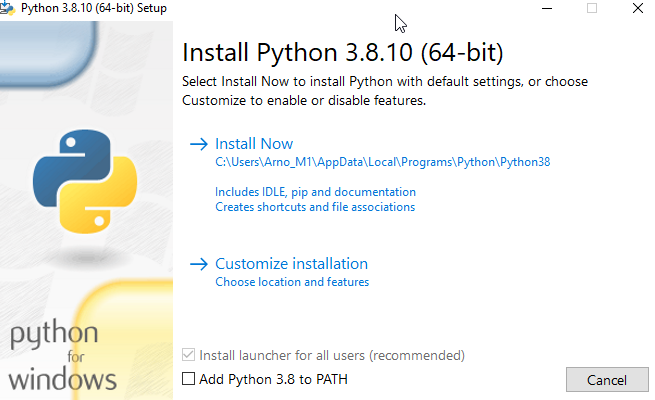
- verify that install 'pip' is ticked
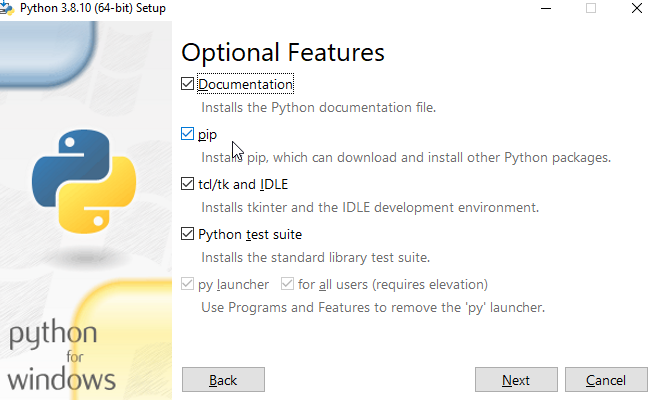
- launch installation
- choose 'Customize Installation'
- Extract packman release file (.zip) to a directory of your choice
- tools like 7-zip and the like can be used
- 'c:\tools\packman' is assumed in this documentation
- Open a command line window 'cmd'
- Change current directory to packman directory
cd c:\tools\packman - Install requirements
py -m pip install -e .
Linux
These steps may vary upon linux distributions. Ubuntu is assumed in the examples.
- Install python 3.8+
sudo apt install python3 - Install pip
sudo apt install python3-pip - Extract packman release file (tgz) to a directory of your choice
- '~/tools/packman' is assumed in this documentation
tar xzvf packman_x.y.z.tgz
- '~/tools/packman' is assumed in this documentation
- Change current directory to packman directory
cd ~/tools/packman - Install requirements
pip install -e .
Reference
Launch
Windows
- Open a command line window 'cmd'
py packman.py
Linux
- Open a terminal (ie Ctrl+Alt+T)
- Launch
packman.py
Command line interface
Launch
All command line examples will use the same format:
packman.py <command> <options>Please adapt to:
- on Windows:
python packman.py <command> <options> - on Linux:
./packman.py <command> <options>
Help
- General help:
packman.py -h
Example output:
usage: packman.py [-h] [--show_all] [--winforce_permissions] {build,config,cpapp_convert,db_add,doc,extract,gen_activation,gen_diff,gen_removal,hps_build,list,merge,post_signingportal,pre_signingportal,sign,sign_retrieve,sponsor_change_create,sponsor_change_merge,stat,ui,up_build,upwd_build,uvrk_build,validate,zip_apply,zip_create,zip_sign} ... Packman v1.14.0 positional arguments: {build,config,cpapp_convert,db_add,doc,extract,gen_activation,gen_diff,gen_removal,hps_build,list,merge,post_signingportal,pre_signingportal,sign,sign_retrieve,sponsor_change_create,sponsor_change_merge,stat,ui,up_build,upwd_build,uvrk_build,validate,zip_apply,zip_create,zip_sign} Detailed command usage: <command> -h options: -h, --help show this help message and exit --show_all do not collapse issues --winforce_permissions force usrX exec permissions on windows Examples: Build dlfile packman.py build -t vos2 -i input_dir -d dl.file.tgz packman.py build -t vos3 -i input_dir -d dl.file.tar Set and show configuration packman.py config -l packman.py config sign.online.product Convert CP application packman.py cpapp_convert -t vos3 -s dev -z cpapp-123345678.zip -o dl.dlfile.tar packman.py cpapp_convert -t vos3 -s dev --cpapp_type appdev -d dl.cpapp_prod.tar -o dl.cpapp_appdev.tar Add bundles to database packman.py db_add -t vos3 -d dl.file.tar User guide packman.py doc Extract dlfile packman.py extract -t vos2 -d dl.file.tgz -o ouputdir packman.py extract -t vos3 -d dl.file.tar -o ouputdir Generate activation dlfile packman.py gen_activation -t vos3 -s dev -d dl.file.tar -o dl.file_activate.tar Generate differential dlfile packman.py gen_diff -t vos3 --src dl.source.tar --dst dl.destination.tar -o dl.differential.tar Generate removal dlfile packman.py gen_removal -t vos3 -s dev -d dl.file.tar -o dl.file_remove.tar Harware Platform Select packaging - HPS packman.py hps_build -t vos3 --neo dlfile_neo1.tar --neo2 dlfile_neo1.tar -o allneo_dlfile.hps.tar List content of dlfiles packman.py list -t vos2 -rd dlfile.tgz packman.py list -t vos3 -rd dl.file.tar Merge or filter dlfile packman.py merge -t vos2 -d dl.file1.tgz dl.file2.tgz -o dl.file_merged.tgz packman.py merge -t vos3 -d dl.file1.tar dl.file2.tar -o dl.file_merged.tar Postprocess dlfile after Signing Portal or Package Manager packman.py post_signingportal -t vos2 -d dlfile.tgz -o output.tgz Preprocess dlfile for Signing Portal or Package Manager packman.py pre_signingportal -t vos2 -d dlfile.tgz -o output.tgz Sign dlfile packman.py sign -t vos2 -s dev -d dl.file.tgz -o dl.file_signed.tgz packman.py sign -t vos3 -s dev -d dl.file.tar -o dl.file_signed.tar Retrieve result of online signature packman.py sign_retrieve -t vos3 --request_id 689b4363c4345a308395574c -o dl.file_signed.tar Create a sponsor change packman.py sponsor_change_create -t vos3 -s dev --current_sponsor 123456 --serial_numbers "123-456-789" -o dl.dlfile.tar Merge two sponsor change dlfiles packman.py sponsor_change_merge -t vos3 -i dl.signed_current.tar dl.signed_new.tar -o dl.dlfile.tar Output information on dlfile packman.py stat -t vos2 -d dlfile.tgz packman.py stat -t vos3 -d dl.file.tar User interface packman.py ui Unified password packaging - UPWD packman.py upwd_build -t vos3 -s dev -e test -i password_changes.json -o file.upwd.tar packman.py upwd_build -t vos3 -s dev -e encryption_cert.pem -i password_changes.json -o file.upwd.tar packman.py upwd_build -t vaos -s dev -e encryption_cert.pem -i password_changes.json -o file.zip packman.py upwd_build -t vaos -s dev -e encryption_cert.pem -i password_changes.json -o file.apk Unified VRK packaging - UVRK packman.py uvrk_build -t vos3 -i payload_123-456-789.vrk2.json -o file.uvrk.tar Validate dlfile packman.py validate -t vos2 -d dl.file.tgz packman.py validate -t vos3 -d dl.file.tar Apply zip file signed to directory packman.py zip_apply -t vos3 -i directory -z files_signed.zip Create zip file to sign packman.py zip_create -t vos3 -i directory -o files_to_sign.zip Sign content of zip packman.py zip_sign -t vos3 -s dev -c EMV -z files.zip -o files_signed.zip- Command help:
packman.py <command> -h
Example output:
packman.py list -h usage: packman.py list [-h] [--report_type {security,dependency,content}] [-r] -t {vos1,vos2,vos3} (-d DLFILE | -b BUNDLE | -p PACKAGE) list content of archive optional arguments: -h, --help show this help message and exit --report_type {security,dependency,content} report type - vos1:{'content'} vos2:{'content'} vos3:{'security', 'dependency', 'content'} -r, --recurse act recursively -t {vos1,vos2,vos3}, --platform {vos1,vos2,vos3} target platform -d DLFILE, --dlfile DLFILE dlfile path -b BUNDLE, --bundle BUNDLE bundle path -p PACKAGE, --package PACKAGE package pathHere a summary of commands:
| Command | Description |
|---|---|
| doc | show documentation |
| config | setup and list configuration |
| build | build archive from directories |
| cpapp_convert | convert CP application |
| db_add | add bundles to database |
| extract | extract content of archive |
| gen_activation | generate activation dlfile |
| gen_diff | generate differential dlfile |
| gen_removal | generate removal dlfile |
| keywrap | wrap key into archive |
| list | list content of archive |
| merge | merge several archives into one |
| pre_signingportal | modify dlfile for usage with signing portal |
| post_signingportal | modify dlfile after signing portal usage |
| sign | sign archive content |
| sign_retrieve | retrieve online signing result |
| sponsor_change_create | create a sponsor change |
| sponsor_change_merge | merge two sponsor change |
| stat | output information on archive |
| ui | launch user interface |
| upwd_build | build unified packaging password |
| uvrk_build | build unified packaging vrk |
| validate | retrieve validation report on archive |
| zip_create | create zip file with files to sign in directory |
| zip_sign | sign file within zip file |
| zip_apply | add signatures in zip file back to directory |
Windows force permissions (vos3)
In order to force executable permission bits when running packman on Windows, a special option flag '–winforce_permissions' can be used:
packman.py --winforce_permissions build -t vos3 -s dev -i input_dir -fd dlfile.tar On Windows, this will build a dlfile archive named 'dlfile.tar' from the content of the directories 'input_dir' for the platform vos3 and if a user package has an executable file, its permissions bits for execution will be set.
doc command
The 'doc' command opens this documentation in a browser.
config command
The 'config' command allows to set configuration key / value that will be used as defaults by other commands. This allows to setup once and simplify command line arguments.
Here is the list of currently supported configurations:
| key | default value | option | Description |
|---|---|---|---|
| sign.online_product | empty | –online_product | online signing product identifier |
| sign.online_token_path | empty | –online_token_path | online signing token file full path |
| sign.online_url | https://sign.verifone.com:52443 | –online_url | online signing product identifier |
| sign.online_timeout | 60 | –online_timeout | online signing approval timeout in seconds |
Example usage to set a value:
packman.py config sign.online_product o3fw8emrARQvXt9pE Example usage to reset a value to default:
packman.py config -r sign.online_product Example usage to list all current values:
packman.py config -l Note: in the usage description, the configurable options are noted with '(config)'
build command
The 'build' command creates archives (dlfile, bundle, package) from the contents of directories. Please refer to 'build' help for all options.
vos2
Example usage:
packman.py build -t vos2 -i input_dir input_dir2 -d dlfile.tgz This will build a dlfile archive 'dlfile.tgz' from the content of the directories 'input_dir' and 'input_dir2' for the platform vos2. This input directory should normally contain CONTROL directory, bundles, ...
The 'build' command can also act recursively to create archives from the content of a directory. The top directory provided contains bundle directories which in turn contain package directories. Each directory must contain the appropriate CONTROL directory and files. The recursive build will recursively package all of them to produce a dlfile. The recursive build is enabled using the option flag '-r'.
Example usage (recursive):
packman.py build -t vos2 -ri input_dir -d dlfile.tgz This will build a dlfile archive named 'dlfile.tgz' from the content of the directory 'input_dir' recursively packaging dlfile/bundle/package directories inside for the platform vos2.
vos3
Example usage:
packman.py build -t vos3 -s dev -i input_dir input_dir2 -d dlfile.tar This will build a dlfile archive 'dlfile.tar' from the content of the directories 'input_dir' and 'input_dir2' for the platform vos3. Each input directory should normally contain manifest and package directories coresponding to one bundle.
Here is an example of a bundle input directory structure:
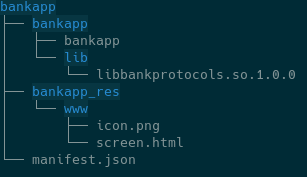
The 'build' command can also act recursively to create archives from the content of a directory. The top directory provided contains bundle directories which in turn contain package directories. Each directory must contain the appropriate manifest file and package directories (with their content). The recursive build will recursively package all of them to produce a dlfile. The recursive build is enabled using the option flag '-r'.
Example usage (recursive):
packman.py build -t vos3 -s dev -ri input_dir -d dlfile.tar This will build a dlfile archive named 'dlfile.tar' from the content of the directory 'input_dir' recursively packaging dlfile/bundle directories inside for the platform vos3.
This command allows to specify Device mode validation (vos3)
titus
Example usage:
packman.py build -t titus -s dev -i input_dir -d titusdl.tar This will build a titusdl archive 'titusdl.tar' from the content of the directories 'input_dir' for the platform titus. Input directory should normally contain manifest and corresponding files.
Here is an example of a bundle input directory structure:
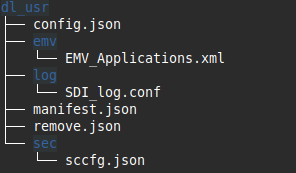
Here is an example of 'manifest.json' for user configuration for titus:
{ "name": "my_titus_usrconfig", "version": "1.0.0", "contents": [ { "name": "usrconfig.tar", "type": "usrconfig" } ]}extract command (all)
The 'extract' command extracts recursively the content of archives (dlfile, bundle, package) to directories. The extracted content is layed out such as a recursive build done on this output would recreate the original archive. Please refer to 'extract' help for all options.
Example usage:
packman.py extract -t vos2 -d dlfile.tgz -o dlfile_dirThis will extract a dlfile archive named 'dlfile.tgz' recursively to the directory 'dlfile_dir' for the platform vos2.
db_add command (vos3)
The 'db_add' command takes as input a dlfile and registers its content to a local database. This database is located at <user_home>/.packman/db/ The content of the database can be used for generating differentials: see gen_diff command (vos3).
Before being registered, the dlfile is first validated.
Example usage:
packman.py db_add -t vos3 -d dlfile.tarThis will look register to database all bundles and upfiles in 'dlfile.tar'.
gen_diff command (vos3)
The 'gen_diff' command takes as input source and destination bundles and creates a differential dlfile. This command operates either by providing a differential description file or by providing source ans destination dlfiles
When providing source and destination dlfiles, packman will add all bundles and upfiles of all dlfiles to the database (see db_add command (vos3) ) then create a differential description file containing the matching information and run the differential command with it.
Differential process overview:
- In all steps, targeting of both source and destination are taken into account
- For all upfiles, removal bundles and sponsor changes in destination: add to diff dlfile
- In all other cases: perform entry by entry selection between "add", "copy" and "sbspatch" operations : add resulting differential bundle to diff dlfile
Example usage (differential description file):
packman.py gen_diff -t vos3 --diff diff_file.json -o dl.diff.tarThis will look for the bundles listed in diff_file.json (source and destination), check that they are present in database and generate a differential dlfile 'dl.diff.tar' for the platform vos3.
Example usage (source and destination dlfiles):
packman.py gen_diff -t vos3 --src dl.source.tar --dst dl.destination.tar -o dl.diff.tarThis will add to database all bundles and upfiles in 'dl.source.tar' and 'dl.destination.tar' and then generate a differential dlfile 'dl.diff.tar' for the platform vos3.
Here is shown the structure of a differential description file:
{ "source": { "bundles": [ { "digest": "36e7300a0559831ede5065d1dd10d6802e4ad884d7965d512eabcb6f562430de", "name": "bundle_a", "version": "1.0.0" } ... ] "upfiles": [ { "digest": "6802e4ad884d7965d512eabcb6f562430de36e7300a0559831ede5065d1dd10d", "name": "mykeya.uvrk.tar" }, ... ] }, "destination": { "bundles": [ { "digest": "4ad884d7965d512eabcb6f562430de36e7300a0559831ede5065d1dd10d6802e", "name": "bundle_b", "version": "1.0.0" }, ... ] "upfiles": [ { "digest": "e36e7300a06802e4ad884d7965d512eabcb6f562430d559831ede5065d1dd10d", "name": "mykeyb.uvrk.tar" }, ... ] }}Note: the differential process on entries ('copy' and 'sbspatch' operations) are allowed on all destination package types (read-only or not) and can refer any file of any source bundle/package as long as this source package is read-only.
This command allows to specify Bundle filters (vos3)
list command
The 'list' command lists content of archives (dlfile, bundle, package). Please refer to 'list' help for all options.
Example usage:
packman.py list -t vos2 -rd dlfile.tgz This will list recursively (-r) the content of a dlfile archive (-d) named 'dlfile.tgz' for the platform vos2.
gen_removal command (vos3)
The 'gen_removal' takes as input a dlfile containing bundles and creates a dlfile containing the corresponding removal bundles. The type of remove bundles can be chosen with '–remove_type' which takes one of the following values:
- bundle_version (default): this creates remove bundles for the bundle and its version
- bundle : this creates remove bundles for the bundle without version specified
- user : this creates remove bundles for the user (removing all bundles for that user)
Please refer to 'gen_removal' help for all options.
Example usage:
packman.py gen_removal -t vos3 -s dev -d dl.file.tar -o dl.file_remove.tarThis will look for the bundles in dlfile named 'dlfile.tgz' and create in 'dl.file_remove.tar' removal bundles using the 'bundle_version' type for the platform vos3.
This command allows to specify Bundle filters (vos3)
list command
The 'list' command lists content of archives (dlfile, bundle, package). Please refer to 'list' help for all options.
Example usage:
packman.py list -t vos2 -rd dlfile.tgz This will list recursively (-r) the content of a dlfile archive (-d) named 'dlfile.tgz' for the platform vos2.
Example:
> ./packman.py list -t vos2 -rd dl.normal.tgzDlfile dl.normal.tgz Bundle bdl_normal.tgz Dir CONTROL/ File control File filelist Package pkg_normal.tgz Dir CONTROL/ File control File filelist File normal Signature pkg_normal.tgz.p7sOther types of reports are available by using the '–report_type' option with:
- content (all platforms, default): lists content and entry types
- security (vos3): list bundles, their signer, user membership and requested capabilities
- dependency (vos3): list bundles, their hardware platform, targeting and dependencies
- target (vos3): lists installed entries with location, type (Dir, File, Symlink), size, linkname, user, group, mode, capabilities, sha1
- similarity (vos3) (experimental): lists equal or similar file contents
merge command (vos1, vos2, vos3)
The 'merge' command allows to combine several archives of same type (dlfile, bundle, package, uvrk, upwd) to create a single archive of that same type containing the merge of all contents. Merging archives with different types is not allowed except between dlfile and a unified package (uvrk, upwd). Please refer to 'merge' help for all options.
Example usage:
packman.py merge -t vos2 -d dlfile1.tgz dlfile2.tgz -o dlfile.tgz This will create a dlfile archive named 'dlfile.tgz' which contains all content of the 'dlfile1.tgz' and 'dlfile2.tgz' for the platform vos2.
packman.py merge -t vos3 -u mykey1.uvrk.tar mykey2.uvrk.tar -o mykeys.uvrk.tar This will create a combined uvrk archive with both uvrk archive keys merged.
packman.py merge -t vos3 -d dlfile.tar -u mykeys.uvrk.tar mypasswords.upwd.tar -o dl.merged.tar This will create a dlfile 'dl.merged.tar' that contains all bundles of 'dlfile.tar', 'mykeys.uvrk.tar' and 'mypasswords.upwd.tar'.
This command allows to specify Bundle filters (vos3) and Device mode validation (vos3)
sign command (all)
The 'sign' command signs content of archives (dlfile, bundle, package). Please refer to 'sign' help for all options and to Signers.
Example usage 1 (vos2):
packman.py sign -t vos2 -s dev -d dlfile.tgz -o dlfile_signed.tgz This will list recursively sign the content of a dlfile archive (-d) named 'dlfile.tgz' for the platform vos2 and output result in 'dlfile_signed.tgz'.
Example usage 2 (vos2):
packman.py sign -t vos2 -rs dev -d dlfile.tgz -fo dlfile_signed.tgz Same as above except that if a signature already exists, it will resign anyway (-r) and if output file already exists, it will force overwriting (-f).
Example usage 3 (vos3):
packman.py sign -t vos3 -s dev -d dlfile.tar -fo dlfile_signed.tar This will sign for development all bundles contained in dlfile.tar for the platform vos3 and output result in 'dlfile_signed.tar'.
For online signing, several options (option name starts with 'online') are available. See online signer (vos3, titus)
Example usage 4 (vos3 online signing):
packman.py sign -t vos3 -s online --online_retrieve --online_product o3fw8emrARQvXt9pE --online_token_path /home/user/mytoken.txt --online_url https://sign.verifone.com:52443 --online_timeout 3600 -d dlfile.tar -fo dlfile_signed.tar This command is generally simplified by use of configuration: see config command It chooses synchronous mode with –online_retrieve and will wait one hour for the approval on the portal with '–online_timeout'. The product, token and url selected for signing are specified with '–online_product', '–online_token_path' and '–online_url' respectively. Once the request is approved on server (within the hour), the dlfile 'dlfile.tar' will be signed and stored in 'dlfile_signed.tar'.
sign_retrieve command (vos3, titus)
The 'sign_retrieve' command is used to retrieve online signed results (asynchronous mode). Please refer to 'sign_retrieve' help for all options.
Packman stores locally all online signing requests that have been issued. A list of all online pending requests made from this PC can be shown by using command without specifying any request id:
packman.py sign_retrieve -t vos3 The list of pending requests is sorted by ascending date, one per line which look like this one:
2025-08-20 13:51:21 id: 68a5b6cbc4345a40839557e8 name: dl.bundle_usr1_signed.tar hash: 472e30141e11d8efd24a8f25e2b00037e2856310c9f61e334ce2a391d1261e05 product: o3fwBemrDRQvAt9pE - id corresponds to the request id
- name corresponds to name of the file sent for online signing
- hash corresponds to hash of the file sent for online signing
- product corresponds to signing product selected for for online signing
In order to retrieve a request result, one need to provide the request id and the output path:
packman.py sign_retrieve -t vos3 --request_id 68a5b6cbc4345a40839557e8 -fo dlfile_signed.tar The above example assumes that token path has already been configured with config command
The 'sign_retrieve' command is also using the configured timeout (config or option '–online_timeout') to determine how long to wait for an approval if request has not yet been approved.
validate command (all)
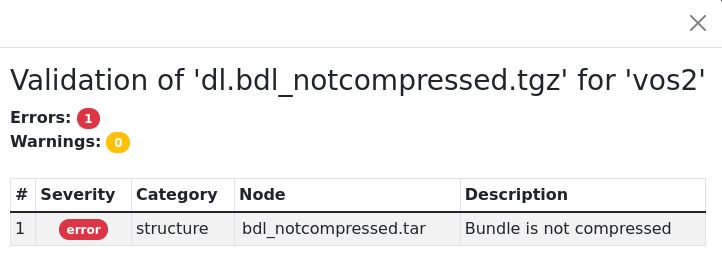
The 'validate' command creates a validation report for the content of archives (dlfile, bundle, package). Please refer to 'validate' help for all options.
Example usage (vos2):
packman.py validate -t vos2 -rd dlfile.tgz This will recursively scan the archive and display packaging errors if found.
Example usage (vos3):
packman.py validate -t vos3 -rd dlfile.tar This will recursively scan the archive and display packaging errors if found.
Example output:
> ./packman.py validate -t vos2 -rd test_resources/dl.pkg_notcompressed.tgzERROR (structure) - bdl_pkg_notcompressed.tgz/pkg_pkg_notcompressed.tar : Package is not compressederrors:1 warnings:0This command allows to specify Device mode validation (vos3)
cpapp_convert command (vos3)
The 'cpapp_convert' command converts a CP application (Commerce Plaform) into an installable dlfile. The input can be a CP application zip file or a dlfile. The type of dlfile output can be chosen using the '–cpapp_type' option: 'prod' for normal type, 'appdev' for development on appdev devices. Please refer to 'cpapp_convert' help for all options.
Example usage:
packman.py cpapp_convert -t vos3 -s dev -z mycpapp-887643134.zip -o dl.mycpapp-887643134.tarThis will extract the CP application zip named 'mycpapp-887643134.zip', generate a CP application dlfile and sign it for development for the platform vos3.
packman.py cpapp_convert -t vos3 -s dev --cpapp_type appdev -z mycpapp-887643134.zip -o dl.mycpapp-887643134_appdev.tarThis will extract the CP application zip named 'mycpapp-887643134.zip', generate a CP application dlfile for appdev device and sign it for development for the platform vos3.
packman.py cpapp_convert -t vos3 -s dev --cpapp_type appdev -d dl.mycpapp-887643134.tar -o dl.mycpapp-887643134_appdev.tarThis will convert the CP application dlfile named dl.mycpapp-887643134.tar to CP application dlfile for appdev device and sign it for development for the platform vos3.
gen_activation command (vos3)
The 'gen_activation' command creates usr1 activation installable dlfile which activates features of the system. This can be used typically to generate activation for Commerce Applications. Please refer to 'gen_activation' help for all options.
Example usage:
packman.py gen_activation -t vos3 -s dev -d dl.mycpapp-887643134.tar dl.mycpapp-887643134_activate.tarThis will extract the CP application bundle in dl.mycpapp-887643134.tar and generate a corresponding activation dlfile and sign it for development for the platform vos3.
upwd_build command (vos3, vaos)
The 'upwd_build' command creates unified packaging for password changes. Please refer to 'upwd_build' help for all options.
Example usage (vos3):
packman.py upwd_build -t vos3 -e encryption_cert.pem -s dev -i password_change.json -o file.upwd.tar This will create the file.upwd.tar package containing encrypted and signed password changes instructions. The '-e encryption_cert.pem' indicates which encryption certificate (pem file) to use for encryption and the '-s dev' indicates signing with development key. For testing purposes only, a generic 'test' encryption certificate is bundled with packman and can be specified with option '-e test' (to test both on prod and dev devices). The password changes instructions are passed using the content of a JSON file named 'password_change.json' in this example. The structure of this instruction file is:
- password_changes (mandatory): array of objects
- target (mandatory): array of strings containing target serial numbers expressions
- name (mandatory): string containing name of the password
- pass (mandatory): string containing value of the password. Valid passwords are 7 to 12 digits.
- expired (optional, default to false): boolean indicating if password is expired
- require_old (optional, default to false): boolean indicating if old password is needed to change password
For the target field, the serial number expression must be either:
- a fully defined serial number for a single device: like "123-456-789" (1 serial number)
- a globing serial number expression using one or more wildcard (*) like "12*-456-78*" (100 serial numbers)
Here is an example of such file:
{ "password_changes": [ { "target": ["112-123-123"], "name": "SUPERVISOR", "pass": "1234567" }, { "target": ["112-123-123"], "name": "LEVEL1", "pass": "1234567" }, { "target": ["112-123-555","112-123-44*"], "name": "LEVEL1", "pass": "00123471321", "expired": true, "require_old": true } ]}In such unified packaging, the naming of content and output archive is important and packman will fail on wrong namings.
Note that 'merge' and 'validate' accept these type of unified packages for processing using the '-u' option.
Special case of vaos
Example usage (vaos):
packman.py upwd_build -t vaos -e encryption_cert.pem -s dev -i password_change.json -o file.zip In order to be comply with vaos package signing, the upwd archive mentioned above will be automatically wrapped into a zip archive. The output archive file can be named with:
- '.zip' extension: can be directly installed on device
- '.apk' extension: can be used to sign online. Once signed, resulting file can be renamed with '.zip' extension for installation. If dev signature is requested (-s dev) this output file will be development signed using 'apksigner' tool. This 'apksigner' tool needs to be installed separately and PATH environment variable set for packman to invoke it. It is available in the Android SDK but can also be installed separately using the Android "Build tools" (choose OS flavor). Some linux distributions allow direct package installation (ie ubuntu: 'sudo apt install apksigner').
uvrk_build command (vos2, vos3, vaos, titus)
The 'uvrk_build' command creates unified packaging for vrk payloads. Please refer to 'uvrk_build' help for all options.
Example usage:
packman.py uvrk_build -t vos3 -i payload_123-456-789.vrk2.json -o file.uvrk.tar This will create the file.uvrk.tar package containing the payload passed as parameter. In such unified packaging, the naming of content and output archive is important and packman will fail on wrong namings.
Note that 'merge' and 'validate' accept these type of unified packages for processing using the '-u' option.
pre_signingportal command (vos2)
The 'pre_signingportal' command preprocesses a dlfile before usage in Signing Portal or Package Manager. This command and the associated 'post_signingportal' work as workarounds for those tools for vos2 platform. It performs the following operations:
- remove blacklist directory in dlfile
- applies all automatic fixes see Automatic fixes
To restore the optimizations, it is recommended to use 'post_signingportal' on resulting dlfile after Signing Portal and Package Manager usage. Please refer to 'pre_signingportal' help for all options.
Example usage:
packman.py pre_signingportal -t vos2 -d dlfile.tgz -o output.tgz This will preprocess the dlfile 'dlfile.tgz' and write preprocessed dlfile to 'ouput.tgz'.
post_signingportal command (vos2)
The 'post_signingportal' command postprocesses a dlfile after usage in Signing Portal or Package Manager. This command and the associated 'pre_signingportal' work as workarounds for those tools for vos2 platform. It performs the following operations:
- restore blacklist directory in dlfile Please refer to 'post_signingportal' help for all options.
Example usage:
packman.py post_signingportal -t vos2 -d dlfile.tgz -o output.tgz This will postprocess the dlfile 'dlfile.tgz' and write postprocessed dlfile to 'ouput.tgz'.
zip_create command (vos3)
The 'zip_create' command creates a zip file containing all files to be signed recursively in a directory. Please refer to 'zip_create' help for all options.
Example usage:
packman.py zip_create -t vos3 -i directory -fo zip_to_sign.zip This will recursively scan files and archive in directory and create zip file to be signed.
sponsor_change_create command (vos3)
The 'sponsor_change_create' command creates a sponsor change dlfile. Please refer to 'sponsor_change_create' help for all options.
Example usage (unlock):
packman.py sponsor_change_create -t vos3 -s dev --current_sponsor 123456 --serial_numbers "123-456-789" -o dl.dlfile.tar This will create dl.dlfile.tar that can be used to remove sponsor of device with serial number 123-456-789 and sponsor ID 123456. This dlfile will need to be production signed with matching sponsor signer 123456 that can sign for usr1.
Example usage (change):
packman.py sponsor_change_create -t vos3 -s dev --current_sponsor 123456 --new_sponsor 456789 --serial_numbers "123-456-789" -o dl.dlfile.tar This will create dl.dlfile.tar that can be used to change sponsor of device with serial number 123-456-789 and sponsor ID 123456 to sponsor 456789. This dlfile will need to be production signed two times:
- signed with matching sponsor signer 123456 that can sign for usr1.
- signed with matching sponsor signer 456789 that can sign for usr1. Those two signed outputs need then to be merged back with the merge command see sponsor_change_merge command (vos3)
sponsor_change_merge command (vos3)
The 'sponsor_change_merge' command merges two signed dlfiles to create a sponsor change dlfile. Please refer to 'sponsor_change_merge' help for all options.
Example usage:
packman.py sponsor_change_merge -t vos3 -i dl.signed_current.tar dl.signed_new.tar -o dl.dlfile.tar This will create dl.dlfile.tar that can be used to change the sponsor of a device. The two dlfiles provided need to be signed by the correct signers for the current and new sponsors. see sponsor_change_create command (vos3)
zip_sign command (vos3)
The 'zip_sign' command signs the files contained in a zip file and create a signed zip file. Zip file used as input is typically the output of the above "zip_create" command. Please refer to 'zip_sign' help for all options.
Example usage:
packman.py zip_sign -t vos3 -s dev -z zip_to_sign.zip -fo zip_zigned.zip This will recursively scan files in zip_to_sign.zip and create zip_zigned.zip containing dev signatures.
zip_apply command (vos3)
The 'zip_apply' command will insert all signatures in zip file back to directories or archives. Zip file used as input is typically the output of the above "zip_sign" command or from signing portal. Directory needs to be the exact same as when the "zip_create" command was used. Please refer to 'zip_apply' help for all options.
Example usage:
packman.py zip_apply -t vos3 -i directory -z zip_zigned.zip This will recursively scan files in directories and add signatures from zip_zigned.zip.
stat command (all)
The 'stat' command outputs general information about an archive in a parsable form. Please refer to 'stat' help for all options.
Example usage:
packman.py stat -t vos3 -d dlfile.tarThis will output information like:
name = dlfile.tararchive_type = Dlfileplatform = vos3size = 10240hash_sha256 = 6b8018510c77b26fa80a651a86db4334d1dbe4f7dcefb843cab304a75644ee7ebundle_count = 1sponsor_id = 010245bundle_prod_count = 0bundle_appdev_count = 0bundle_osdev_count = 1ui command
The 'ui' command without any options launches a local webserver and a browser client for user interface.
Example usage:
packman.py ui The 'ui' command can also directly provide one or multiple archives to be opened in the user interface.
Example usage:
packman.py ui -t vos3 -d dl.file.tarThis will act as shortcut to open ui, upload the dl.file.tar, add it to catalog and select it in the user interface.
Please refer to User interface as guide to the user interface.
Bundle filters (vos3)
Where mentioned, commands like gen_removal command (vos3), merge command (vos1, vos2, vos3) and list command allow to use bundle filters to include or exclude some bundles from the processing. The following filter options are available:
- –include_bundle_name: select which bundle names to be included (*)
- –exclude_bundle_name: select which bundle names to be excluded (*)
- –include_bundle_user: select which bundle users to be included (*)
- –exclude_bundle_user: select which bundle users to be excluded (*)
- –include_tgt_devices: select bundle matching target device models to be included
- –include_tgt_dt_names: select bundle matching target device tree names to be included
- –include_tgt_serial_numbers: select bundle matching serial numbers to be included
- –include_tgt_hardware_platforms: select bundle matching hardware_platforms to be included
- –include_arch_type: select type of archives to be included (one or more of 'bundle', 'upfile', 'upwd' and 'uvrk')
- –exclude_arch_type: select type of archives to be excluded (one or more of 'bundle', 'upfile', 'upwd' and 'uvrk')
(*) accepts wilcard '*' to specify globing for the match.
All filters can be combined and each accept multiple values separated by spaces.
Signers
The sign command (all) as well most other commands allow to sign the output file as part of its processing. This is done by specifying a signer with the "--signer" (-s) option. Optionally, one can choose which user to sign for with the '–signed_users' option to target specific device users (eg usr1).
For 'vos1' and 'vos2' platforms, signing with development keys/certs will issue PKCS7 (*.ps7) signatures.
For 'vos3' platform, signing with development keys/certs will issue CMS (*.cms) signatures. The '–cms_signer' (-c) can be used to specify a specific cms signer.
Following sections will describe each signer
dev signer (all plaforms)
The 'dev' signer is used for development signing and can be performed by packman directly using test keys/certs that are shipped with packman.
local signer (vos1,vos2)
The 'local' signer is used for production signing using smartcards and the File Signature Tool (FST). In order to use the 'local' signer:
- File Signature Tool (FST) must be running (please refer to FST documentation)
- use 'local' signer for signature requests with smartcards approval
online signer (vos3, titus)
The 'online' signer is used for production signing using a remote signing portal. In order to use the 'online' signer:
To be done once:
- user must have token access rights to signing portal (ask your administrator)
- user logs into portal 'https://sign.verifone.com', creates an Auth token using "Add auth token" in profile / Auth Token
- copy the complete token value (~500 characters) and save it to a text file
- set configuration for the token: 'packman.py config sign.online_token_path ~/mytoken.txt'
- set configuration for the product: 'packman.py config sign.online_product o3fw8emrARQvXt9pE'
With the above done, any command with 'online' signer will use the provided token path and product. Naturally, you can still use the options '–online_token_path' and '–online_product' to override the values (namely if you use several tokens and/or several products).
The online signer can be synchronous (immediate result) or asynchronous (deferred result).
- If option '–online_retrieve' is present, synchronous mode will be used: packman will wait for the result of the approval for "--online_timeout" seconds.
- If option '–online_retrieve' is absent, asynchronous mode will be used: packman will not wait for the result of the approval and the 'sign_retrieve' command must be used later to retrieve the result.
User interface
Start
When initially started, the browser window shows the following:

Add to catalog
To add an archive to the catalog, click on "Add", this will open this dialog:
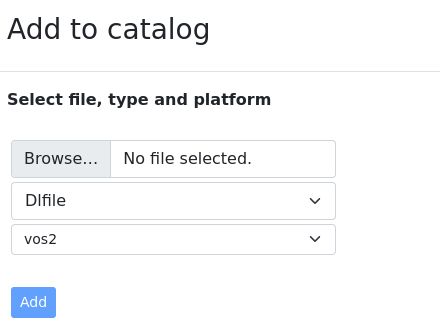
Select the archive on your disk, select the type of archive and the platform, then confirm with "Add" button. The newly added archive will appear in the list and can be removed using remove button "X". This operation can be performed several times and the current archive can be selected in the dropdown list.
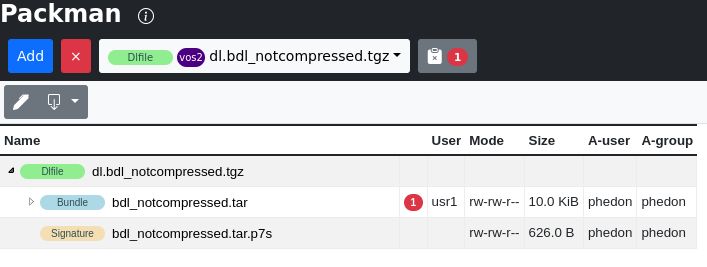
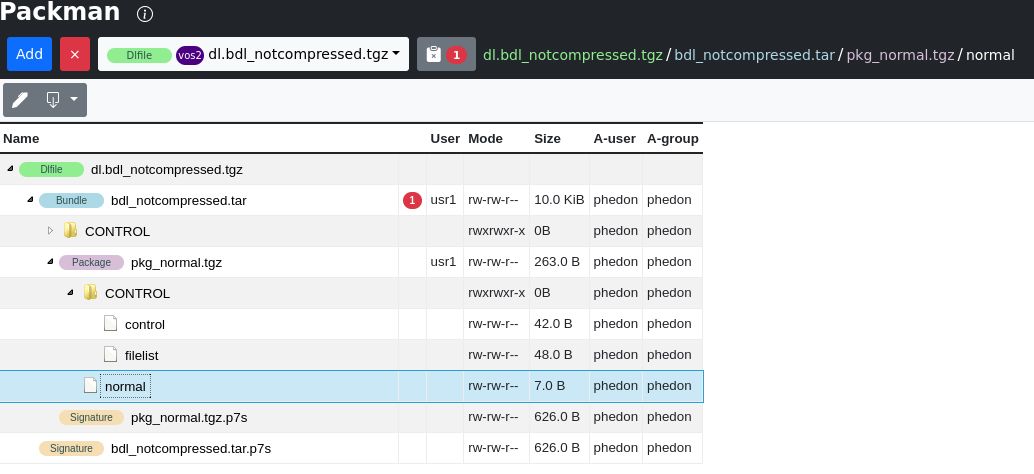
Tree view
The selected archive from the catalog is shown using a tree view which looks like a file explorer view, you can fold and open directories as well as archives.
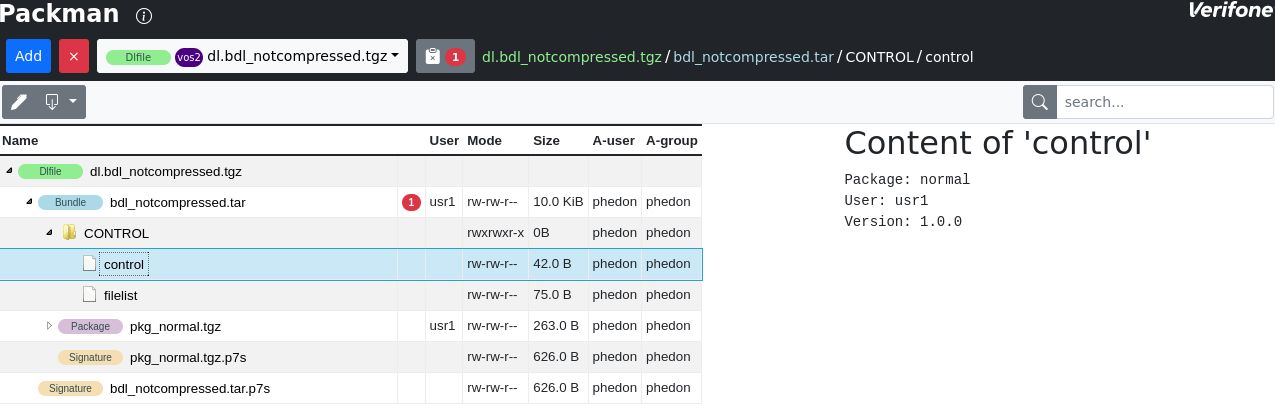
Content view
If the currently selected node in the tree has content that packman can display, the content of the file will be shown on the right side of the window. Control files, signatures, images, html, xml, css, etc. can be viewed this way.
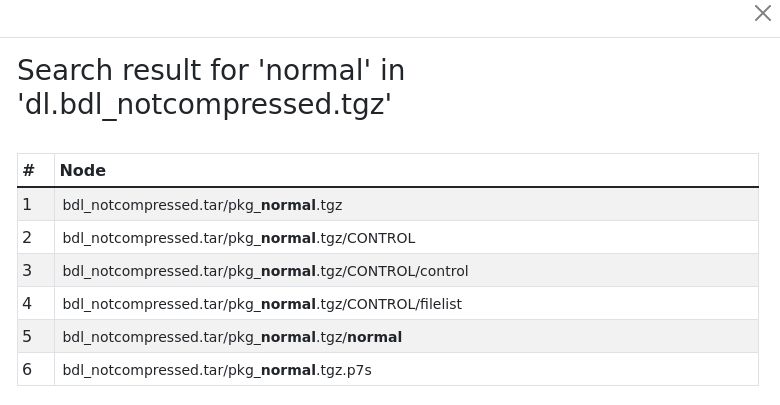
Search
The search entry area allows to look for nodes in the tree that contains the entered text. Note that clicking on the node path will bring you directly to the selected node in the tree.
Validation report
The billboard icon right to the catalog list shows the current number of validation errors, clicking on it will bring up the validation report.
Bread crumbs
When selecting a node, the complete path of this node (separated by '/') is displayed. Each of these breadcrumbs are clickable to jump to their location.
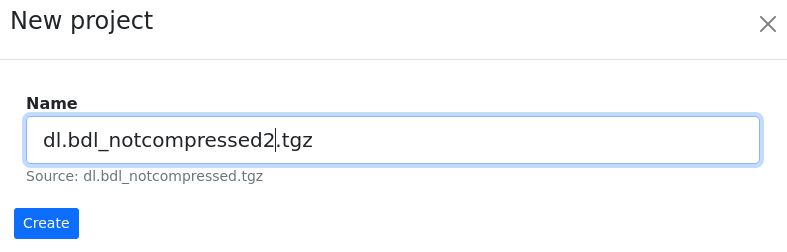
Create a project
In order to edit an archive, select it and click on the 'pen' icon. It will ask for a name for this project archive. This project file must have a name that does not already exist in the catalog.
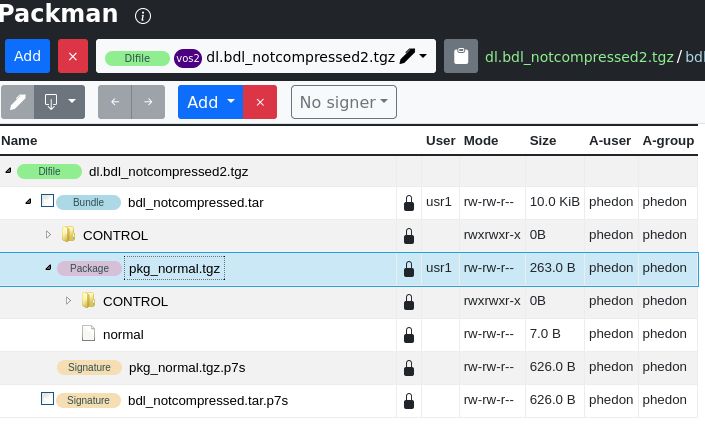
Writable nodes
Depending on the signer that is currently selected and the chosen signer users, the nodes of a project archive may be modifiable or not. This is shown with lock icons.
Select signer and signer users
Choosing a signer is done using the signer dropbox.
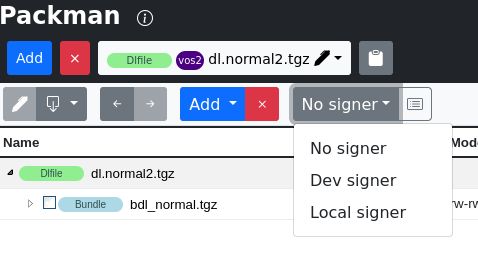
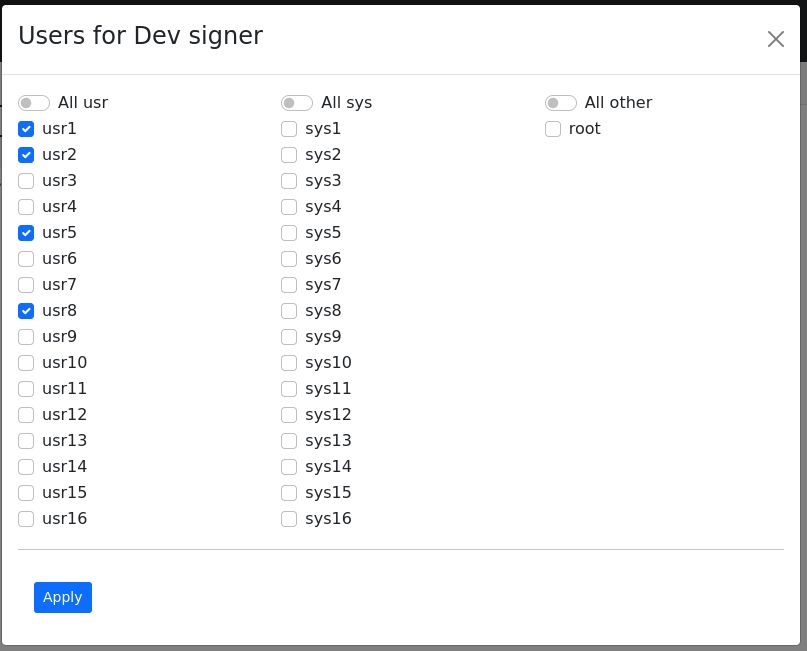
When a signer has been selected, the icon next to it allows to select the signer users. The users shown are the ones supported by the current signer. Thus for local signer, this is also depending on the currently inserted smartcard. Checking or unchecking users allows to limit the allowed signed users.
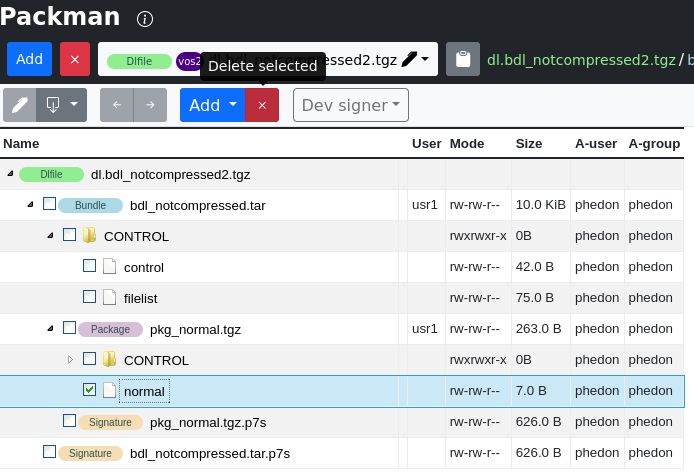
Delete selected nodes
Nodes can be selected (checkbox) and removed using 'X' button
Undo / redo
Operations done to the project can be undone or redone using these buttons.

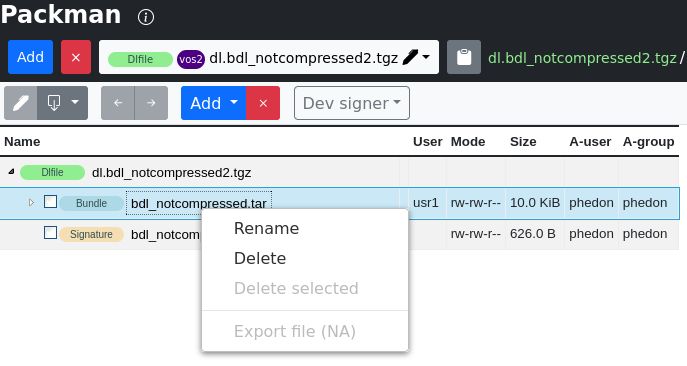
Context menu
A context menu is available on nodes for renaming, deleting, ...
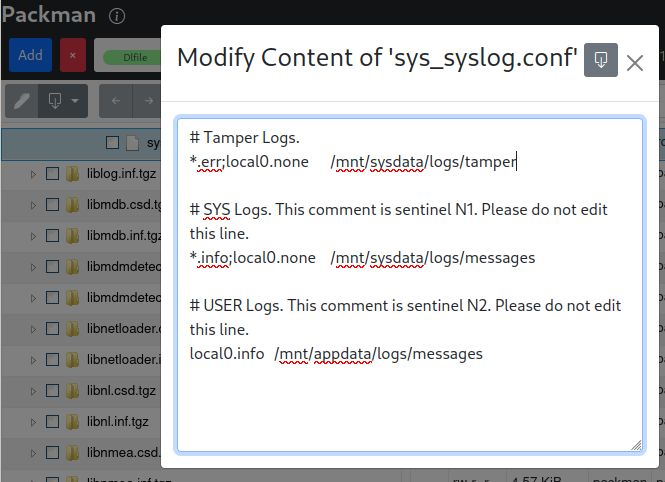
Edit text file
In order to edit text files, select the file (file must be writable) and when content is displayed on the right pane, click on 'edit' button. This allows to modify content and save modified content into selected file.
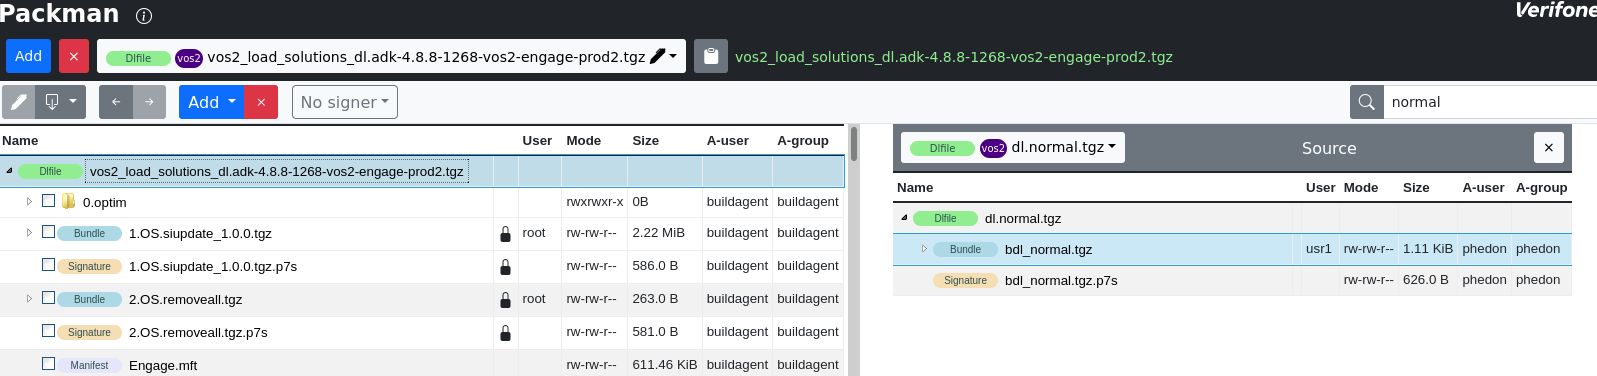
Adding files to archive
In order to add files to the current project, select the "Add from catalog" from the "Add" button. This will bring the catalog list into the right part of the window for selection and will show treeview too. To add files to the current project, drag and drop the file into the project.
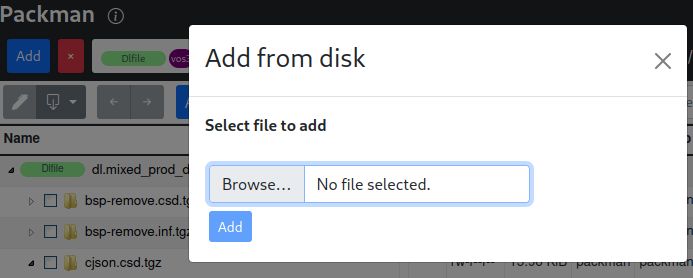
Another way to add a file is to choose "Add from disk". The will bring up a file chooser dialog box to insert it into the tree.
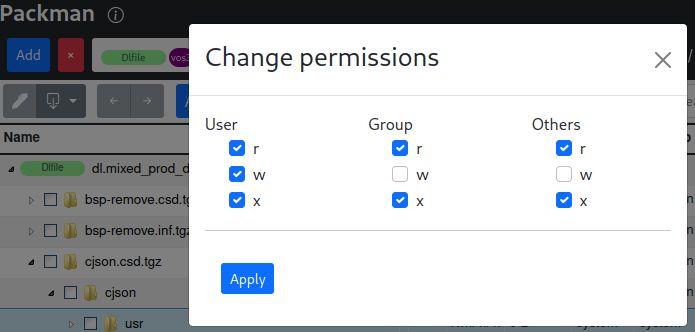
Change permissions
Selecting and right-click on node allows to choose "Permissions" that let you choose the permissions to set/unset.
Exporting
The exporting operation will use the current signer and create the resulting archive you edited. Some specific exports are also available which correspond to command line operation. Please refer to Command line interface for more information on their usage.

Automatic fixes
When generating an archive, packman applies automatic fixes on contents that are writable. A content is considered writable when one of the following applies:
- content does not involve a signature nor signature of its parent
- content involves a signature and selected signer is applicable
- special operation where signing is postponed: ie pre_signingportal
Here is the list of automatic fixes:
- fix depth-first ordering of archives
- fix compression on archives
- fix naming of extensions for archives, signature, certificate directory, remove '.' directories
- fix filelist presence and content
- fix blacklist presence and content
- fix order of items in archives
- fix permissions on windows
- remove permissions on non-executable files
- fix VHQ manifest presence and content
- fix control file fields like ensuring 'Name' usage in bundle and 'Package' in packages
Device mode validation (vos3)
When validating an archive, packman checks for signature coherency. User can specify four different behaviors explained here:
- Specifying "--mode prod", both system and user bundles must be prod signed
- Specifying "--mode osdev", both system and user bundles must be osdev signed
- Specifying "--mode appdev", system bundles must be appdev signed and user bundles must be osdev signed
- Without specifying the mode, one of the below must validate:
- one of the above modes is matching
- system bundles must be prod and user bundles may be osdev signed: this however triggers a warning that user prod signing is needed