External orders tracking in the 2Checkout affiliate network
Overview
Take advantage of External Order Tracking to keep track of sales generated by members of the 2Checkout Affiliate Network for services/products that you sell using multiple payment processors and different affiliate networks or a third-party ecommerce platform, in addition to those sold through the 2Checkout system, if any.
External Order Tracking ensures that 2Checkout rewards Affiliates for referred orders sold outside the 2Checkout platform. The 2Checkout Affiliate Network currently features over 40,000 affiliates working on a pay-per-sale commission-based model. According to the data in our system, companies selling mainstream software can experience an average jump in sales of 10%-15% simply by leveraging the 2Checkout Affiliate Network.
This technology is based on two types of pixel tracking implementations. While both implementations have the same behavior, their inner workings are quite different.
Image pixel
An invisible image pixel to track shopper actions once they buy a product/subscription after being redirected via a link from an 2Checkout Affiliate. 2Checkout uses the recorded data to provide you with reports and to pay the affiliates who generate sales of your products/services.
iFrame pixel
The most common way of tracking conversions. Tests have shown that iFrame pixels are much more accurate than image pixels. Additionally, iFrame pixels offer more room for further developments, if necessary.
External Order Tracking Requirements
Image pixel requirements
Should you choose to use the image pixel technology, you must meet the following requirements:
- Enable the 2Checkout Affiliate Network for your account.
- Use a custom domain with 2Checkout(e.g. store.merchant.com).
- Use a custom domain with third-party ecommerce providers(e.g. store.merchant.com).
- Configure products sold through a third-party platform within the 2Checkout platform.
- Assign the products to commissions lists associated with 2Checkout affiliates. Make sure to specify a commission you're willing to pay for affiliate referrals.
- Contact your 2Checkout account manager for details on legal / financial requirements.
iFrame pixel requirements
Should you choose to use the iFrame pixel technology, you must meet the following requirements:
- Enable the 2Checkout Affiliate Network for your account.
- Configure products sold through a third-party platform within the 2Checkout platform.
- Assign the products to commissions lists associated with 2Checkout affiliates. Make sure to specify a commission you're willing to pay for affiliate referrals.
- Contact your 2Checkout account manager for details on legal / financial requirements.
Important: iFrame pixel tracking does not require you to create a custom domain with 2Checkout.
Integrating Image Pixel Tracking
Provided that you meet all the requirements mentioned above you can now move to the integration stage.
- Go to Affiliate Network -> Build your network and select the External Orders Tracking tab.
- Copy the JavaScript code available on this page into the source code of the Thank You pages that you use outside 2Checkout
- Replace the UPPER-CASE values with the corresponding order variables in the external ordering platform. Depending on whether or not you're using a custom domain, you will need to configure the tracking.type parameter accordingly
- tracking.type='image' or tracking.type='iframe' if you are using a custom domain
- tracking.type='iframe' if you are not using a custom domain
Integrate the modified JavaScript code into the source code of the Thank you page displayed to shoppers at the end of a successful sale. This area is designed to offer a range of details, including an external order reference, info on the products sold, their value, etc.
External Order Tracking relies on cookies to track the activity of the shopper during the purchase process. Essentially, when users click links from 2Checkout affiliates, 2Checkout records the clicks and places tracking cookies on their machines. 2Checkout affiliate links can point to a specific product or multiple offerings from you, or redirect to your website.
External Order Tracking comes into play when users complete an order with the third-party payment provider you're using, reaching the confirmation screen at the end of the ordering process. This page features the tracking script (an invisible 1x1 pixel image or iFrame) set up to record the details of the sale.
You can see completed sales tracked with Pixel Tracking in the External orders area of your Control Panel, under Affiliate Network.
Confirm external orders to credit 2Checkout Affiliates
For affiliates to be credited and paid for the referred purchases, even if the commission is warranted, you need to first approve external orders manually. Make sure to check the validity of external orders with purchases made through the third-party platform you're using.
The information recorded contains the external reference of products, the date when the order was placed, the affiliate whose link was used, the names of theexternal products and the number of units purchased, as well as the price paid by the shopper and the associated currency.
Before confirming external orders, match the products tracked via Pixel Tracking with those you defined in the 2Checkout platform. Once an external product is matched with one defined in the 2Checkout platform, subsequent matches involving the same two items will be done automatically by the system. Note: You cannot match multiple products from the same external order with a single product in the 2Checkout system.
The commission that 2Checkout Affiliates receive is calculated based on the price recorded when the External Order is placed successfully, and is not impacted by the pricing schemes you configure in the 2Checkout platform.
External orders in the 2Checkout platform can show the following status messages:
- Pending
- Processing
- Rejected
- Confirmed
You can edit and confirm both Pending and Rejected orders. When you confirm an external order, a new order is also generated in the 2Checkout platform, which will be available in the Order search area, under Orders & customers.
You can approve external orders either one by one, or selecting multiple items at once. Note that once you confirm an external order, its details are locked and can no longer be modified. For unconfirmed external orders, any changes will be reflected real-time across all items in this area, if the modifications impact additional orders than the one being edited.
Rejected orders will be ignored by 2Checkout and affiliates will not receive any commission.
When do 2Checkout affiliates receive a commission?
2Checkout's Affiliate Network is based exclusively on a pay-per-sale model. This means that affiliates receive a commission, a percentage out of the price for all shopper purchases that they refer. You alone control the value of the commission paid to affiliates in the 2Checkout Network when a visitor referred by them purchases a product or a service on your website.
Do affiliates automatically receive commission for ever sale they generate?
No. You first need to confirm the sales reported by our External Tracking technology as valid.
Under which conditions can I reject sales?
You can reject all invalid or erroneously reported sales if identified as such. For example, you can reject an order to avoid duplicate crediting of an affiliate that works with both 2Checkout Affiliate Network and another affiliate network.
What does the Other message stand for?
Orders can contain additional costs on top of the price of the products purchased. When 2Checkout identifies such costs, including taxes (VAT, sales tax), shipping taxes, etc., they're featured in a manner designed to make it clear that they cannot be matched with a product in the 2Checkout system.
How does 2Checkout calculate the affiliate commission?
2Checkout calculates the affiliate commission only according to the price of the products shoppers acquire from you, disregarding any additional costs they pay.
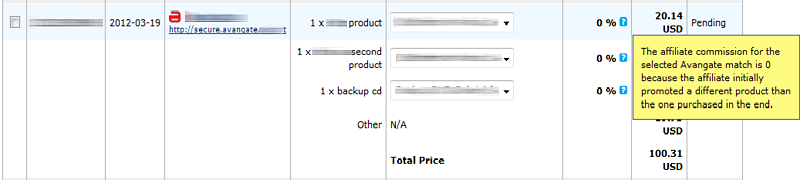
Why is the commission of some external orders zero (0) even if they're valid sales?
The affiliate commission for the selected 2Checkout match is 0 because the affiliate initially promoted a different product than the one purchased by the shopper. As such, the 2Checkout system has determined that the commission is not warranted.
You should reject orders for which the commission's value is zero (0). However, even if you try to approve them, the 2Checkout system is designed to disregard them, since there's no commission to pay affiliates.
Can the commission for an External Order be modified?
Only for Pending External Orders, by modifying the commission settings for affiliates, which will be applied automatically.
What values can be sent for the parameters market as optional in the JavaScript code?
Either the first and last name, company, email, postal code, etc. in the case of setContact, for example, when they exist, or null otherwise. Replace each optional parameter with NULL. Alternativelly, the entire line: tracking.setContact('FIRST_NAME', 'LAST_NAME', 'COMPANY', 'EMAIL', 'POSTAL_CODE', 'CITY', 'STATE', 'FISCAL_CODE', 'ISO_COUNTRY_CODE', 'ADDRESS'); can be removed.
What happens when the "none" option is selected when matching products?
2Checkout will not pay Affiliates a commission for External Products which you don't match with items configured in 2Checkout (their equivalents) and select noneinstead.
What data does the external order tracking mechanism captures?
We only capture data that we receive from the after sales page in the 3rd party ecommerce platform.
The mandatory values that we need in order for External Order Tracking to function are:
- Order ID (from 3rd party eCommerce solution, for sync purposes - e.g. if one of their orders gets refunded, the merchant will be able to reject the order in 2Checkout also);
- Currency - the currency that was used in the order;
- Total Price - price paid by the customers;
- Product details:
- Product name - name of product from 3rd party eCommerce solution
- Unit price - unit price in 3rd party eCommerce solution
- Quantity - quantity
- Product ID - product ID in 3rd party eCommerce solution
There are some optional variables also that the merchant can send: First name, last name, company, email, postal code, city, state, fiscal code, country code (ISO), address.