Country-based promotions
Overview
Create promotions that apply based on your customer's country of purchase. Customers across the world respond to different incentives, therefore by making your promotions country-specific you are increasing the effectiveness of your marketing tools. Set promotions to apply to a certain country, region, or continent, depending on your business needs.
How it works
To make your promotions country-specific, follow these steps:
1. Set pricing localization
Geo-specific promotions work by incorporating a local pricing configuration in the promotion setup. Use pricing localization capabilities to define specific prices based on the customer's country/region/continent. Check our pricing localization article for learning how to define local prices for your products.
2. Assign pricing configurations to your promotions
To make your promotions geo-specific, click on Add pricing options when creating a promotion. Select the products that have a localized pricing scheme, and add the pricing configuration in the promotion setup.
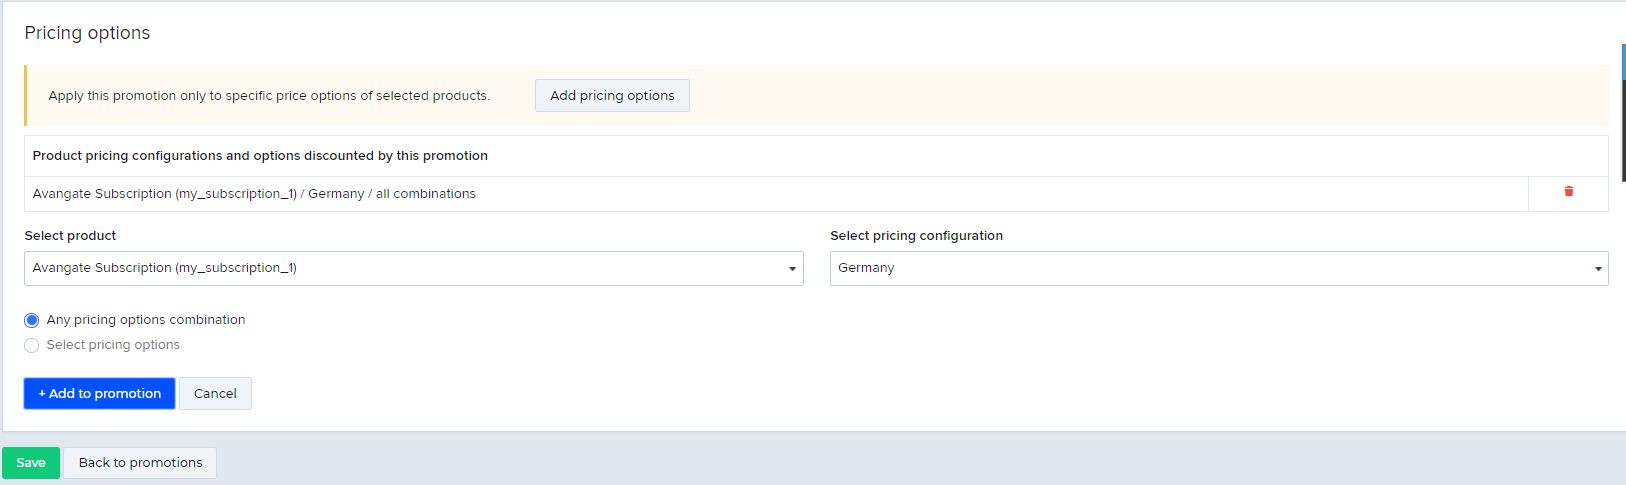
Click on Add to promotion, to successfully add a localized pricing configuration to your promotion.
Cookie management for 2Checkout myAccount
Overview
A cookie is a small text file that a website places on a user’s computer (including smartphones, tablets, or other connected devices) to store information about the user’s activity. Throughout the world, regulating entities see cookies as a “persistent identifier”, thus falling under the rules applied to protect Internet users' personal information.
Regulatory entities:
- For California – CCPA
- For EU – GDPR, ePrivacy Directive, Cookies and other tracking technologies
- National regulations (per country) on privacy and protection of personal information
Availability
All shoppers have access to the myAccount customer portal. Consequently, all of them will be seeing the cookie consent displayed (in one form or another, depending on where they are located when they access the portal. See more details below).
Out-of-the-box enhancement by 2Checkout
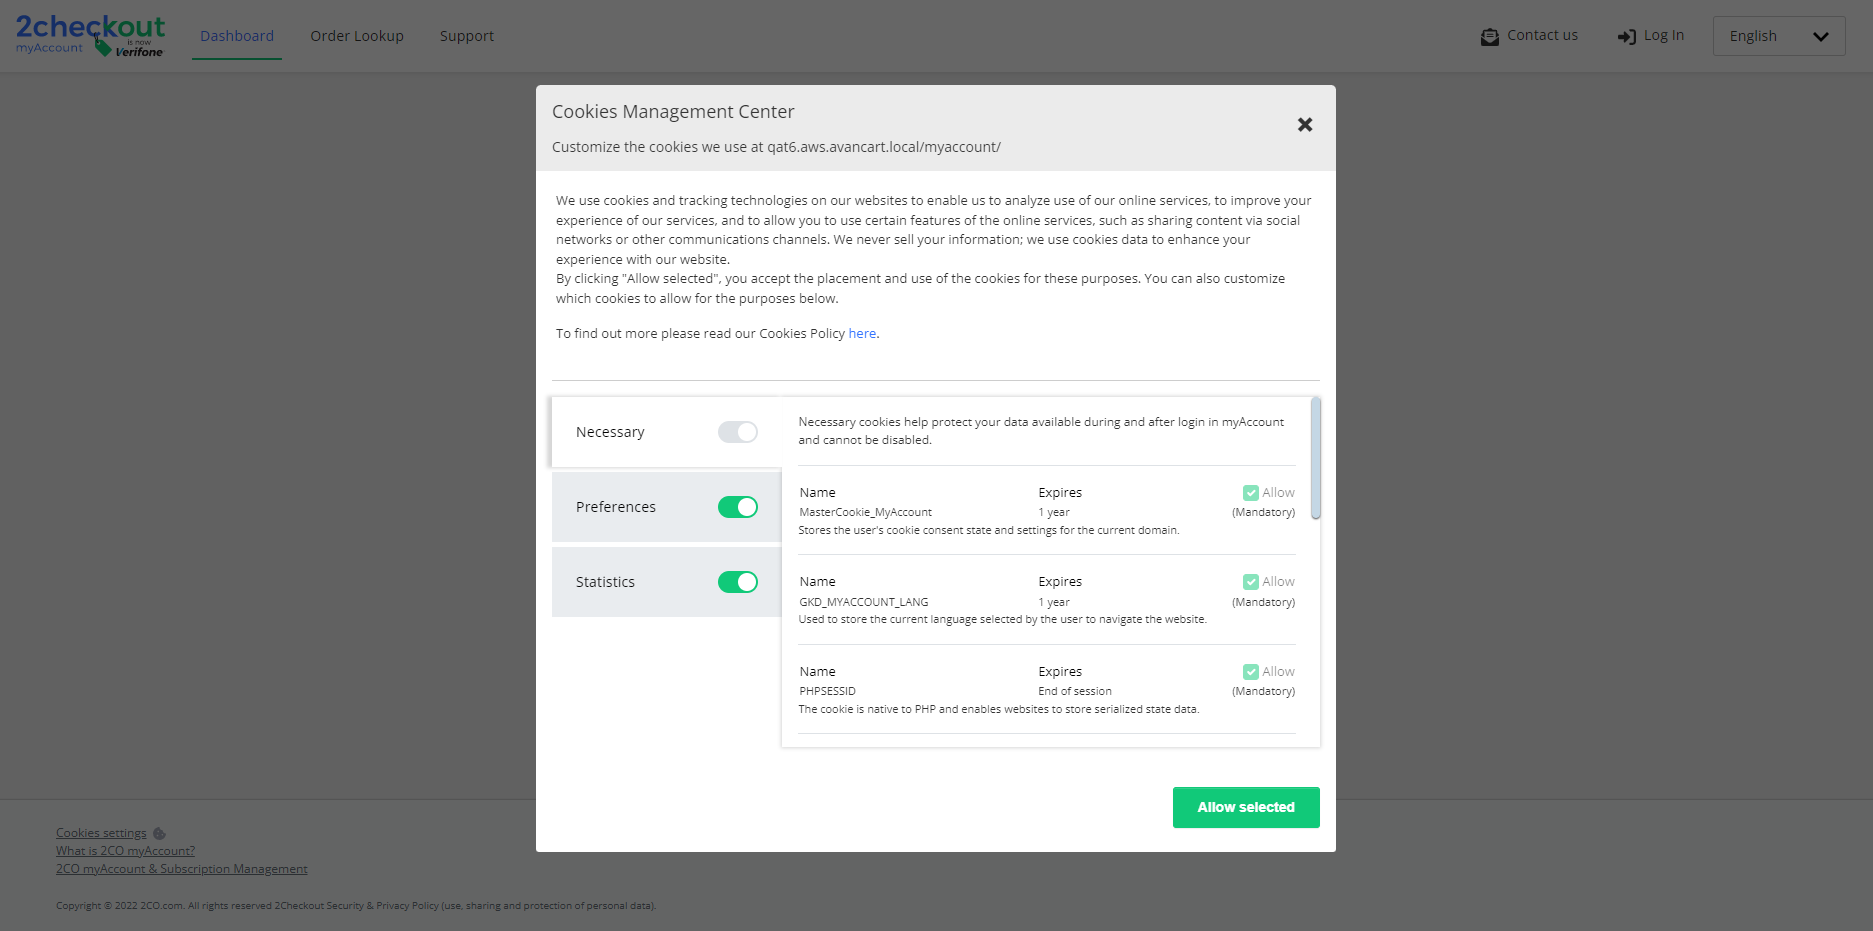
For shoppers in California (USA) and the European Union, 2Checkout uses three types of cookies:
- Strictly necessary (mandatory) - These cookies help protect shoppers' data available during and after logging into their 2Checkout myAccount and cannot be disabled.
- Preference (optional) - These cookies are used to remember customers’ choices during navigation through their 2Checkout myAccount, such as pagination selection or list types.
- Statistics (optional) - These cookies help 2Checkout understand the shoppers' interaction with their customer myAccount, so that our system can identify issues and continuously improve the overall experience shoppers have. Data is collected and reported anonymously.
2Checkout collects consent upon the shoppers' 1st access in myAccount through a footer ribbon where the user can:
- Accept all cookies - This will check all the above 3 types of cookies
- Customize settings/Do not sell my info (for California users only) - This will enable the user to check any cookies other than the mandatory ones
- Access the 2Checkout cookie policy.
Once the shopper performs an action on the footer ribbon, this will not be shown during any other subsequent accessing of the portal (for a one-year period). A link to “Cookie settings” will be available (bottom right corner), where the user will be able to change options for the optional types of cookies at any time. After one year, the footer ribbon will, once again, be displayed, to collect consent for the placed cookies.

By clicking on the Customize settings button, the user will be prompted with a separate window where they can choose their preferred settings.
The footer ribbon displayed for California shoppers will display a variation of the text on the customize settings button, as shown below.

For shoppers from the rest of the world (ROW), including the US outside California, 2Checkout uses three types of cookies:
- Strictly necessary - These cookies help protect customers' data available during and after login into their myAccount platform and cannot be disabled.
- Preference - These cookies are used to remember customers’ choices during navigation through myAccount, such as pagination selection or list types.
- Statistics - These cookies help 2Checkout understand the interaction of the users with their myAccount platform so our system can identify issues and continuously improve the overall experience they have. Data is collected and reported anonymously.
2Checkout collects consent upon 1st access in myAccount that all cookies are enabled (they cannot be unchecked) through the footer ribbon where the user can:
- Click OK - This will mark the fact that the user acknowledged the cookies set-up.
- Access the 2Checkout cookie policy.
Once the shopper performs an action on the footer ribbon, this will not be shown during any other subsequent accessing of the portal (for a one-year period). A link to “Cookie settings” will be available (bottom right corner), where the user will not be able to change options for the optional types of cookies.
For US users with unidentified state locations, 2Checkout will display the rules applied for California users.
For ROW users with unidentified state location 2Checkout will display the rules applied for EU users.
Customization options
Depending on the template you already use for your 2Checkout myAccount platform, the footer ribbon can be adapted to visually align with your website's layout. But customization needs to keep mandatory elements in place, to make sure compliance requirements are met:
- The user needs to be prompted to actively provide consent for the cookie setup.
- The link to the “cookies settings” needs to always be available inside the customer portal – for the user to view/change options.
- The link to the Cookie policy available on 2Checkout website should always be displayed inside the ribbon + cookie management overlay.
If customization is needed for your company, you can reach out to your assigned account manager within 2Checkout or write an email to support@2checkout.com to assist you in the process.