Order details page
Overview
Use the Order details page to get order information, request refunds, confirm purchase orders and send invoices via email.
Order details page sections
Order status section
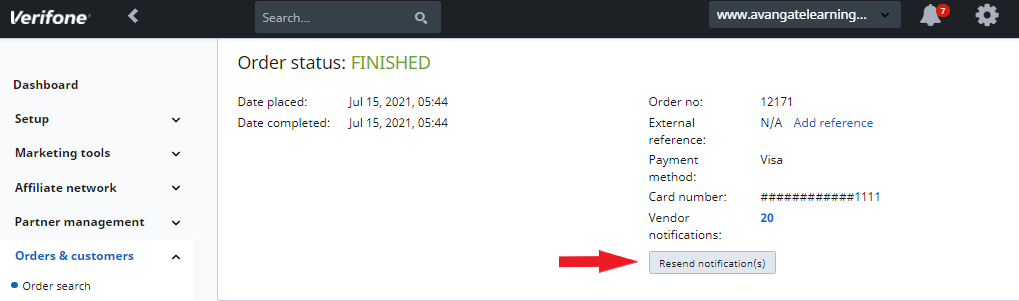
The Order status section is the main order information area at the top of the page shows details such as:
- The unique order reference number
- Order status
- Date when the order was placed
- Date when the order was completed
- Chargeback status in scenarios in which a dispute was registered, along with its evolution
- Order number
- External reference number
- Payment method
- Notifications sent to the merchant (view additional info in the Order History section, at the bottom of the page)
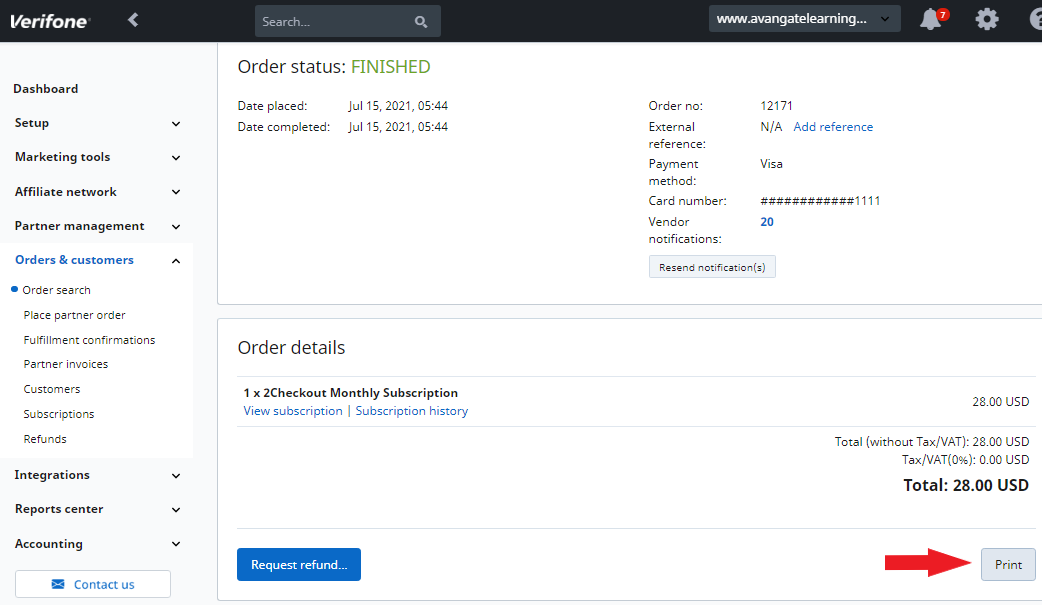
Order details
The Order details area displays information about:
- Product names
- SKUs (stock-keeping units, provided that they're defined)
- Price details and pricing options info
- Extra info
- Discounts
- Taxes including VAT, sales tax, and shipping fees
- Affiliate info and commission
- Link source
- Additional information
The Order details area also enables fast access to any subscriptions associated with products sold to customers.
In addition, via the Delivery details link you can access Delivered codes and the Product download link sent.

Shipping details
The Shipping details area displays information regarding the delivery of your tangible/physical products. Use this section to view the order shipping method, the tracking URL and Number provided to the customer, and the additional information you filled in when marking the order as shipped.
This section is displayed only for orders that have a physical product.

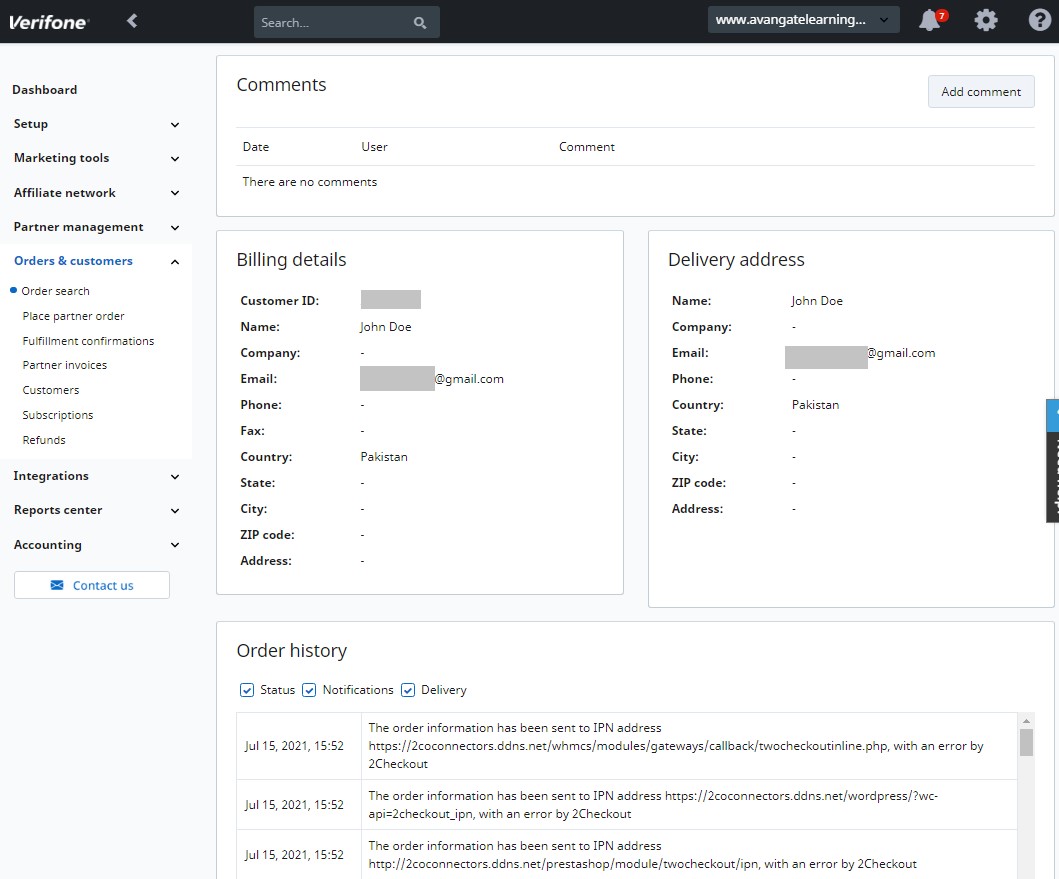
Comments
The comments area displays any comments attached to this order using the Add comment functionality. Comments can be removed from an order by clicking the Delete button. Comment deleting is only available to the control panel users who added the notes.
Billing details and delivery address
This area provides the billing and delivery information that customers enter during the purchase order.
Use the link on the Customer ID to access the Customer account of the shopper using the subscription(s) associated with the product(s) purchased via a specific order.
Order history
The order history area displays information on order status evolution, the notifications sent as well as delivery details. Use the filters at the top of this section to view only specific details or all data in chronological order.
Order details page actions
Resend notifications
Information on the number of sent vendor notifications is displayed in the area at the top of the screen when viewing the details for a specific Order.
At the same time, the Order history area at the bottom of the Order Details page is designed to let you filter only details on both email and Instant Payment Notifications (IPN) sent by the 2Checkout system.
To resend notifications for an order for which you've already received the initial IPN and email messages, follow these steps:
- Log in to your Merchant Control Panel.
- Navigate to the Orders & customers.
- Click on Order search and add your desired filter to search for a specific order.
- On the Order Details page, click on the Resend notification(s) button in the Order status section, at the top of the page.
- Check the checkbox next to the Debug IPN option and click Resend. You'll receive a visual output of the IPN content sent to you, so you can use the information to fine-tune your script.
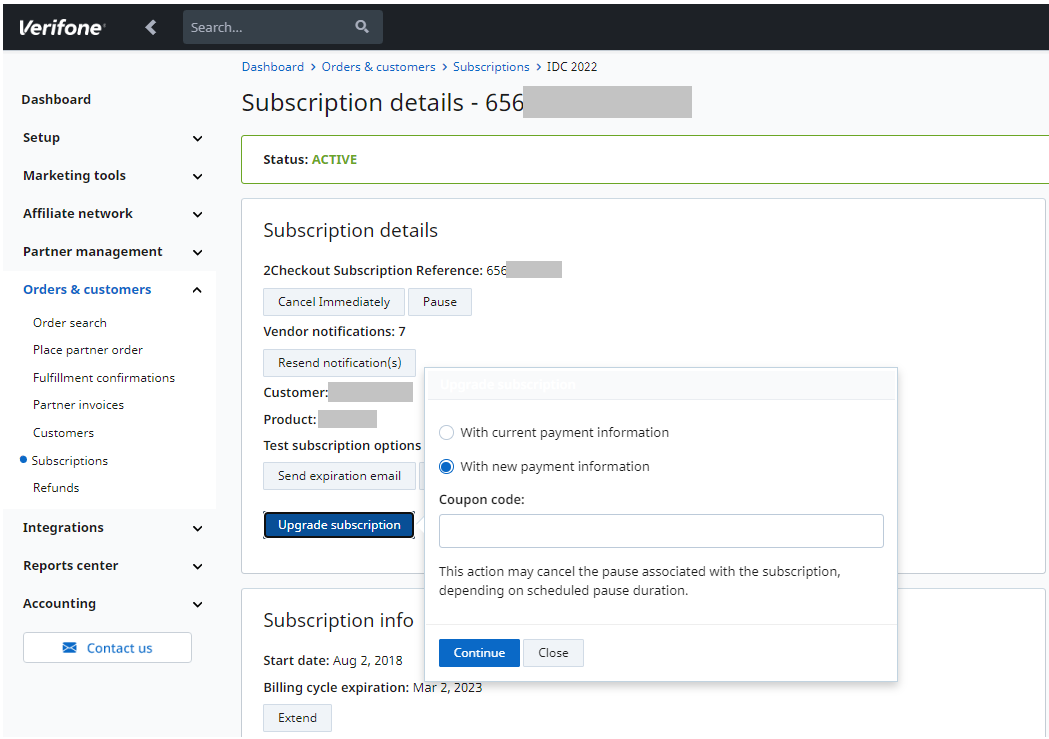
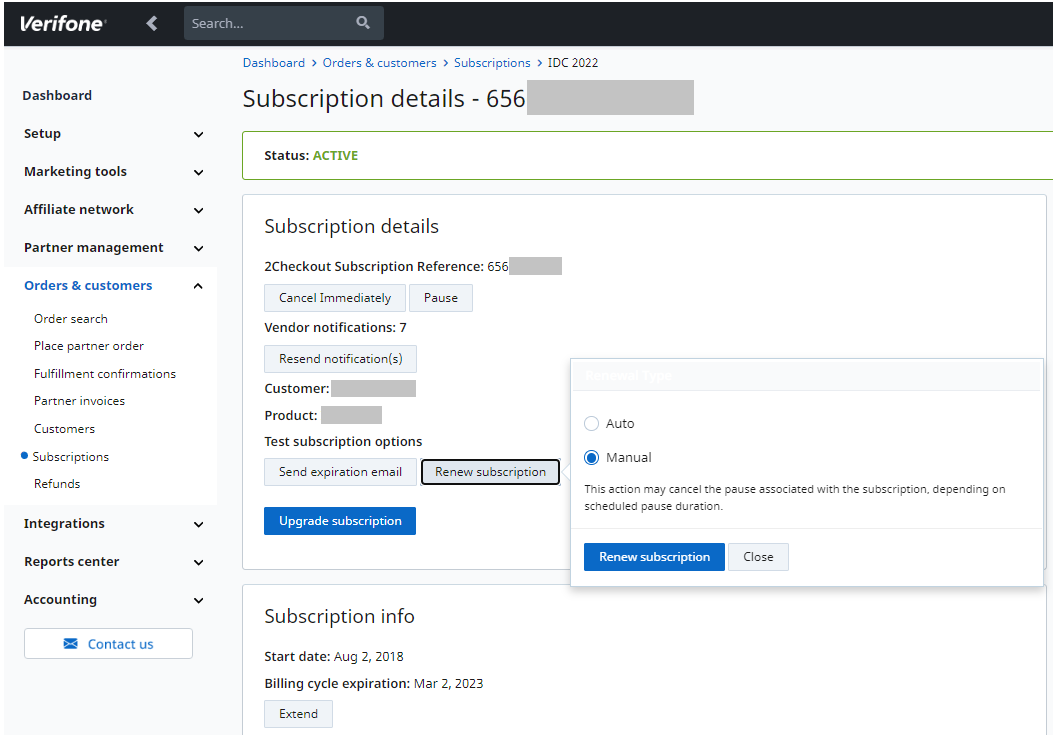
View subscription
Use the View Subscription link to access details on the subscriptions associated with products sold as a part of specific orders.
Delivery details
Use the Delivery details link to any access Delivered codes and Product download link sent. The Delivery details pop-up also enables you to resend both delivered codes and product download links to customers, using the email address specified in the popup window.
Mark as shipped
For orders that require the physical delivery of a product, use the Mark as Shipped button to confirm the shipment of the product. Optionally, you can fill in a tracking number and additional shipping information, before marking the order as shipped.
Print package slip
Use the Print Package Slip functionality to print a document containing order and shipment information. Add this document to the package sent, so that customers who purchase tangible goods may use it for identifying their packages.
Requesting a refund
Refunds can be requested for each order.
Add a comment
Attach comments to orders by clicking the Add comment button.
You can print the Order details page by clicking the Print button in the Order details section.
Confirm or cancel Purchase Orders
When customers use Purchase Orders as a payment method, to confirm or cancel the order, click to edit it after you identified it using Order search. In the area at the top of the screen, you can access the files uploaded as a part of the PO payment process, but also cancel or confirm the Purchase Order.
Once the PO payment is complete, the following information will be displayed when viewing the order:
Upgrades and renewal orders
Upgrades and renewal orders are marked accordingly, just as in the screenshots below:
Send invoices on-demand via email
This feature enables you to send and re-send invoices via email for orders placed through the 2Checkout system.
To send invoices on-demand via email, the following requirements must be met:
- a shopper invoice has to be attached to the order;
- orders need to have been finalized, reaching the Complete status. This feature is also available for Refund orders as well as those paid with a Purchase Order (with the Pending status).
Send/re-send an invoice
To send or re-send an invoice, follow these steps:
- Go to Orders & customers → Order Search.
- Search for the order for which you'll send/re-send the invoice.
- Click the reference number of the items returned to the query to access the Order Details page.
- Click Send invoice.
- By default, the email field is prefilled with the email address extracted from the Billing details for the order. This piece of information is editable, and you can enter another email address to which the invoice will be sent.
Integrate UberCart
Availability
UberCart integration is available only for 2Checkout accounts that handle their own tax and invoice management (2Sell and 2Subscribe accounts).
UberCart Settings:
- Download or clone extension at https://github.com/craigchristenson/ubercart-3-2checkout
- Extract and upload the uc_2checkout directory to /modules/ubercart/payment/ on your hosting/server.
- Sign in to your Drupal admin.
- Click Modules.
- Under UberCart-Payment activate 2Checkout and save your changes.
- From the admin menu click Store.
- Under Configuration click Payment Methods.
- Click Settings.
- Enter your Vendor Account Number (2Checkout Merchant Code).
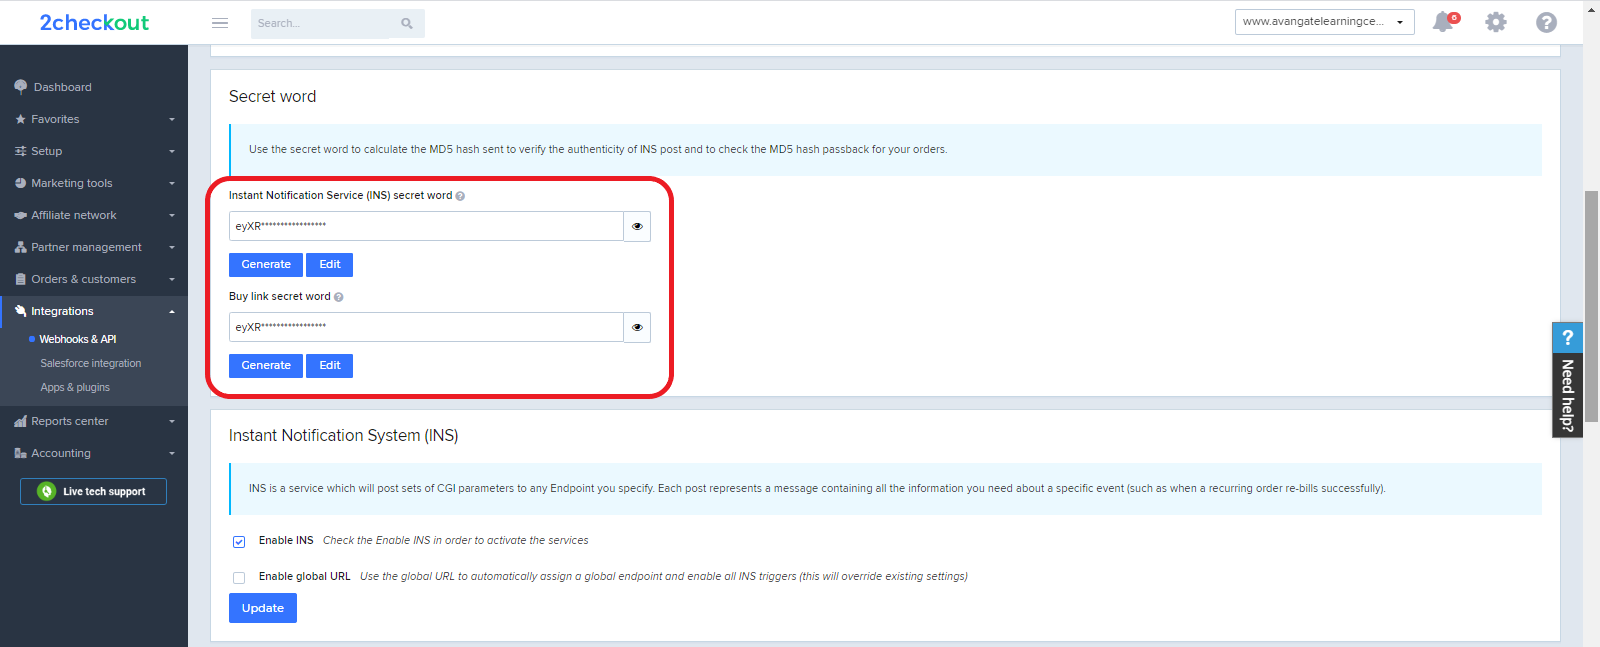
- Under Secret Word for order verification enter your Secret Word. (Must be the same value entered on your 2Checkout Control Panel.) To obtain the Secret Word, contact 2Checkout or, if you already have a 2Checkout account, log in to your Merchant Control Panel and navigate to Dashboard → Integrations → Webhooks & API → Secret Word → INS Secret word. Your INS secret word should be the same as the buy-link secret word (can be found under Dashboard → Integrations → Webhooks & API, scroll down to the Secret Word area, under the INS Secret Word). Edit your INS secret word and buy-link secret word to match each other, then copy and paste them into your UberCart admin.
- Under checkout type, select either Single page checkout or Multi-page checkout.
- Click Save Configuration.
2Checkout Settings:
- Sign in to your 2Checkout account.
- Navigate to Dashboard → Integrations → Webhooks & API
- Follow these steps to activate Redirect URL:
- In the Redirect URL section check “Enable return after sale”
- For Return method, select Header redirect
- Set the Approved URL to the URL provided in your UberCart admin (Replace http://yourdomain.com with the actual URL to your domain)
- Click Update to save your settings.
About UberCart
Ubercart is an open source e-commerce solution fully integrated with the leading open source content management system, Drupal, winner in two categories of the Packt Publishing 2008 Open Source CMS Awards. This is a killer combination for anyone looking to build a community around a product, sell access to premium content, offer paid file downloads, and much more, all while maintaining a seamless connection to your users. Ubercart leverages the advantages of Drupal’s major core and contributed systems, providing your users with shopping cart functionality that integrates with other parts of your company or community website.
For more information visit: UberCart.com
Merchant Control Panel Dashboard
Overview
The Merchant Control Panel Dashboard acts as a homepage after the login and comes with a wide array of functionalities that allow live monitoring of the main business metrics, customization, and easy in-page navigation, while also offering extended reporting capabilities.
What can you do?
- Search orders, customers, and subscriptions via reference/email by using the header search bar.
- Easily switch between accounts with the Account dropdown.
- Easily access reports with a call to action included in each of the Dashboard's widgets.
- See notifications using the Notifications bell.
- Access the Knowledge Center articles by clicking the Help button – Documentation.
- Use the Account settings cogwheel to find your Merchant code, Settings, User management, System options, and the User details for your current user and also the Log Out button.

Track business metrics
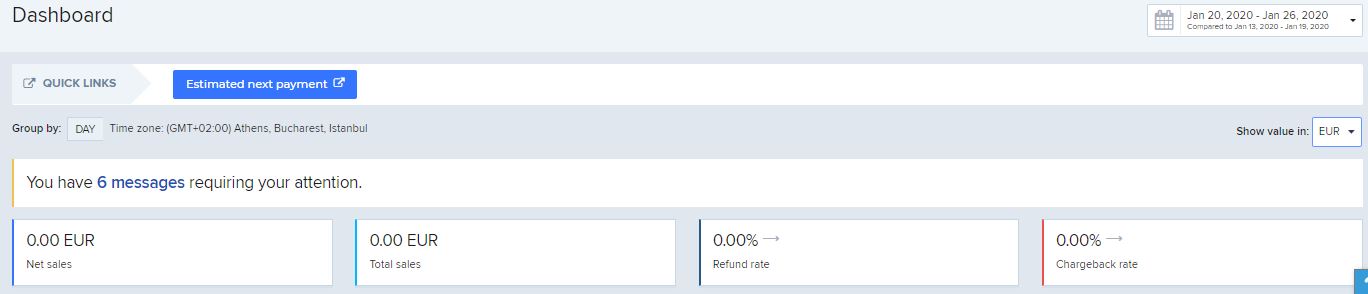
All the information displayed on the Control Panel dashboard is based on the timeframe previously selected. Data may be grouped by day, week, and month. Control the interval for which the data is being displayed, by selecting one of the predefined timeframes: today, yesterday, last 7 days, last 30 days, this month, last month, or set a specific timeframe with the custom range option.
The “Show value in” drop-down, allows you to choose the dashboard display currency.
You can easily access reports by using the call to action integrated into each of the dashboard's widgets. They act as a redirect to the reporting section, where you can pull detailed information about all your main business metrics. All the amounts displayed in the Control Panel Dashboard (with the exception of the Account Balance report) are calculated by converting your orders to your preferred Control Panel display currency using the daily exchange rates from the European Central Bank.
What information can you find here?
- Account balance – represents the estimated total revenue after all the taxes have been paid, commissions were applied and disputes (chargeback and refunds) amounts were retained and released.
- Total sales – this data corresponds to the total sales that were registered in the timeframe selected.
- Refund rate – is the value of the processed refunds in the selected interval divided by the value of finished orders (eStore, Affiliates, CM) in the same time period. Based on the threshold that was set, the arrow here can change, making it easier for you to notice any issues in time.
- Chargeback rate – represents the number of chargeback disputes that were generated in the timeframe selected, against the total number of orders placed in the previous comparison time frame. Depending on the trends and threshold the arrow can change color and orientation, making it easier for you to keep track of it.
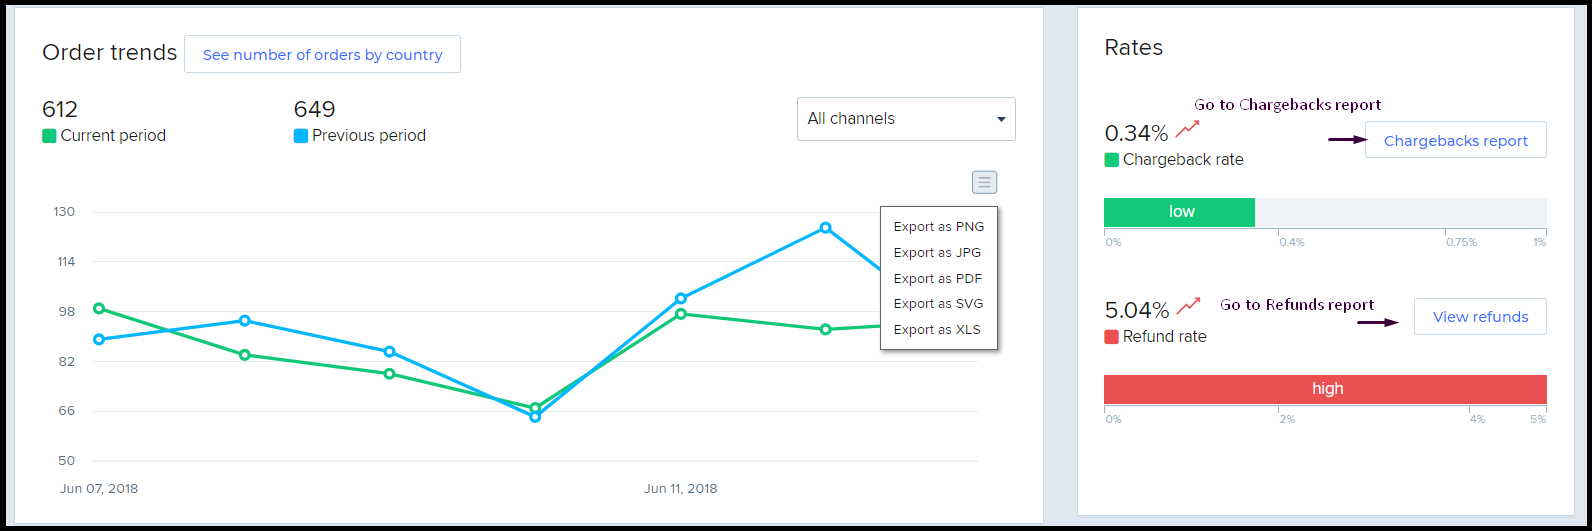
For more details on the Chargeback and Refund rates, the dashboard contains a separate widget, that also displays visual indicators.
Depending on the rating score and threshold exceeding the risk, the widget displays different colors: green (low rate and risk), orange (moderate rate and risk) and red (high rate and risk or threshold exceeded).
If you need further details about the Chargeback or Refund rates, you can use the button embed in the widget, which acts as a redirect to the main reports.
Live-monitoring of Sale Trends
Sales overview
- Monitor your sales trends. The widget displays the total sales value, the average order value (average value of all orders placed), and the total number of orders placed.
- View a forecast for your sales trends. If the data displayed in the dashboard also contains information from the current day, a forecast is computed for your sales trends. Alternatively, if you select a larger time interval for displaying the data (last 12 months), group the information by week/month to view a forecast of your trends.
- Values are displayed in comparison with the trends from the previous period.
- Export the information directly from the dashboard in the format you prefer.
Order trend monitoring
This widget allows you to:
- Monitor your order tendencies for the current interval in comparison with the previous period.
- View a forecast of your order trends. If the data displayed in the dashboard also contains information from the current day, a forecast is computed for your order trends. Alternatively, if you select a larger time interval for displaying the data (last 12 months), group the information by week/month to view a forecast of your trends.
- Filter the data displayed, based on the sales channels.
- Export the chart in different formats for better reporting and data interpretation, using the button integrated into the widget.
- Get easy access to the order report section through the button included in the widget.
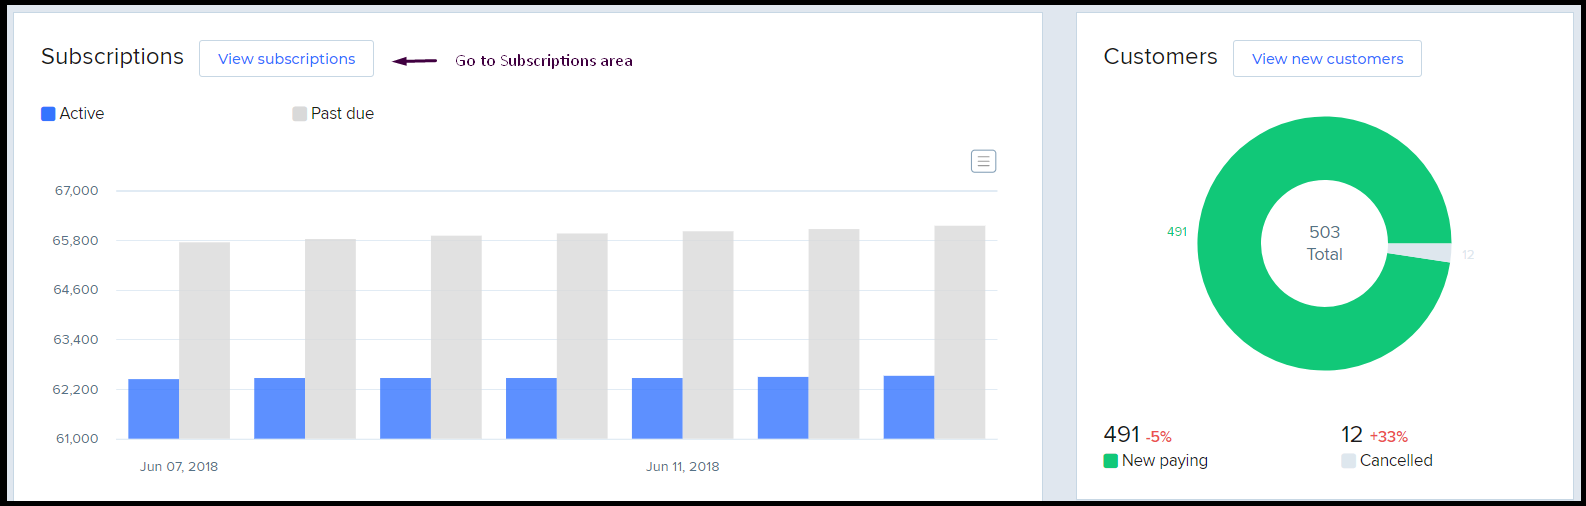
Subscription, customer, and renewal evolution
Subscription trends and customer evolution
Track your subscriptions' trend evolution, both for your active ones and those that are past due. Given the fact the subscriptions are in direct correlation with your customer retention rate, you can also monitor your customer pool evolution.
The evolution is registered under the total number of customers and the new ones that purchased one of your subscriptions, against those that have canceled the subscription.
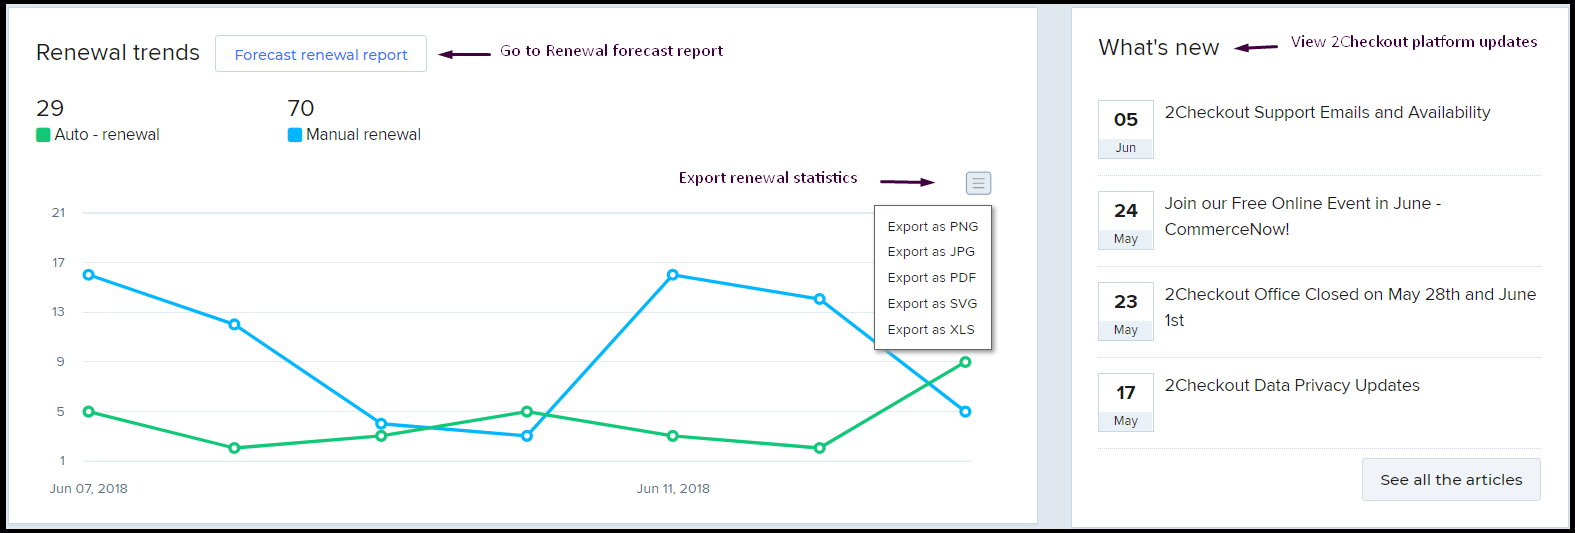
Renewal trends
Keep track of your subscription renewal trends with a widget that shows details and evolution for both automatic and manual renewals.
What’s new
Get easy access to the news feed and stay informed about all new features that are continuously released. Even though the section contains only the most recent ones, you can also check the older news with a click on the “See all the articles” button.
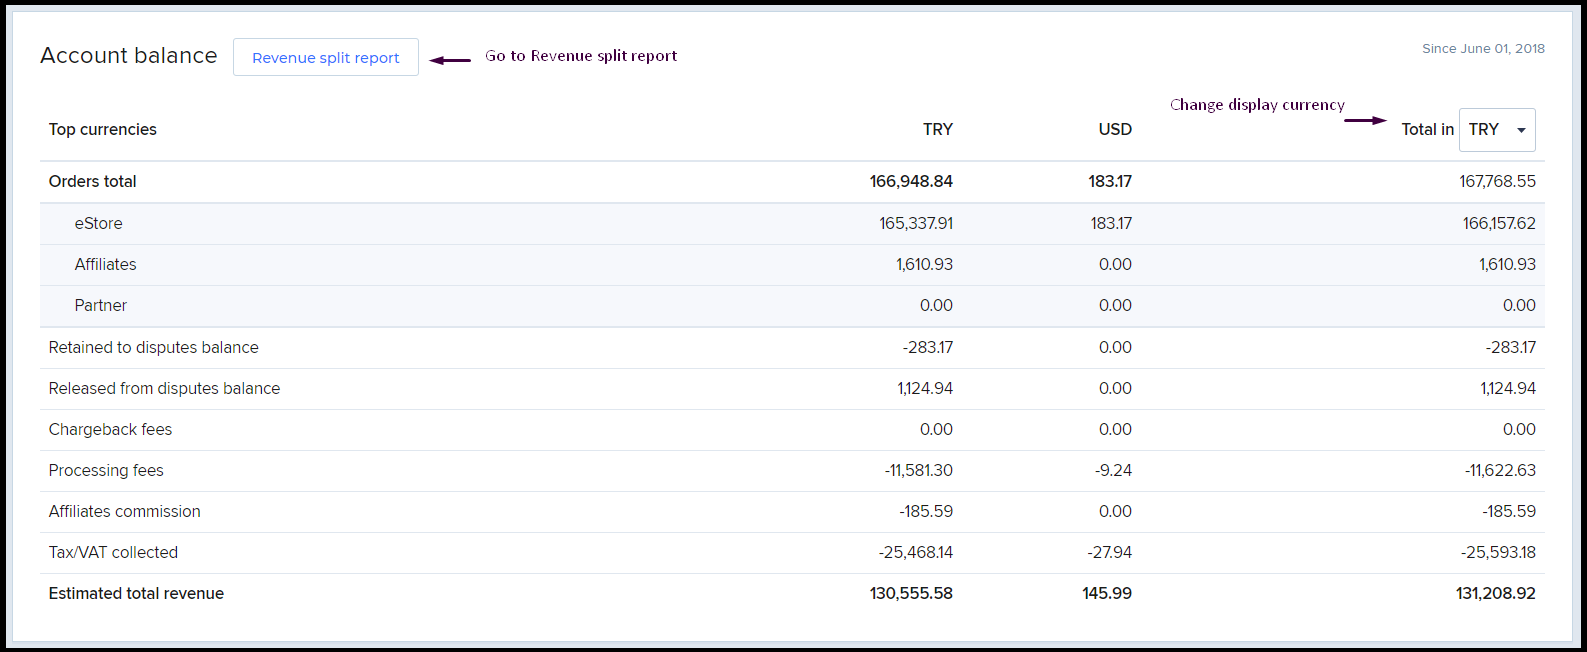
Stay up to date – Account balance
Account balance
Always keep track of your revenue with the Account balance widget. This report provides you information about:
- The total order value for each transactional currency.
- Overview of the total order value for each of your sales channels.
- Live-monitoring over the fees and taxes that were applied to your sales.
- Total estimated revenue generated for the given interval.
New orders are included in the Account balance report within 2-3 hours from the time they were completed. 2Checkout converts the amounts displayed in the Account balance report by using the exchange rate from your order currency to payout currency.
Integrate with 2Checkout
We’ve recently added a new Integrations sections to the Control Panel that includes webhooks, API, and other apps and plug-ins, which will ease the integration of your eCommerce platforms with 2Checkout and will help activate notifications like IPN, LCN, and INS in one single space with just a few clicks. The Webhooks and API section, as shown in the image below, controls all the integration aspects, including third-party store creators, and allows you to customize your notifications directly from the central dashboard. Also, in the Webhooks and API you'll find your 'merchant code' and 'secret key' for integration with third-party connectors (e.g. Shopify, WiX, Magento, WooCommerce, etc.).

Integrate Aliphia
Availability
Aliphia integration is available only for 2Checkout accounts that handle their own tax and invoice management (2Sell and 2Subscribe accounts).
Aliphia Settings:
- Sign in to your Aliphia Account
- Click Settings -> System Settings
- Click the Merchant Account tab
- Select 2Checkout
- Enter your 2Checkout Merchant Code
- Enter your Secret Word. To obtain the Secret Word, contact 2Checkout or, if you already have a 2Checkout account, log in to your Merchant Control Panel and navigate to Dashboard → Integrations → Webhooks & API → Secret Word → INS Secret word. Your INS secret word should be the same as the buy-link secret word (can be found under Dashboard → Integrations → Webhooks & API, scroll down to the Secret Word area, under the INS Secret Word). Edit your INS secret word and buy-link secret word to match each other, then copy and paste them into your Aliphia admin.
- Click Save.
2Checkout Settings:
- Sign in to your 2Checkout account.
- Navigate to Dashboard → Integrations → Webhooks & API
- Follow these steps to activate Redirect URL:
- In the Redirect URL section check “Enable return after sale”
- For Return method, select Link in the Thank You Page or Header redirect
- Set the Approved URL to the URL provided in your Aliphia admin (Replace http://yourdomain.com with the actual URL to your domain)
- Click Update to save your settings.
About Aliphia
Easy and reliable invoicing software that helps you to run your business with the comfort to access it from anywhere.
For more information, visit Aliphia.