Revenue split
Overview
A graphical report including only data for finished and refunded orders, spanning over the selected time frame.
The report is designed to offer information on the evolution of the Net product price, 2Checkout fees and commissions, tax/VAT, Download insurance services (DIS) profit and costs, disputes balance, RRT fee, chargeback fees, and shipping costs from one month to another.
The data centralized by the Revenue Split report is meant to be as close as possible to the 2Checkout Sales Report, albeit still estimate, and as such the info may differ from the finalized details.
Availability
The Revenue Split report is available for all merchants on all accounts. However, the 'All converted to' filter is visible only for merchants who have more than 1 payout method activated.
Revenue Split
Totals for specific Payout currency - this option causes the Revenue Split report to present results for finished and refunded orders settled in the same currency also selected as the Totals for specific Payout currency.
For example, if EUR is selected for the 'Totals for specific payout currency' filter, the results will centralize data from orders paid for by customers in EUR, as well as for orders paid in other currencies, but that were settled in EUR. Only settlement currencies can also act as 'Totals for specific payout currency'. Currency conversions taken into consideration for the Revenue Split report are made using the exchange rates applied for each transaction at the moment of completion.
All converted to – this option causes the Revenue Split report to present results for all finished and refunded orders settled in a specific payout currency.
For example, if EUR is selected for the 'All converted to selected currency' filter, the results will centralize data from orders paid for by customers in EUR, as well as for orders paid in other currencies, no matter the payout currency. Only settlement currencies can also act as 'All converted to the selected currency'. Currency conversions taken into consideration for the Revenue Split report are made using the daily exchange rates and this report presents an estimate of the revenue that will be paid in the selected payout currencies.
Totals for specific Transaction currency – this option causes the Revenue Split report to present results for all finished and refunded orders placed in a specific currency, no matter the settled currency.
Integrate WIX
Overview
Wix is a complete web solution that offers a global user base, open SDK, and unparalleled design capabilities to create a unique ecosystem. Partners, developers, web designers, and other online professionals can effectively market their apps and services to millions through Wix.
The Wix connector enables merchants to process orders with 2Checkout.
Availability
WiX integration is available only for 2Checkout accounts that handle their own tax and invoice management (2Sell and 2Subscribe accounts).
Recurring payments are not yet available.
Wix Settings
Follow the instructions below to integrate your WiX account with 2Checkout:
- Log into your WIX dashboard.
- Under Settings, click on Select Payments.
- Under the Credit/Debit Cards tab, click on Change provider, and then click on Connect, under the 2Checkout logo.
- If you want to sign up for a 2Checkout account, click on Create an Account and follow the instructions.
- If you already have a 2Checkout account, click on Connect Existing Account and follow the instructions below.
- Make sure your account has been approved by 2Checkout (this can take several days if you have just opened one).
- Log into your 2Checkout account, navigate to the Integrations → Webhooks & API section and retrieve your Publishable Key and Private Key.
- Retrieve your Seller ID from the 2Checkout Merchant Code in the API section.
6. Insert the keys (see the above steps) and the Seller ID into the Wix Connect your Account Form.
7. Click on Connect My Account button. Once you are connected, you can accept payments with 2Checkout.
2Checkout Settings
- Sign in to your 2Checkout account.
- Navigate to Dashboard → Integrations → Webhooks & API section.
- Follow these steps to activate Redirect URL:
- In the Redirect URL section check “Enable return after sale”
- For the Return method, select Header Redirect or Link in Thank You page
- Set the Approved URL to your Wix URL
4. (Optional) In the Instant Notification System (INS) section check the “Enable INS” box → Set up a Global URL Endpoint.
5. Click Update to save your settings.
About WiX
Wix is the brainchild of Avishai Abrahami, Nadav Abrahami, and Giora Kaplan. Like many great ideas, it was discovered through accidental fate (on the beach). While constructing a website to be the basis of another start-up idea, the tech-savvy threesome quickly discovered that creating their own website was difficult, frustrating, and very costly. It was this agonizing experience that led them to a light bulb moment - build a platform that empowered anyone to create their own website with no coding or design skills needed. Better yet, make it free. Find out more about WiX here.
Orders origin
Overview
2Checkout monitors the source of orders placed by your customers via eStore, and helps you gain insight into shopper behavior and habits.
The tracking set in place enables the 2Checkout system to provide accurate information on the origin of eStore orders (new acquisitions, renewals and upgrades are all covered). There are three (3) sources for the orders placed by your customers, according to the interface they used to finalize the purchase process.
| Web | encompasses all orders placed using desktop devices (such as PC or laptop) |
|---|---|
| Mobile | is characteristic of orders placed using mobile device (such as smartphone or tablet) |
| API | used for orders involving the 2Checkout API. Note: API is available only if you're using the 2Checkout API to allow customers to place orders. The API origin is shown regardless of the device customers use to place orders, as long as the process involves the 2Checkout API |
| Automatic billing | includes all orders placed through the automatic renewal flow. For products that have renewals configured, customers can opt in for automatic renewal of their orders. |
When exporting CSV (comma separated values) files or Excel (XLS) documents, you will be able to find information on the source of orders in the Origin column.
Order search
Overview
Use 2Checkout's order search capabilities to search for information on purchases/orders your customers/partners made. Order search requires that you have an active 2Checkout account and shoppers/partners have placed at least one order using your buy-links.
Most orders should be available in the search results almost instantly, but there might be situations where it might take up to 15 minutes for an order to be available in search results.
Availability
Order search is available to all 2Checkout accounts.
Search for orders
- Log in to your Merchant Control Panel.
- Navigate to Orders & customers → Order search.
-
Select eStore Orders (for information on purchases your customers made) or Partner orders (for information on purchases your partners) made.
A. eStore Orders
4. Click on the eStore orders tab.
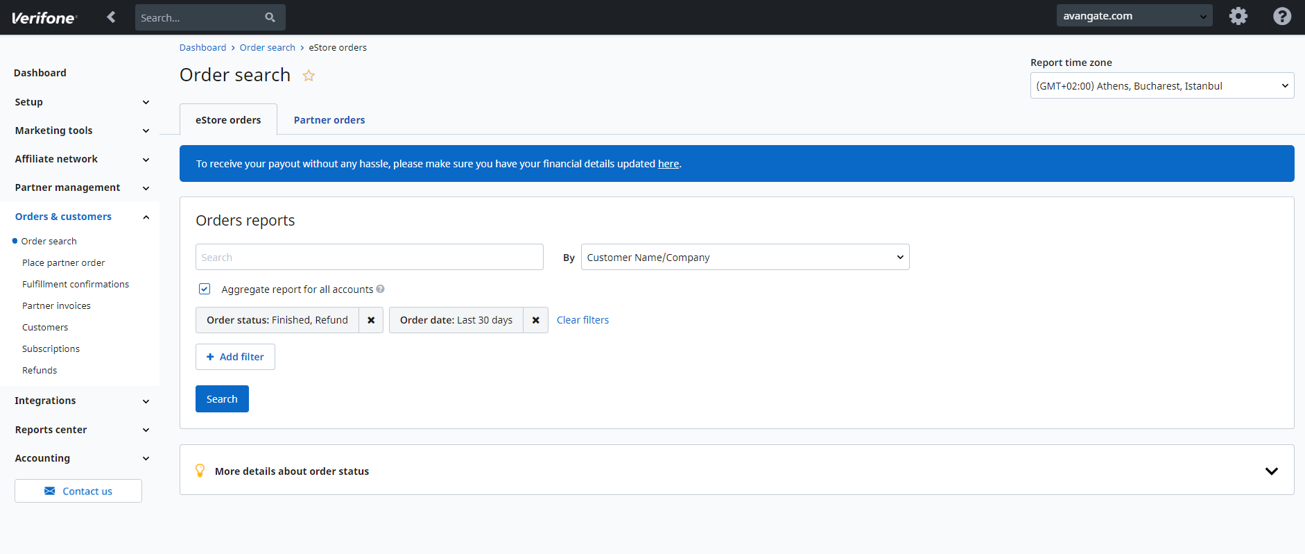
5. Select the query type to search by:
- Reference
- External reference
- Shopper reference number
- Customer Name/Company
- Coupon code
- Invoice number
- Phone
- SKU (Stock Keeping Unit)
- Sales SRC (the source of the sale defined using the SRC parameter)
- Credit cards last 4 digits
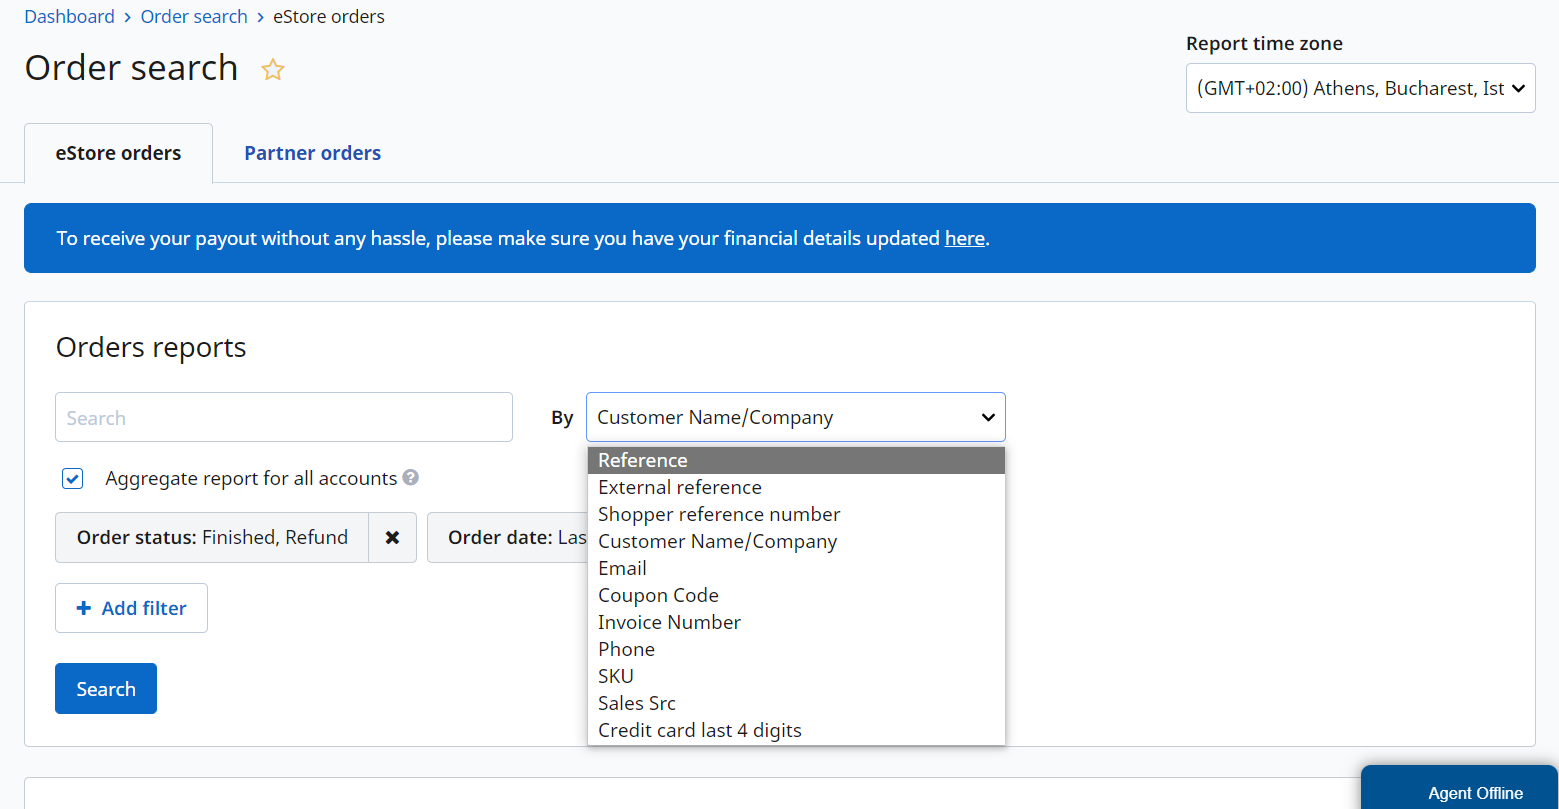
6. The Exact matches checkbox will be displayed only after users enter a search criteria in the Search field.
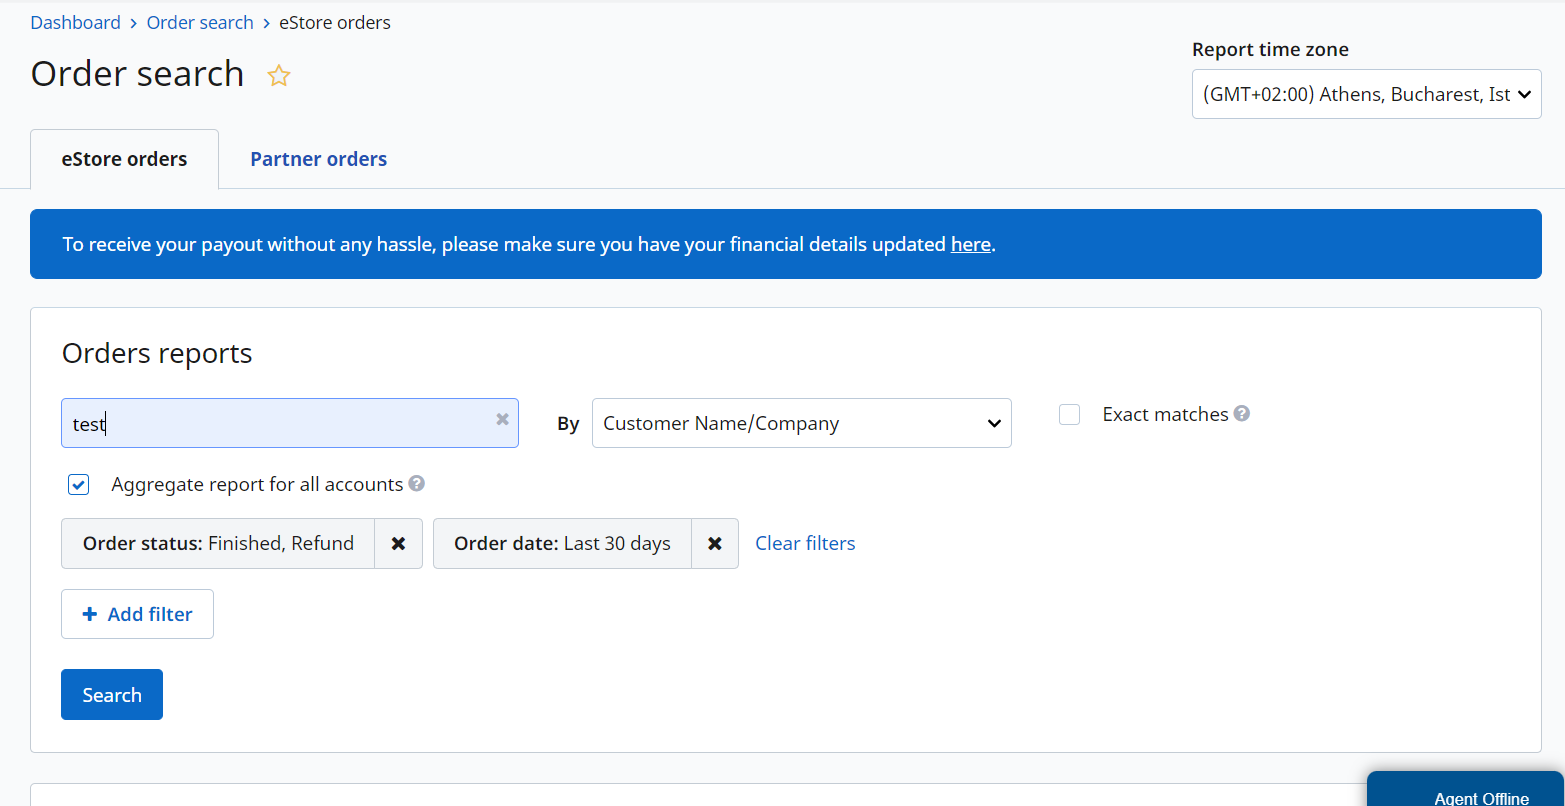
7. Use additional filters to narrow down your search by clicking the Add filter button:
- Products
- Delivery type
- Order flow
- Order type
- Order origin
- Country
- Payment method
- Test orders
- Confirmation status - there are three available options:
- Waiting: will display all orders to be confirmed.
- Confirmed: will display all the orders already confirmed.
- All: will display all orders waiting and confirmed.
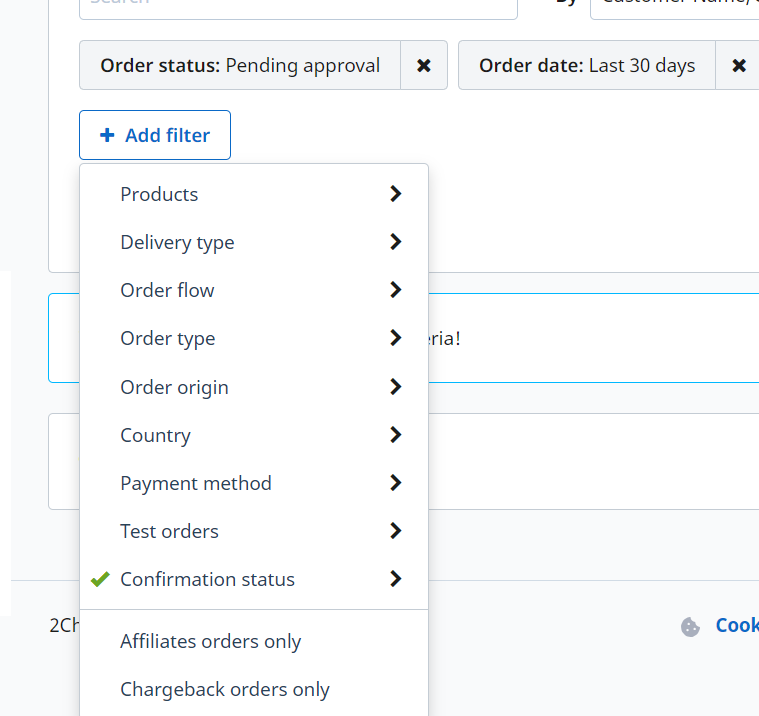
8. You can choose to display only orders coming from affiliate sales or orders with chargebacks, by using the following filters:
- Affiliate orders only
- Chargeback orders only
B. Partner Orders
4. Click on the Partner orders tab.
5. Select the query type to search by:
- Reference
- Partner reference number
- Partner Invoice Number (you can use either the Proforma Invoice Number or the Payment Invoice Number)
- SKU
6. Use additional filters to narrow down your search by clicking the Add filter button:
- Products
- Partner
- Product source
- Country
- Subscription type
- Order added by
- Partner invoice date
- Price list
7. You can choose to display only orders coming with comments or orders without invoice, by using the following filters:
- Only orders with comments
- Only orders without invoice
Order status and date
eStore Orders
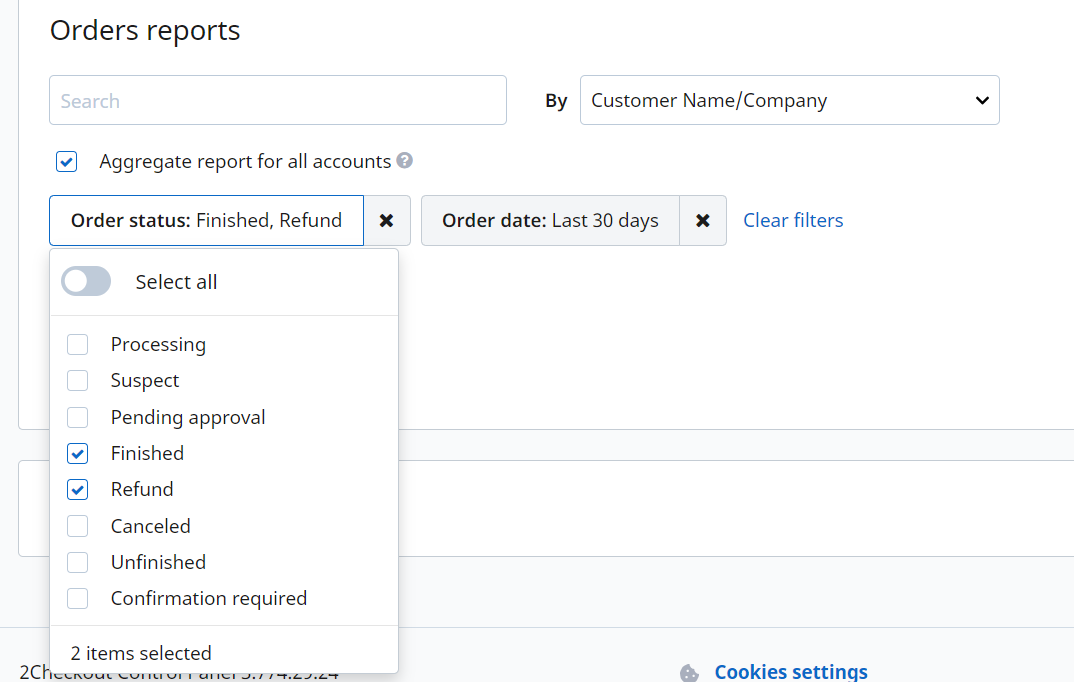
- By default, Finished and Refund order statuses and Order Date: Last 30 days filters are preselected
- You can add the following filters to group your search criteria by Order status:
- Processing
- Suspect
- Pending approval
- Finished
- Refund
- Canceled
- Unfinished
- Confirmation required
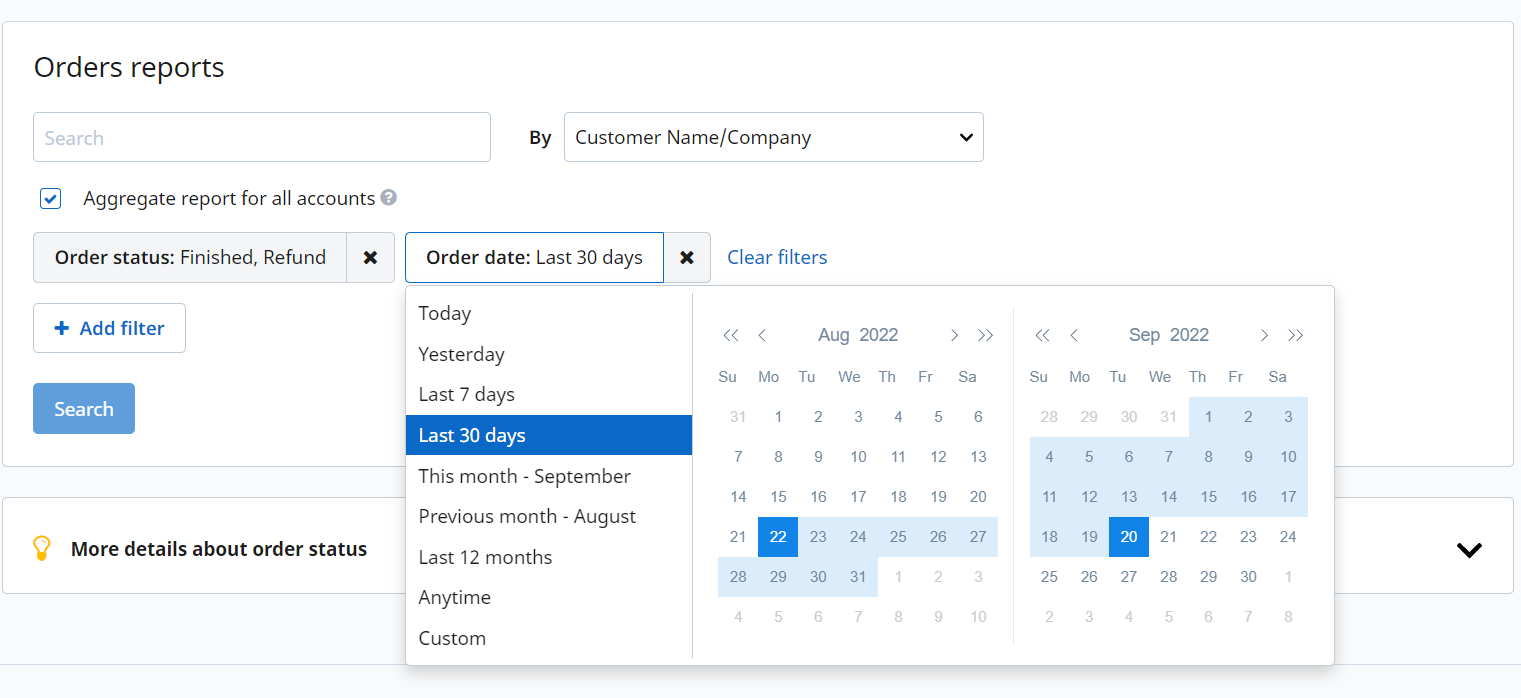
- You can search by multiple Order date filters:
Partner Orders
- By default, Pending approval, Refunded, Complete, Awaiting payment and Delivery needs more info order statuses and Order Date: Last 30 days filters are preselected.
-
You can add the following filters to group your search criteria by Order status:
- Canceled
- Rejected
- You can search by multiple Order date filters:
Order status
eStore Orders
| Order status in search export | Order status in Merchant Control Panel | Approval status | Notes |
|---|---|---|---|
| COMPLETE | Finished | Finished | The order is paid and fulfilled. |
| AUTHRECEIVED | Pending approval | Pending approval | 2Checkout is currently investigating the order. The payment was approved by the bank but is not recommended to take any action until the final approval from 2Checkout is received. |
| In progress / Processing | In progress | The order has been approved and is waiting for fulfillment confirmation. | |
| Purchase order | Unfinished | Unfinished 'Purchase Order' (the order has been approved but not paid yet) | |
| Confirmation required | Unfinished | The order contains products that need your delivery approval and it will be processed after you confirm it. | |
| Suspect | Suspect | The order did not pass 2Checkout anti-fraud filters. It can still be approved if customer authentication is successful (2Checkout will contact the customer and/or request documents related to the payment). | |
| REVERSED | Canceled | Canceled | The order was canceled because it failed to pass 2Checkout anti-fraud filters and the transaction funds have been returned to the customer. |
| PENDING | Unfinished | Unfinished |
The order has incomplete/delayed/invalid payment details. If you have activated the follow-up option (see Ordering options settings), 2Checkout will try to recover the order (the customer will receive a follow-up email with further information for finalizing the order). This can happen in either of the following situations:
Note: Orders with status Pending, with the same product ID, same Product Info (if available), same customer Email Address, and not older than 24 hours are considered duplicate and are not displayed in the Merchant Control Panel. |
| Suspect | Suspect | The order did not pass 2Checkout anti-fraud filters. It can still be approved if customer authentication is successful (2Checkout will contact the customer and/or request documents related to the payment). | |
| TEST | TEST | TEST | Test order. |
| TOTAL REFUND | Refunded | Refunded | The order has been canceled and the funds have been returned to the customer. |
| PARTIAL REFUND | Refunded | Refunded | The order has been canceled and a partial amount has been returned to the customer. |
| CHARGEBACK | Refunded | Refunded | The refund issued as a result of a lost chargeback dispute. |
Partner Orders
| Order status in search export | Notes |
|---|---|
| PENDING APPROVAL | The order has not yet been reviewed. |
| REFUNDED | Order has been refunded. |
| CANCELED | Order is canceled. |
| PAYMENT UNDER REVIEW | 2Checkout is currently investigating the order. The payment was approved by the bank but is not recommended to take any action until the final approval from 2Checkout is received. |
| REJECTED | The order has been rejected. |
| COMPLETE | Order is both paid and fulfilled. |
| AWAITING PAYMENT | Order awaits partner payment or, in case partner pays you directly through wire transfer, the order awaits payment confirmation from your side. |
| DELIVERY NEEDS MORE INFO | To complete the fulfillment of the order, more information is needed, such as end user/reseller information or input from the codes generator. If the partner has a credit limit, payment status of the order can be found by checking the proforma invoice status (if proforma is not available, then the order has not been paid). If the partner does not have a credit limit, the order is paid at this point. |
Restrict users from running blank & partial eStore order searches
The 2Checkout platform allows all users to run blank or partial order searches by default. This is done through a special role that is activated on all merchant accounts.
To restrict certain users from running blank and partial order searches:
- Go to Account Settings and click on User management and then on the Manage button.
- On the Users page, select the user you want to restrict and click the Edit button
 to disable the blank & partials searches for that user.
 - On the Add role page, under the Orders & Reports roles section, uncheck the Blank & partial searches for eStore checkbox.
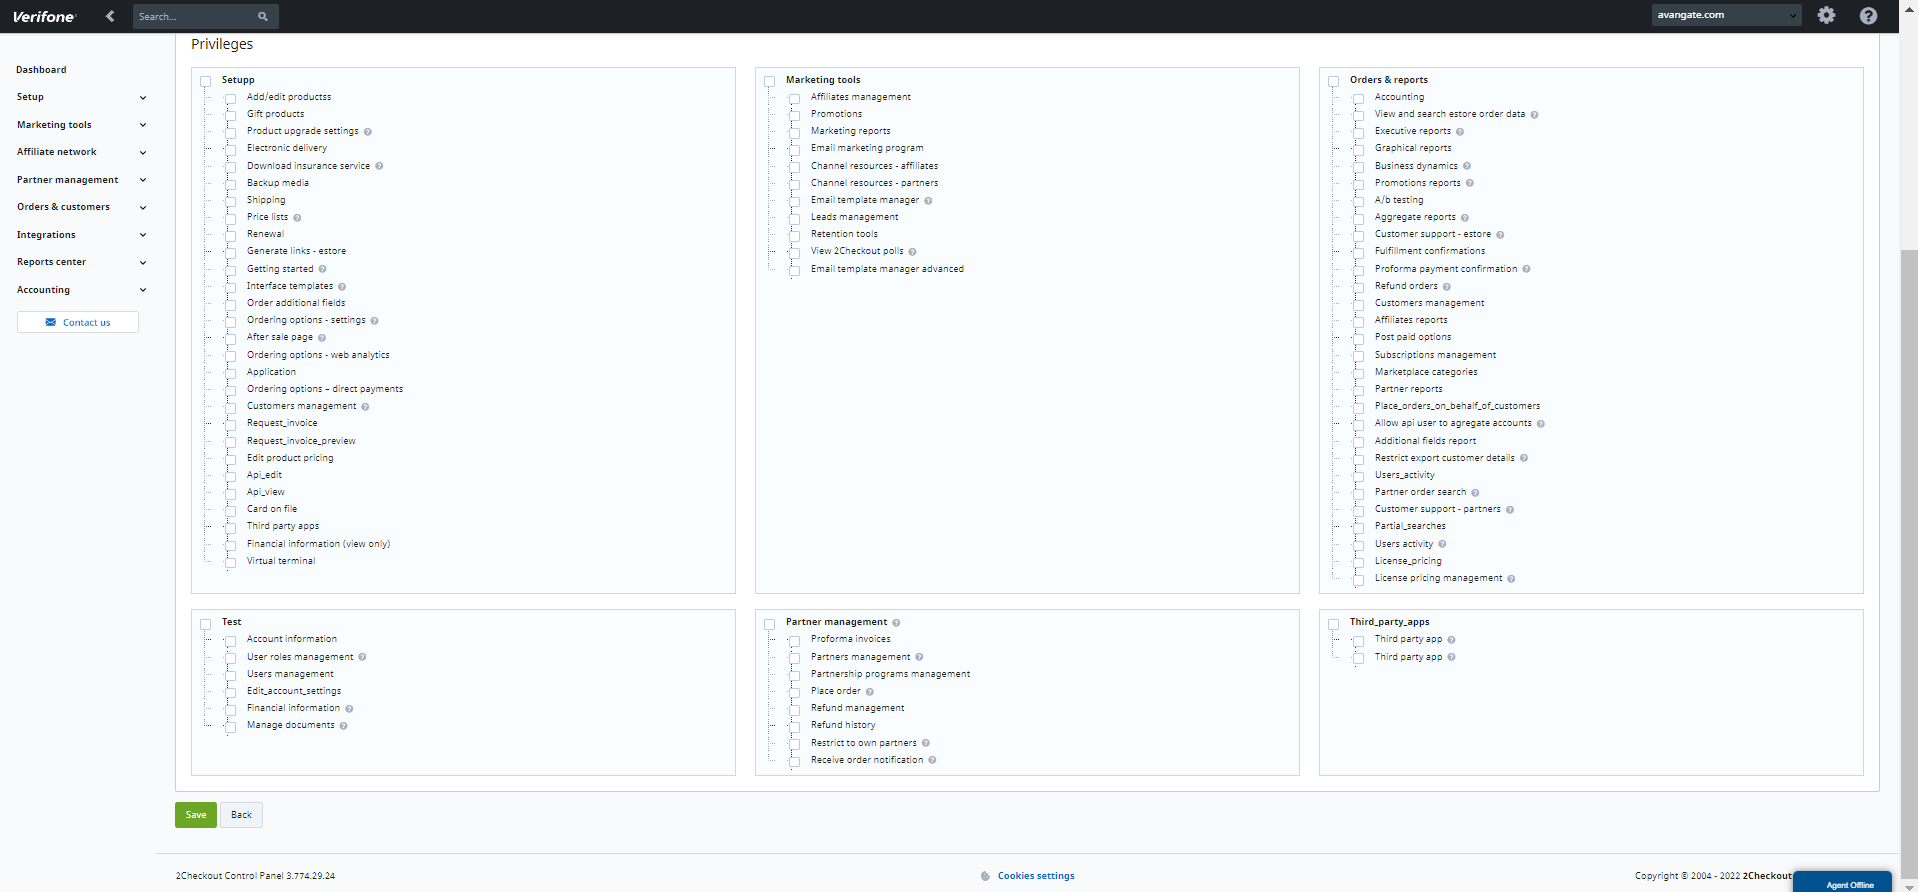
- Click Save role at the bottom of the page.
Once you disable this privilege, users governed by the role you edited will no longer be able to run blank or partial searches. They will be prompted to enter the full customer or company name/reference/email address in order to search in the Name/Company or Email fields.
Search for orders placed through the purchase order flow
- Go to Order Search and click Add filter.
- Use the Order flow filter to select the Purchase order.
- Click Search.
Search for eStore orders by settled date
If you are a European merchant on the PSP business model (2Sell & 2Subscribe accounts) with the Payout at cashed date option enabled, you can search for orders using the Settled Date filter in the Merchant Control Panel.
The settled date is the date the order is marked by the system as ready for payout when orders have one of the following statuses:
- Finished
- Refund
- Partial Refund
When searching for orders by Settled date, results return reconciled orders.
If you have multiple accounts and one of the accounts has the 'Payout at cashed date' option enabled, if you select 'Search by Settled date' and 'Aggregate reports for all accounts', your search will return the orders with the settled date.
The 'Search orders by settled date' option is not featured currently in the Order Search Export and Instant Search Export (ISE) but will be added at a later stage.
Merchants who do not meet the above criteria will be prompted with the default Search order view.
How it works
- Log in to your Merchant Control Panel.
- Navigate to Orders & customers → Order search.
- Click on the eStore orders tab.
- For the Search by filter, select Settled date.

Order Search Export Templates
You can create order search export templates by adding or removing different column headers to help you analyze and improve revenue churn.
You can add a new column header to your order search export report (for example, you can add the External Customer ID column) by adding a new template for improved reporting capabilities.
To add/edit an order search export, follow these steps:
- Log in to your Merchant Control Panel.
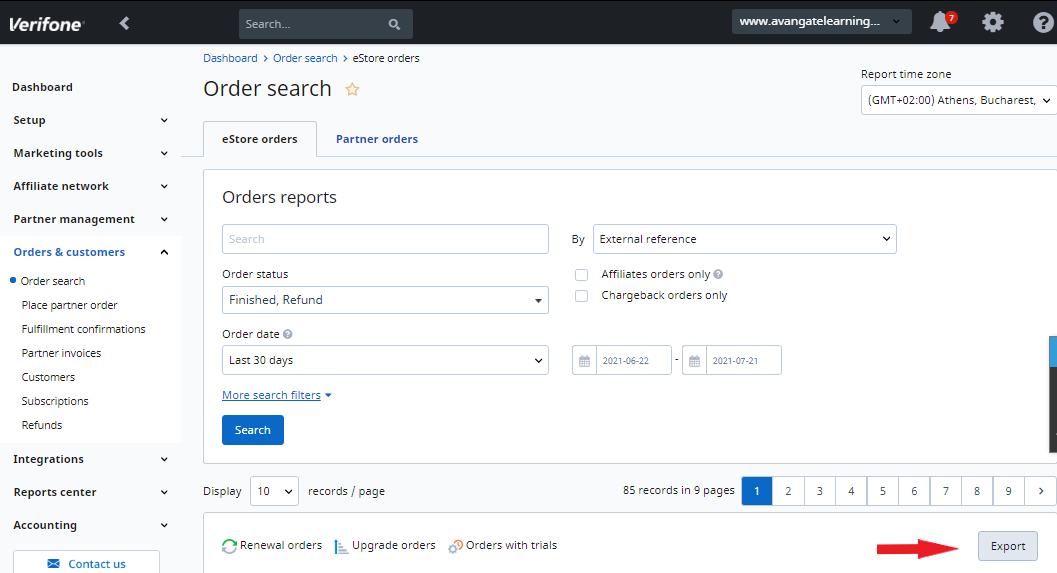
- Navigate to Orders & customers → Order search and click on the Export button, as shown in the image below.
- Click on Edit templates.
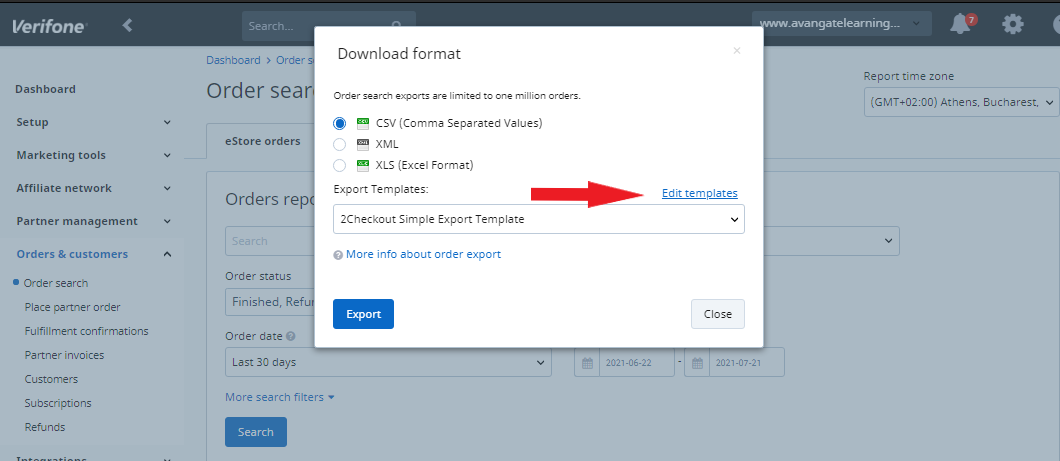
- To edit a template, click on the Edit icon next to the template name.
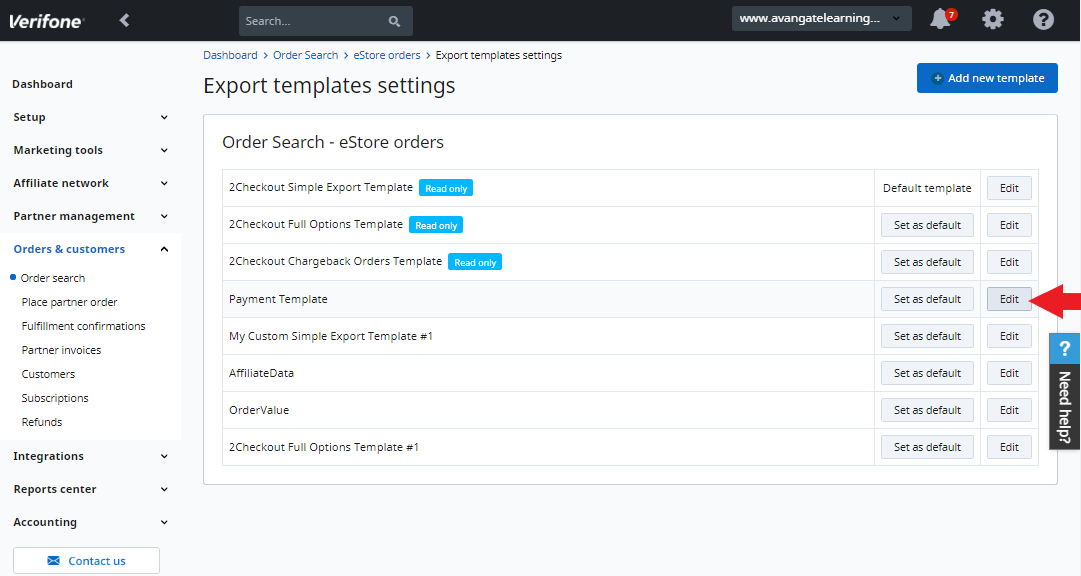
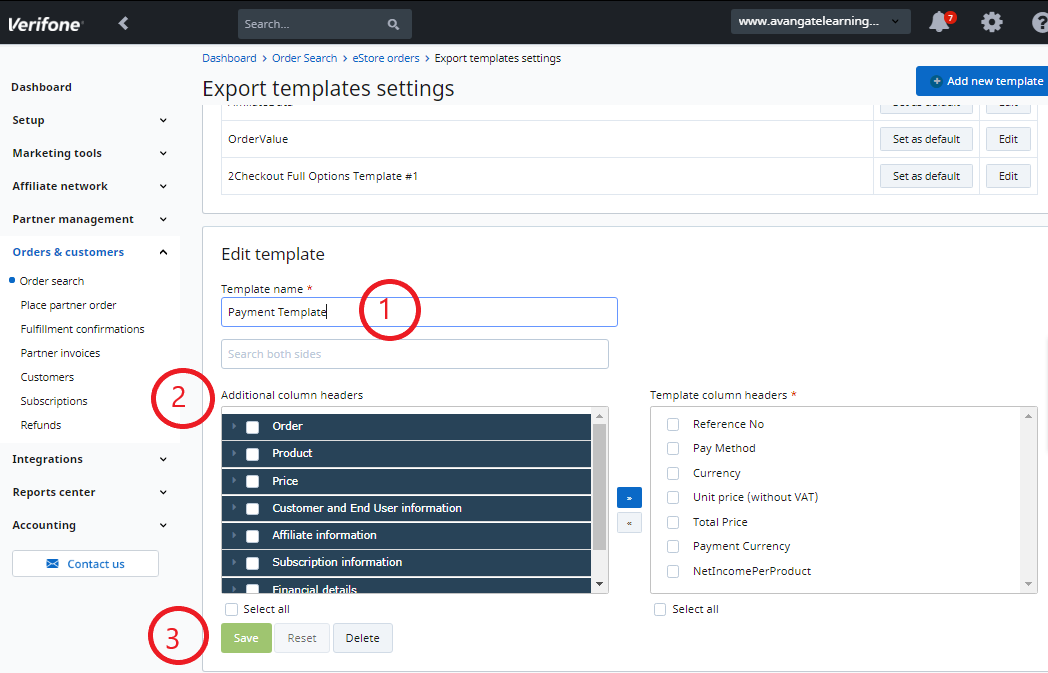
- Edit the template by changing the Template name and/or by adding or removing the column headers you wish to include in your export.
- Click Save.
- To add a new template, click on the Add new template button on the Export templates settings page.
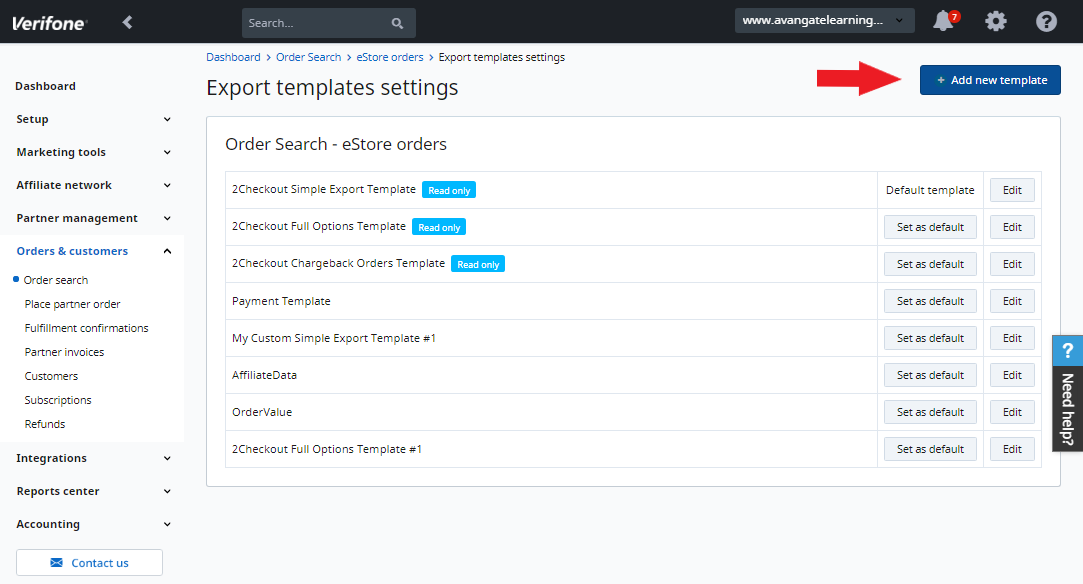
- Customize your template by creating a Template name and by adding the column headers you wish to capture in your export.
- Click Save.
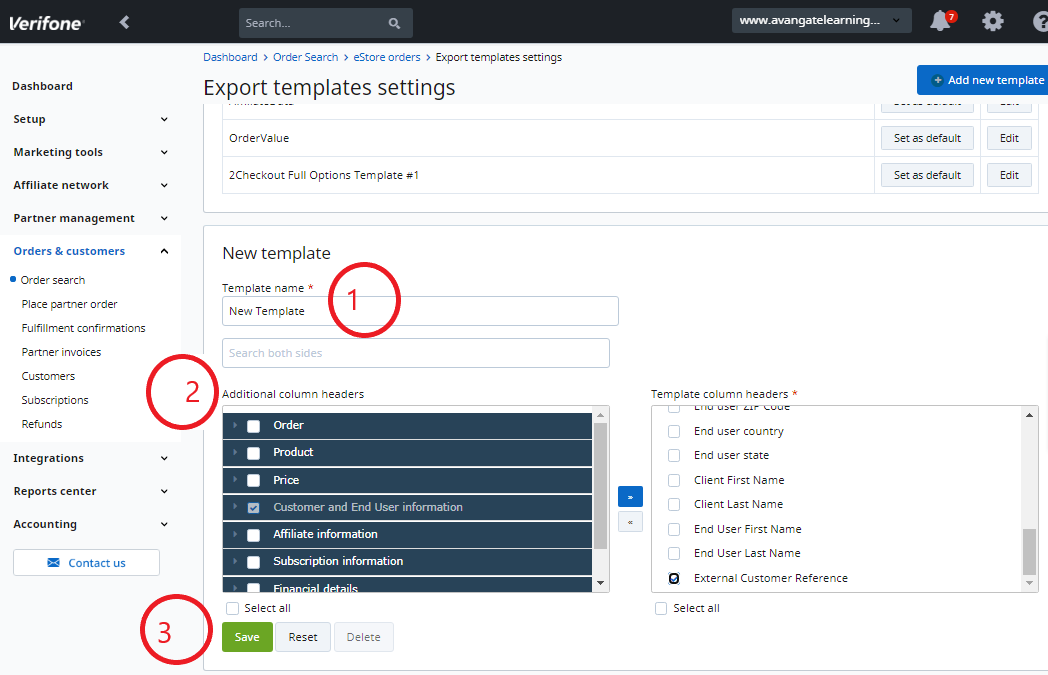
Promotions
Overview
Configure multiple types of promotions to encourage shoppers to purchase your products and renew subscriptions.
Fix-amount discounts are applied to the net amount.
Availability
Contact your account manager to enable Order Promotions for your account.
All other promotion types are available for all 2Checkout accounts.
Any advertised promotion (coupon-based or not) will be applied to the unit price after that unit price has been affected by volume discounts.
Requirements
Add at least one product before defining a promotion.
Impact
Depending on the promotion configuration, you can set it to trigger for specific or all products or orders.
Promotion types
You can configure multiple promotion types:
- Product promotions
- Special price promotions
- Multi-product promotions
- Order promotions
- Recurring promotions
- Quantity promotions
- Affiliate promotions
- Partner promotions
Promotion codes
When defining promotions, you can set your discounts to auto-apply, or they can be applied based on a coupon code entered by the customer in the shopping cart.
The promotional codes have the following attributes:
- The maximum length is 255 alphanumeric characters.
- The minimum length is 1 alphanumeric character.
- Not case sensitive.
- The character encoding type is UTF-8.
Limitations
You can apply only one type of promotion during the shopping process. Regular, quantity, and order promotions are mutually exclusive.
Email variables
Overview
Use email variables to customize shopper emails for your specific scenarios.
Refer to the email list below to see each email theme and draft variables, their description, and preview values.
Requirements
Editing the 2Checkout emails requires using a variation of the Smarty version 3 syntax. Namely, instead of using { and } as delimiters, please us [% and %], as shown in the example below.
[%$FIRST_NAME_BILLING%] instead of {$FIRST_NAME_BILLING}Customize theme and email variables
Customize theme variables to better reflect company-specific details in your emails, such as your logo, address, or support information.
To customize the variable values, follow the steps below.
- Create a new email theme (from scratch or from an existing one) or a new email draft.
- Click the Manage variables button in the editor.
- Modify the values in the Test value column according to your preferences.
- Click Save.
- You can undo the changes by clicking the Undo icon next to the value field.
- Use the Preview feature to see how the new variable values will be displayed to your shoppers.
Use case: customize support information
To customize the support information displayed in your emails, follow the next steps.
- Open the Email editor and click Manage variables.
- Find or search for the following email variables:
- MERCHANT_SUPPORT_EMAIL
- MERCHANT_SUPPORT_PHONE
- Modify the test values of these variables to reflect the changes you wish to perform.
- Click Save.
- Use the Preview feature to see how the new variable values will be displayed to your shoppers.
Email monitor
Overview
The 2Checkout email monitor gives you greater visibility on the emails that your customers receive from 2Checkout. You can choose to receive emails from the following categories by simply entering the email address that you want the email forwarded to:
- Order confirmations
- Software delivery
- Renewal notifications
- Follow-up emails
- Purchase order emails
Availability
Available to all 2Checkout accounts.
Workflow
To enable the email monitor:
- Log into your 2Checkout account in the Merchant Control Panel.
- Navigate to Dashboard → Integrations → Webhooks and API.
- In the Webhooks and API section, scroll down to the Notifications section and check the Email monitor box to enable this feature.
- Select the categories of emails that you want to receive, then enter the email addresses in the To field. You can choose to send the emails as Carbon copies or Blind carbon copies.
- Click Update to save the settings.
