Signature validation for return URL via ConvertPlus
Overview
To start, you need to have the buy-link with the return-URL and return-type parameters defined and signed. Read here how to create such a link and sign its parameters.
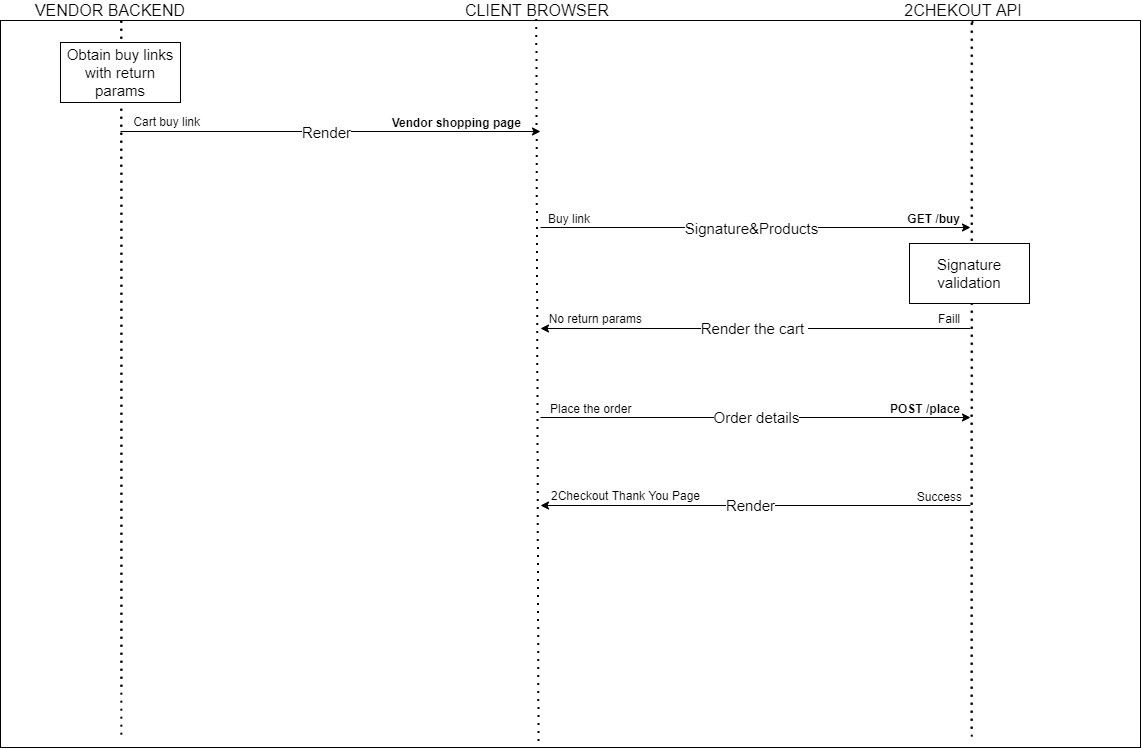
After opening the buy-link in the browser, the shopper will be redirected to the 2Checkout page. During the booting of the cart, the signature is checked against the buy-link query parameters.
In case of an invalid signature, the buy-link parameter is disregarded and the shopper will see the 'Thank You' page instead of a redirect.
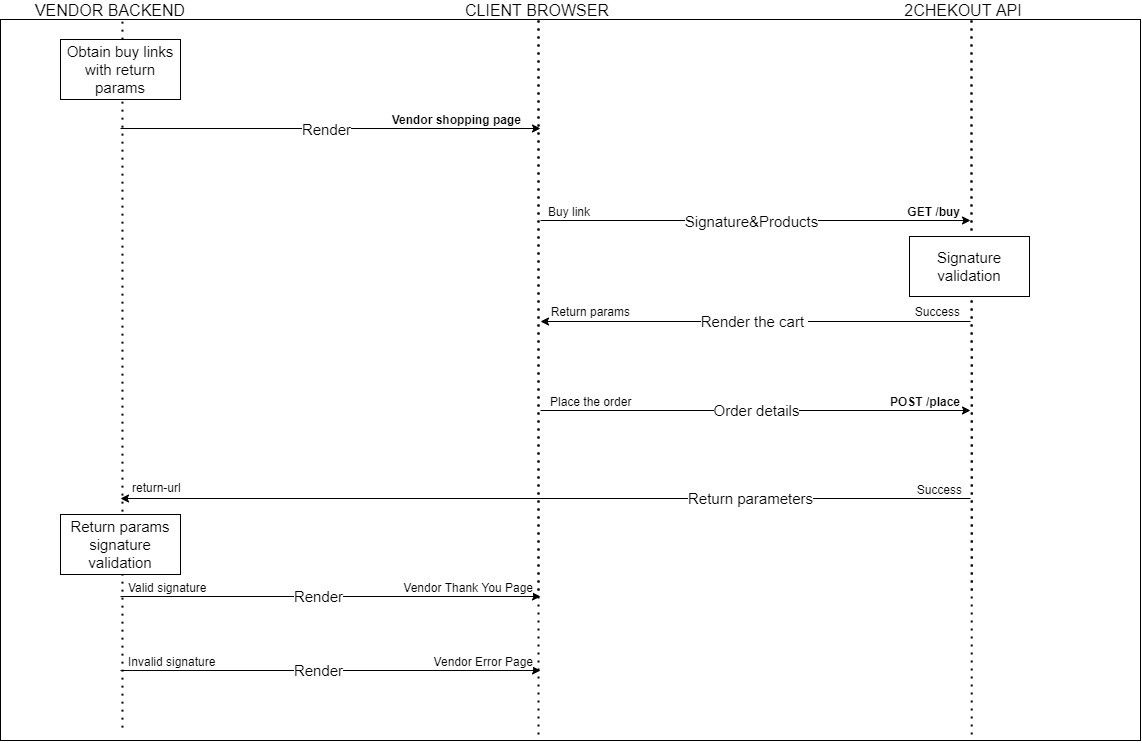
In case of a valid signature for the buy-link parameters and successful order placing, the shopper is redirected to the page you have defined in the return parameters. The return-URL is appended with all buy-link parameters and with some extra parameters, all of them are signed and their signature should be present in the query parameters.
In the backend, you need to gather all these parameters and validate the parameter's hash you generate with the new signature appended to the return-URL.
To generate the hash and validate the return URL, follow the steps below.
Build the ConvertPlus Signature
To sign a ConvertPlus buy-link, you need to follow these steps:
- Sort the parameters that require a signature alphabetically.
- Serialize the parameters and append to them the length of their values.
- Concatenate the resulting values.
- The serialized value is then encrypted with your Buy-Link Secret Word using the HMAC method (algorithm sha256).
- The resulting value is added to the buy-link under the signature parameter.
In order to generate a valid ConvertPlus signature, you should include all the parameters from the return URL, except the signature.
Example
When encrypting the values to generate the signature for the return-URL parameter, use an URL with the following structure: https://..... Do not use an encoded URL.
1. Let's consider the following parameters:
- return-url = 'https://www.yourbackend.com'
- return-type = 'redirect'
- merchant = 'YOUR_VENDOR_CODE' (this is the merchant code)
- prod = 'TEST_PROD' (this is the product code)
- qty = 1
- price = 29
- tpl = default
- refno = 11606896
- total = 29
- total-currency = USD
- currency = USD
The regular return link will have the following structure:
https://www.yourbackend.com/?merchant=YOUR_VENDOR_CODE¤cy=USD&return-url=https%3A%2F%yourbackend.com%2F&return-type=redirect&tpl=default&prod=TEST_PROD&price=29&qty=1&refno=11606896&total=29&total-currency=USD&signature=95052ee0c558b53040e97d7d81add2e0f1400ca0936a558910c68ddc8301fc63
2. Sort the parameters alphabetically: currency, merchant, price, prod, qty, refno, return-type, return-url, total, total-currency, tpl.
3. Serialize the values. To serialize a value, you need to append before it the number of letters or digits a value has. For example, the return-type parameter has the 'redirect' value that will be serialized as '8redirect'', where 8 is the number of characters that make up the value.
- currency - 3USD
- merchant - 16YOUR_VENDOR_CODE
- price - 229
- prod - 9TEST_PROD
- qty - 11
- refno - 811606896
- return-type - 8redirect
- return-url - 24https://yourbackend.com/
- total - 229
- total-currency - 3USD
- tpl - 7default
4. Concatenate the values:
3USD16YOUR_VENDOR_CODE2299TEST_PROD118116068968redirect24https://yourbackend.com/2293USD7default'
5. Encrypt using your Buy-Link Secret Word that can be found in your Merchant Control Panel, under Integrations → Webhooks & API → Secret word section.
The serialized value is then encrypted using the HMAC method.
- the algorithm used is sha256
- the key used when encrypting is the merchant secret word (in this example, the secret word is 'vendor-secret-key')
This outputs a 64 character string:
3598511a17b038b9a0f5579f26bb51a17a8e78ac99a2f6b833714a88a6bbb0c4
Also, you can use HashValidationTool:
<?php
class HashValidationTool
{
const SHA_256 = 'sha256';
private $params;
private $signature;
private $key;
/**
* HashValidationTool constructor.
*
* @param string $key
*/
public function __construct(string $key)
{
$this->key = $key;
}
/**
* @return string
*/
private function encrypt(): string
{
$serialized = $this->serializeParameters($this->params);
if (strlen($serialized) > 0) {
echo 'Success: serialized params - ' . $serialized . PHP_EOL;
return bin2hex(hash_hmac(self::SHA_256, $serialized, $this->key, true));
} else {
echo 'Error: serialization parameters are empty' . PHP_EOL;
return '';
}
}
/**
* @param string $url
*
* @return bool
*/
public function validate(string $url): bool
{
$this->setUrl($url);
return $this->encrypt() === $this->signature;
}
/**
* @param array $array
*
* @return string
*/
private function serializeParameters(array $array): string
{
ksort($array);
$serializedString = '';
foreach ($array as $value) {
if (is_array($value)) {
$serializedString .= $this->serializeParameters($value);
} else {
$serializedString .= strlen($value) . $value;
}
}
return $serializedString;
}
/**
* @param string $url
*/
private function setUrl(string $url): void
{
$urlParts = parse_url($url);
parse_str($urlParts['query'], $this->params);
$this->signature = $this->params['signature'];
unset($this->params['signature']);
}
}
$hashValidationTool = new HashValidationTool('vendor-secret-key');
if ($hashValidationTool->validate('https://www.yourbackend.com/?merchant=YOUR_VENDOR_CODE¤cy=USD&return-url=https://yourbackend.com/&return-type=redirect&tpl=default&prod=TEST_PROD&price=29&qty=1&refno=11606896&total=29&total-currency=USD&signature=95052ee0c558b53040e97d7d81add2e0f1400ca0936a558910c68ddc8301fc63')) {
echo 'valid';
} else {
echo 'invalid';
}
The successful order with a valid signature for the default theme is described in the following diagram.
The successful order with an invalid signature for the default theme is described in the following diagram.