Authentication
Overview
Use the login method for the authentication process in the 2Checkout system.
Parameters
| Parameters | Type/Description |
|---|---|
| merchantCode | Required (String) |
| Your merchant identification code. | |
| date | Required (String) |
| GMT ISO Date format (e.g. 2010-01-01 12:13:14) | |
| hash | Required (Object) |
| Calculated HMAC_SHA256 signature based on merchantCode and date, using your secret key. |
Response
|
Parameters |
Type/Description |
|---|---|
|
sessionID |
String |
|
|
Session identifier, the output of the Login method. Include sessionID into all your requests. 2Checkout throws an exception if the values are incorrect. |
Request
<?php
/**
* @throws JsonException
*/
function callRPC($Request, $host) {
$curl = curl_init($host);
curl_setopt($curl, CURLOPT_POST, 1);
curl_setopt($curl, CURLOPT_SSL_VERIFYPEER, 1);
curl_setopt($curl, CURLOPT_VERBOSE, true);
curl_setopt($curl, CURLOPT_SSL_VERIFYHOST, 2);
curl_setopt($curl, CURLOPT_SSLVERSION, 0);
curl_setopt($curl, CURLOPT_RETURNTRANSFER, 1);
curl_setopt($curl, CURLOPT_HTTPHEADER, array('Content-Type: application/json', 'Accept: application/json'));
$RequestString = json_encode($Request, JSON_THROW_ON_ERROR);
curl_setopt($curl, CURLOPT_POSTFIELDS, $RequestString);
$ResponseString = curl_exec($curl);
if (!empty($ResponseString)) {
echo($ResponseString);
$Response = json_decode($ResponseString, false, 512, JSON_THROW_ON_ERROR);
if (isset($Response->result)) {
return $Response->result;
}
if (!is_null($Response->error)) {
echo("Method: {$Request->method}" . PHP_EOL);
echo("Error: {$Request->error}" . PHP_EOL);
}
} else {
return null;
}
return null;
}
$host = 'https://api.2checkout.com/rpc/6.0/';
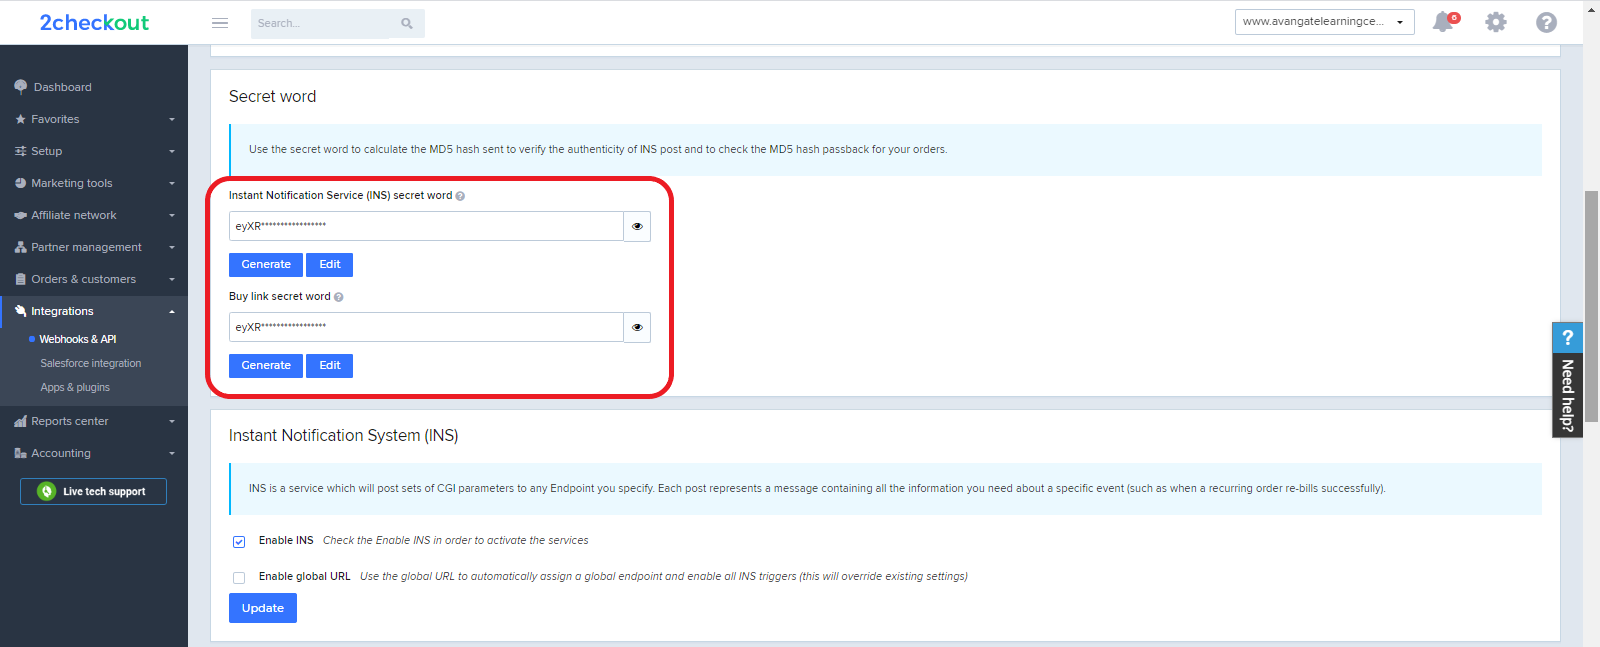
$merchantCode = "YOUR_MERCHANT_CODE"; // your account's merchant code available in the 'System settings' area of the cPanel: https://secure.2checkout.com/cpanel/account_settings.php
$key = "YOUR_SECRET_KEY"; // your account's secret key available in the 'System settings' area of the cPanel: https://secure.2checkout.com/cpanel/account_settings.php
$string = strlen($merchantCode) . $merchantCode . strlen(gmdate('Y-m-d H:i:s')) . gmdate('Y-m-d H:i:s');
$algo = "sha256";
$hash = hash_hmac($algo, $string, $key);
$i = 1;
$jsonRpcRequest = new stdClass();
$jsonRpcRequest->jsonrpc = '2.0';
$jsonRpcRequest->method = 'login';
$jsonRpcRequest->params = array($merchantCode, gmdate('Y-m-d H:i:s'), $hash, $algo);
$jsonRpcRequest->id = $i++;
try {
$sessionID = callRPC($jsonRpcRequest, $host);
echo("Auth token: {$sessionID}" . PHP_EOL);
} catch (JsonException $e) {
echo("Error: {$e->getMessage()}" . PHP_EOL);
}