Fulfillment

Overview

The fulfillment process depends on the type of options you selected when configuring fulfillment for your products in your Merchant Control Panel.

Availability

Available for all 2Checkout accounts.

Fulfillment/delivery

Static lists

2Checkout handles fulfillment on your behalf using Static lists. 2Checkout does not provide links to actual product download files or valid activation keys for test orders, even if you configured/uploaded them into the platform. Instead, testers receive this default activation key: ___TEST___CODE___.In addition, testers receive a dummy file for download, test_file.zip, and not the actual product file.

Dynamic lists

You deal with fulfillment using Dynamic lists and need to confirm the completion of the process through IDN or in the Fulfillment Confirmations area. In scenarios in which you generate activation codes/binary keys using a key generator that you host in your system, 2Checkout strongly recommends that you adapt it to deliver test keys/codes. 2Checkout does not provide links to actual product download files for test orders, even if you configured/uploaded them into the platform. Testers receive a dummy file for download, dubbed test_file.zip, and not the actual product file.

2Checkout sends a collection of parameters to your server within HTTP POST to the URL that generates the code/key. The TESTORDER parameter will help you differentiate between test and 'real' orders. Use this parameter to restrict code/key delivery only for 'real' orders. Note: Unless you prepare your system accordingly, you will deliver valid codes/keys for test orders.

TESTORDER

Specifies if the order is for testing purposes.

Possible values:            

  • YES - for test orders.   
  • NO - for actual purchases.

Read the guidance provided in the 2Checkout delivery (fulfillment) article to understand what kind of information is supplied by 2Checkout to your system using HTTP POST.

Fulfillment confirmation is automatic and does not require confirmation. Note: 2Checkout does not deliver files or keys in this scenario.

IDN (Instant Delivery Notification)

If your setup requires fulfillment confirmation through IDN, then you also need to confirm fulfillment for test orders in order for their status to advance to Finished.

IRN (Instant Refund Notification)

You can use IRN to issue refunds for the test orders you placed.

ISE (Instant Search Order Export)

You can control the inclusion or exclusion of test order data in ISE file output by using the EXPORT_TEST_ORDERS parameter:

EXPORT_TEST_ORDERS

Possible values:

  • YES - Include test orders along with real orders.
  • NO (default) - Do not include test order data and export only details for actual purchases.
  • ONLY - Export only test order data.

Email notifications

  1. The 2Checkout system will send out payment receipts and fulfillment/delivery notifications for test orders, per your account's configuration.
  2. Provided that you set up manual and automatic renewal notifications, the 2Checkout system will deliver the renewal emails for test subscriptions according to your account's configuration.

Authentication

Overview

Use the login method for the authentication process in the 2Checkout system.

Parameters

Parameters Type/Description
merchantCode Required (String)
  Your merchant identification code.
date Required (String)
  GMT ISO Date format (e.g. 2010-01-01 12:13:14)
hash Required (Object)
  Calculated HMAC_SHA256 signature based on merchantCode and date, using your secret key.

Response

Parameters

Type/Description

sessionID

String


Session identifier, the output of the Login method. Include sessionID into all your requests. 2Checkout throws an exception if the values are incorrect. 

The sessionID expires in 10 minutes.

Request

<?php

/**
 * @throws JsonException
 */
function callRPC($Request, $host) {
    $curl = curl_init($host);
    curl_setopt($curl, CURLOPT_POST, 1);
    curl_setopt($curl, CURLOPT_SSL_VERIFYPEER, 1);
    curl_setopt($curl, CURLOPT_VERBOSE, true);
    curl_setopt($curl, CURLOPT_SSL_VERIFYHOST, 2);
    curl_setopt($curl, CURLOPT_SSLVERSION, 0);
    curl_setopt($curl, CURLOPT_RETURNTRANSFER, 1);
    curl_setopt($curl, CURLOPT_HTTPHEADER, array('Content-Type: application/json', 'Accept: application/json'));
    $RequestString = json_encode($Request, JSON_THROW_ON_ERROR);
    curl_setopt($curl, CURLOPT_POSTFIELDS, $RequestString);

    $ResponseString = curl_exec($curl);

    if (!empty($ResponseString)) {
        echo($ResponseString);
        $Response = json_decode($ResponseString, false, 512, JSON_THROW_ON_ERROR);
        if (isset($Response->result)) {
            return $Response->result;
        }
        if (!is_null($Response->error)) {
            echo("Method: {$Request->method}" . PHP_EOL);
            echo("Error: {$Request->error}" . PHP_EOL);
        }
    } else {
        return null;
    }
    return null;
}

$host = 'https://api.2checkout.com/rpc/6.0/';

$merchantCode = "YOUR_MERCHANT_CODE"; // your account's merchant code available in the 'System settings' area of the cPanel: https://secure.2checkout.com/cpanel/account_settings.php
$key = "YOUR_SECRET_KEY"; // your account's secret key available in the 'System settings' area of the cPanel: https://secure.2checkout.com/cpanel/account_settings.php

$string = strlen($merchantCode) . $merchantCode . strlen(gmdate('Y-m-d H:i:s')) . gmdate('Y-m-d H:i:s');
$algo = "sha256";
$hash = hash_hmac($algo, $string, $key);

$i = 1;

$jsonRpcRequest = new stdClass();
$jsonRpcRequest->jsonrpc = '2.0';
$jsonRpcRequest->method = 'login';
$jsonRpcRequest->params = array($merchantCode, gmdate('Y-m-d H:i:s'), $hash, $algo);
$jsonRpcRequest->id = $i++;

try {
    $sessionID = callRPC($jsonRpcRequest, $host);
    echo("Auth token: {$sessionID}" . PHP_EOL);
} catch (JsonException $e) {
    echo("Error: {$e->getMessage()}" . PHP_EOL);
}

Upsell

Overview

The object includes information related to the upsell campaigns, including product information and discount settings.

UpSell Object

The object below is returned as a successful response for the following SOAP API 6.0 methods:

Parameters Type Description

Name

String

Name of campaign, max 500 characters.

Code

String

Unique system-generated campaign code.

StartDate

String

The date when the up-sell campaign starts, in the YYYY-MM-DD format. Can be NULL.

EndDate

String

The date when the up-sell campaign ends, in the YYYY-MM-DD format. Can be NULL.

DisplayForManualRenewals

Boolean

Flag to control if the campaign will be displayed for manual subscription renewal orders. Can be set as true/false.

Discount

Object

Discount definition object, details below.

      Type

String

Type of discount. Can be FIXED or PERCENT.

      Value

Integer

Percentage discount value (PERCENT discount only).

      Values

Array of objects

List of currency discounts (FIXED discount only), details below:

            Currency

String

Code of currency for the related amount.

            Amount

Integer

Discount amount value for the related currency.

      DefaultCurrency

String

Code of default currency (FIXED discount only).

PrimaryProduct

Object

Main (primary) product object, details below:

      Code

String

The code of the product that the recommendation is made for.

      Quantity

Integer

The quantity for the primary product. Can be 0 (standing for any quantity).

      PriceOptions

Array of objects

Price options list for the primary product, details below:

            Code

String

Price option group code.

            Options

Array of objects

Price options list, details below:

                  Code

String

Price option code.

                  Value

Integer

Price option value (for scale interval price option group only).

RecommendedProduct

Object

Recommended product object, details below:

      Code

String

The code of the recommended product.

      Quantity

Integer

The quantity for the recommended product. Can be 0 (standing for “match quantity” setting).

      PriceOptions

Array of objects

Price options list for the recommended product, details below:

            Code

String

Price option group code.

            Options

Array of objects

Price options list, details below:

                Code

String

Price option code.

                Value

Integer

Price option value (for scale interval price option group only).

Enabled

Boolean

Sets the campaign enabled or disabled. Can be set as true/false.

Description

Array of objects

List of campaign language descriptions, details below:

      Language

String

Code of the language.

      Text

String

The text of the description in the associated language.

IPN and LCN URL Settings

Overview

Set the IPN and LCN settings in your Merchant Control Panel and assign a single specific webhook to a single URL by using the NOTIFICATION_URL parameter. If you add a second, third, or fourth endpoint in the IPN or LCN tab, 2Checkout can send Instant Payment Notifications (IPN) and License Change Notifications (LCN) to alternative URLs, not just the defaults.

Availability

Available for all 2Checkout accounts using the Default Flows cart. Not available to 2Checkout accounts using only the ConvertPlus shopping cart. 

How it works

The 2Checkout system sends out notifications (IPNs and LCNs) to the URLs that you can configure in the URL areas under:

  1. IPN settings (https://secure.2checkout.com/cpanel/ipn_settings.php)
  2. LCN settings (https://secure.2checkout.com/cpanel/lcn_settings.php)
  3. Both IPN and LCN (https://secure.2checkout.com/cpanel/webhooks_api.php)

You can prioritize sending to a specific endpoint URL using the NOTIFICATION_URL parameter, as described below under the 'How do I get 2Checkout to send IPNs and LCNs to URLs other than the default links set?' section. However, if you set a default URL in the Notification URLs section, then the notification is sent to that particular URL, as well as any other URL set in the IPN/LCN dedicated tab unless specified otherwise when using the parameter.

Requirements

Enter valid URLs for both IPN and LCN when editing URL configurations.

Default IPN and LCN URLs 

IPN

  1. Navigate to IPN settings (https://secure.2checkout.com/cpanel/ipn_settings.php).
  2. Enter the default URL where the 2Checkout system will send out Instant Payment Notifications (IPNs). 
  3. Changes to the IPN URL in the IPN settings area reflect under the default URL notification configuration for your account, if only one value is entered and edited. For multiple values, only the first one is taken into account.

LCN

  1. Navigate to LCN settings (https://secure.2checkout.com/cpanel/lcn_settings.php).
  2. Enter the default URL where the 2Checkout system will send out License Change Notifications (LCNs).
  3. Changes to the LCN URL in the LCN settings area reflect under the default URL notification configuration for your account, if only one value is entered and edited. For multiple values, only the first one is taken into account.

Default URL configuration 

  1. Navigate to the Integrations → Webhooks and API section (https://secure.2checkout.com/cpanel/webhooks_api.php).
  2. Edit the Default URL configuration.
  3. Enter URLs for both IPN (mandatory) and LCN notifications (mandatory) and Save.
  4. The settings automatically reflect under the IPN URL in the IPN settings area and the LCN URL in the LCN settings area. Note that this will not edit the current value, but add one new entry. Removing this value from a total of 4 in the dedicated IPN/LCN section will not replace the default one in the general section, it will only leave a blank.
  5. Changes to the default URL notification configuration for your account reflect under the IPN URL in the IPN settings area and the LCN URL in the LCN settings area.
  6. Click Reset to revert a URL configuration to the last saved state.

Custom IPN and LCN URLs 

  1. Navigate to the Integrations → Webhooks and API section (https://secure.2checkout.com/cpanel/webhooks_api.php) in your Merchant Control Panel.
  2. Scroll down to the Notification URLs section and click on the Add additional URL button to gain access to the parameter value field.
  3. Enter a parameter value. You will use this parameter in buy-links for new purchases, manual subscription renewals, and upgrades, controlling the URLs used by the 2Checkout system to send IPN and LCN notifications. Read below for instructions.
  4. Enter URLs for both IPN (mandatory) and LCN notifications (mandatory) and click Save.
  5. The settings reflect under the IPN URL in the IPN settings area and the LCN URL in the LCN settings area.
  6. Changes to the default URL notification configuration for your account reflect under the IPN URL in the IPN settings area and the LCN URL in the LCN settings area.
  7. Click Reset to revert a URL configuration to the last saved state.

How do I get 2Checkout to send IPNs and LCNs to URLs other than the default links set?

You can use the multiple URL functionality and send IPN and LCN notifications to several URLs. Once you set multiple URLs for receiving IPN or LCN notifications, you will receive the same keys/parameters on all endpoints without having the possibility to customize them based on the defined endpoints. However, if the URL from the general section is not declared under the IPN/LCN tabs as well, the notification will still be sent if the parameter is used. You can set up eight (8) URLs for both your IPN and LCN notifications.

To set multiple URLs, you need to use the:

  • Parameter value specified for each new URL configuration. The parameter value can be found in the Parameter Value field by navigating to Integrations → Webhooks and API section, scrolling down to the Notification URLs section, selecting the Configuration parameter, and clicking on the Edit button.

parameter_value.png

  • And the NOTIFICATION_URL parameter in buy-links (for new purchases, manual subscription renewals, and upgrades).

For example, let's assume that you created a URL configuration with the following settings:

Parameter value:

MYTESTNOTIFICATIONS

IPN URL:

http://www.MyDomain.com/ipn_response.php

LCN URL:

http://www.MyDomain.com/lcn_response.php

And that you're using this buy-link:

https://secure.2checkout.com/order/checkout.php?PRODS=1234567&QTY=1&CART=1&CARD=2

You need to insert NOTIFICATION_URL=MYTESTNOTIFICATIONS into the buy-link:

https://secure.2checkout.com/order/checkout.php?PRODS=1234567&QTY=1&CART=1&CARD=2&NOTIFICATION_URL=MYTESTNOTIFICATIONS

IPN and LCN HASH 

Default URLs for IPN and LCN

IPN HASH = HMAC_SHA signature calculated from IPN_PID[0], IPN_PNAME[0], IPN_DATE and DATE and the Secret key for your account for notifications sent to the default URL parameters configured for your account.

LCN HASH = HMAC_SHA signature calculated using the secret key for your account and the values received for LICENSE_CODE, EXPIRATION_DATE, DATE and the Secret key for your account for notifications sent to the default URL parameters configured for your account.

Custom IPN and LCN configurations

IPN HASH = HMAC_SHA signature calculated from IPN_PID[0], IPN_PNAME[0], IPN_DATE and DATE and the system-generated secret keys when custom URL configurations are used.

LCN HASH = HMAC_SHA signature calculated using the values received for LICENSE_CODE, EXPIRATION_DATE, DATE and the system-generated secret keys when custom URL configurations are used.

FAQs

1. Where can I find the secret key?

For custom IPN and LCN URL:

1. Navigate to the Integrations → Webhooks and API section (https://secure.2checkout.com/cpanel/webhooks_api.php).

2. Click on the Add IPN URL or on the Add LCN URL buttons, or the Edit button of one of the existing URL configurations.

3. The system-generated secret key valid for each URL configuration respectively is available in the IPN/LCN secret key field.

2. What notifications are sent to the URLs set through the NOTIFICATION_URL parameter and for what triggers?

The IPN and LCN notifications for the initial purchase, as well as for the subsequent renewals of the subscriptions generated for this order and for any future upgrades will be sent to the IPN and URL parameters


Trigger

IPN

LCN

Non-default URLs set using NOTIFICATION_URL

New purchase/order of a subscription

YES

YES

YES

Manual renewal of the subscription

YES

YES

YES

Automatic subscription renewal

YES

YES

YES

Subscription upgrade

YES

YES

YES

3. What is the default value of NOTIFICATION_URL?

Include NOTIFICATION_URL=DEFAULT (case sensitive) to send IPN and LCN notifications to the default URLs you configure.

4. Is the value of the parameter saved on each order and subscription?

The IPN value is mentioned in the order history, but at the subscription level, neither the IPN nor the LCN is visible, unless you use the subscription reference number in the reporting section to identify the LCN.

5. What happens with future notifications if I used the NOTIFICATION_URL parameter?

All future LCN and IPN notifications for future renewals and upgrades of current subscriptions for which a NOTIFICATION_URL value was used will be sent to the URLs configured for that value.

6. What happens if I change the value for a parameter used?

All future LCN and IPN notifications for renewals and upgrades of current subscriptions for which a NOTIFICATION_URL value was used will be sent to the default URLs configured for your account. What happens if I change the custom URLs for a configuration?

All future LCN and IPN notifications for renewals and upgrades of current subscriptions for which a NOTIFICATION_URL value was used will be sent to the new URLs configured.

7. Can I use multiple endpoints for the NOTIFICATION_URL parameter and send IPNs and LCNs to more than one URL each?

You can use multiple endpoints in the specific LCN/IPN section, but you cannot add multiple endpoints in the general section. The NOTIFICATION_URL parameter offers the option to use specific endpoints for specific buy-links, but does not “add” to the default ones. You can set up eight (8) URLs for both your IPN and LCN notifications.

8. Is this parameter available for network cross-selling orders through the 2Checkout system?

No, the parameter will only work for your account.

9. Does this parameter work for partner and API orders?

This functionality is not supported for the time being.

Integrate WP e-Commerce

Availability

WP-eCommerce integration is available only for 2Checkout accounts that handle their own tax and invoice management (2Sell and 2Subscribe accounts). 

WP e-Commerce Settings:

  1. Download or clone the 2Checkout payment module at https://github.com/craigchristenson/2checkout-wp-e-commerce.git
  2. Upload the ‘wpec-twocheckout-hosted’ directory to “/wp-content/plugins/” on your web server and activate the ‘2Checkout Payment Gateway for WP e-Commerce ’ plugin.
  3. In your WordPress admin select Settings -> Store to open your WP e-Commerce settings.
  4. Under Payment click Settings under 2Checkout.
  5. Enter Display Name. Example: Credit Card (Visa, MasterCard, American Express, Discover, JCB, PIN Debit) and PayPal
  6. Enter your 2Checkout Merchant Code.
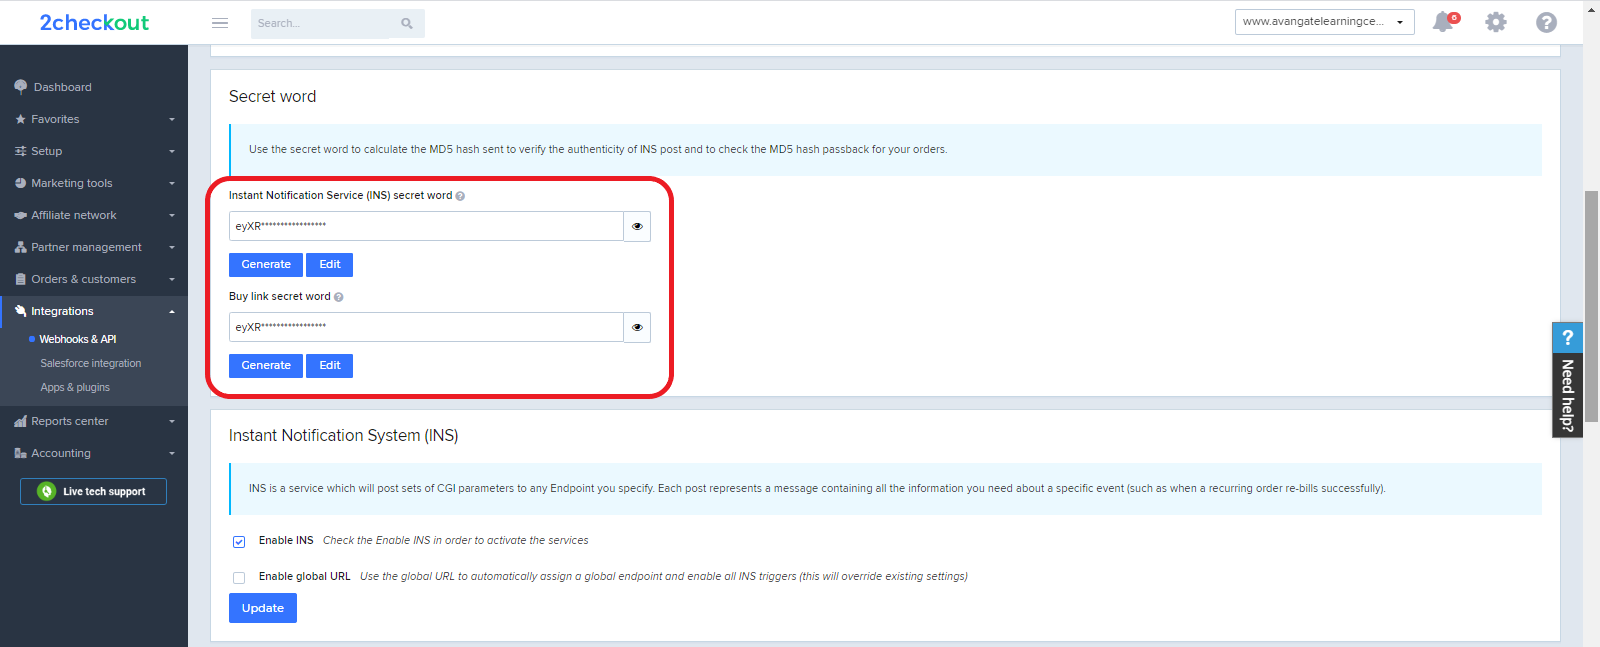
  7. Enter your 2Checkout Secret Word. (Must be the same value entered on your 2Checkout Control Panel.) To obtain the Secret Word, log in to your 2Checkout Merchant Control Panel and navigate to Dashboard→ Integrations → Webhooks & API → Secret Word → INS Secret word.  Your INS secret word should be the same as the buy-link secret word (can be found under Dashboard → Integrations → Webhooks & API, scroll down to the Secret Word area, under the INS Secret Word). Edit your INS secret word and buy-link secret word to match each other, then copy and paste them into your WP-eCommerce admin. INS secret word.png
  8. Select the language you want the 2Checkout purchase routine to be in.
  9. Select ‘Production’ for live mode or ‘Sandbox’ for sandbox mode.
  10. Select the appropriate billing fields for the Forms Sent to Gateway section.
  11. Click Update.

2Checkout Settings:

  1. Sign in to your 2Checkout account.
  2. Navigate to Dashboard → Integrations → Webhooks & API
  3. Follow these steps to activate Redirect URL:
    • In the Redirect URL section check “Enable return after sale”
    • For Return method, select Header redirect
    • Set the Approved URL to the URL provided in your WP e-Commerce settings  (Replace http://yourdomain.com with the actual URL to your domain)
    • Click Update to save your settings

About WP e-Commerce

WP e-Commerce is a free WordPress shopping cart plugin that lets customers buy products, services and digital downloads online.

For more information visit: https://wpecommerce.org

Integrate 1ShoppingCart

Availability

1ShoppingCart integration is available only for 2Checkout accounts that handle their own tax and invoice management (2Sell and 2Subscribe accounts).

1ShoppingCart Settings:

Perform the below set of instructions in your 1ShoppingCart account to integrate it with 2Checkout.

  1. Sign in to your 1ShoppingCart account.
  2. Navigate to Setup → Gateway Setup
  3. Click the Payment Gateway radio button, then click Edit
  4. Under the Select Gateway drop-down menu, select 2CheckOut.com
  5. Enter your 2Checkout Account Number (SID) in the Gateway ID/Merchant Login field.
  6. Under Which Cards Do You Accept? ensure the following boxes are checked: Visa, MasterCard, AmEx, Discover, JCB
  7. Under Other Payment Setting set the “Sale Type” to Authorize and Capture
  8. Click the Done button.

2Checkout Settings:

Follow the below instructions in your 2Checkout Control Panel to finalize the 1ShoppingCart integration process.

  1. Sign in to your 2Checkout account.
  2. Navigate to Dashboard → Integrations → Webhooks & API section
  3. Follow these steps to activate Redirect URL:

4. Click Update to save your settings. 

About 1ShoppingCart

1ShoppingCart is the most affordable way to build your list, automate marketing and make sales online. We make it easy to get your business online, capture leads and convert them into customers automatically. Start your free trial today and experience the power of all-in-one sales and marketing software designed by marketers, for marketers.

For more information visit: 1ShoppingCart


Adobe Analytics reports

Overview

You can receive real-time statistics on your shopping cart performance to help you make informed decisions on increasing conversion rate and revenue.

You can request the Adobe Analytics Key Metrics report by sending an email to i.buh.cro@verifone.com. We'll investigate if this data is available, and will send you a report link in read-only format. You don’t need to have an Adobe Analytics account to view this read-only report. You will be able to change the desired time range for which you want to see the data.

Report details

The report contains the following sections:

  1. Report Key metrics evolution for the past 12 full months (updated monthly): Unique Visitors, Orders, Conversion Rate (based on Unique Visitors), Revenue per Visitor (based on Unique Visitors), Revenue (revenue generated by web orders, automatic renewals, refunds and chargebacks and test orders are not taken into account).Adobe Analytics Segments
  2. Key metrics by country for the top revenue generating countries. This set of data will also pertain to the last 12 full months and will be updated monthly.                                                                   Adobe Analytics Segments 2

The date range of the reports is automatically set to “last 12 full months” with data being updated monthly. If you wish to change the date range, you can do so by clicking on the displayed date option in the top right corner and choose a new desired date range.

Key Metrics Reports

Upsell

Overview

Upselling is the practice that allows you to invite your customers to purchase a higher-end product, an upgrade, or an additional item in order to make a more profitable sale. The 2Checkout Public API supports upsell campaigns through which you can recommend catalog products to your shoppers.

UpSell Object

Use the UpSell object in order to recommend products to customers via SOAP API 6.0.

Parameters

Parameter name Type Description

Name

String

Name of the upsell campaign.

StartDate

String

The date when the up-sell campaign starts, in the YYYY-MM-DD format. Can be NULL (starts immediately after enabling).

EndDate

String

The date when the up-sell campaign ends, in the YYYY-MM-DD format. Can be NULL (ends immediately after disabling).

DisplayForManualRenewals

Boolean/Integer

Flag to control if the campaign will be displayed for manual subscription renewal orders. Can be set as true/false/0/1.

Discount

Object

Discount definition object, details below:

      Type

String

Type of discount. Can be FIXED or PERCENT.

      Value

Integer

Percentage discount value (PERCENT discount only).

      Values

Array of objects

List of currency discounts (FIXED discount only), details below.

            Currency

String

Code of the currency for the related amount.

            Amount

Integer

Discount amount value for the related currency.

      DefaultCurrency

String

Code of default currency (FIXED discount only).

PrimaryProduct

Object

Main (primary) product object, details below:

      Code

String

The code of the product that the recommendation is made for

      Quantity

Integer

The quantity for the primary product. Can be 0 (standing for any quantity)

      PriceOptions

Array of objects

Price options list for the primary product, details below:

            Code

String

Price option group code.

            Options

Array of objects

Price options list, details below:

                  Code

String

Price option code.

                  Value

Integer

Price option value (for scale interval price option group only).

RecommendedProduct

Object

Recommended product object, details below:

      Code

String

The code of the recommended product.

      Quantity

Integer

The quantity for the recommended product. Can be 0 (standing for “match quantity” setting).

      PriceOptions

Array of objects

Price options list for the recommended product, details below:

            Code

String

Price option group code.

            Options

Array of objects

Price options list, details below:

                Code

String

Price option code.

                Value

Integer

Price option value (for scale interval price option group only).

Enabled

Boolean/Integer

Sets the campaign enabled or disabled. Can be set as true/false/0/1.

Description

Array of objects

List of campaign language descriptions, details below:

      Language

String

The language code.

      Text

String

The text of the description in the associated language.

UpsellingDisplayType String Set upsell settings display type. Can be overlay, interstitial.


JSON-RPC API

Before you start using the 2Checkout API, check your PCI DSS compliance status. Find out more details about what PCI compliance means and what you should do to be PCI compliant here


Request invoice/payment

Overview

Send invoices by email to your customers, and request payment for your products. The email sent to your customers will have a link to a checkout page where the customer can make a payment to you. The Request invoice/payment functionality exists primarily for invoicing purposes where it may be necessary to bill for a product or service that does not have a static price, or the final sales price is unknown.

You can also use Request invoice/payment for billing excess server time for web hosts, or for services that need to be billed in addition to the product/pricing structure hard-coded via 2Checkout’s product listing. 

Note: At this moment, the Request invoice/payment functionality can be sent only in English.


Availability

Available to all 2Checkout accounts (Request invoice → for 2Checkout PSP accounts/Request payment → for 2Checkout MoR accounts.)

You can use the Request invoice/payment functionality for both ConvertPlus and 2Checkout Default ordering flows.

Workflow

  1. Login to the 2Checkout Control Panel.
  2. Go to Setup > Generate links.
  3. Select the preferred ordering flow: Default flows or ConvertPlus.
  4. Select the product/s for which you want to send the payment request.
    • For ConvertPlus, you can request payment for dynamic products.
    • For Default flows, you can request payment for catalog products with dynamic pricing.
  5. Click on Request invoice/payment.
  6. Once the Request invoice appears, define the following attributes:
    • Language - The language used in the communication with your customers.
    • Customer name - The name of the customer used in email.
    • External ref no - External reference number that you control. Acts as an invoice number.
    • Customer email - Email used for sending the payment request.
    • Additional text - Comments displayed in the email content sent to your customers.
  7. Preview the Request invoice email, or Send it right away to your customers.

article.png

request payment.png

Reporting

You can track orders placed as a result of the Request invoice flow from Orders & customers > Order search. Filter the results by using the External reference included in the email sent to your customers. Alternatively, you can export the orders in full options template format, and check for the values in the External Reference No column.

Measure the performance of your Request invoice feature by accessing the Email Metrics report available in the Control Panel. The information extracted in the report can be split based on the ordering flow used: ConvertPlus or Default 2Checkout flows.

Need help?

Do you have a question? If you didn’t find the answer you are looking for in our documentation, you can contact our Support teams for more information. If you have a technical issue or question, please contact us. We are happy to help.

Not yet a Verifone customer?

We’ll help you choose the right payment solution for your business, wherever you want to sell, in-person or online. Our team of experts will happily discuss your needs.

Verifone logo