Implement Facebook Pixel in Default Carts through Google Tag Manager
A. Create a tag for Facebook Pixel Page View Initialization
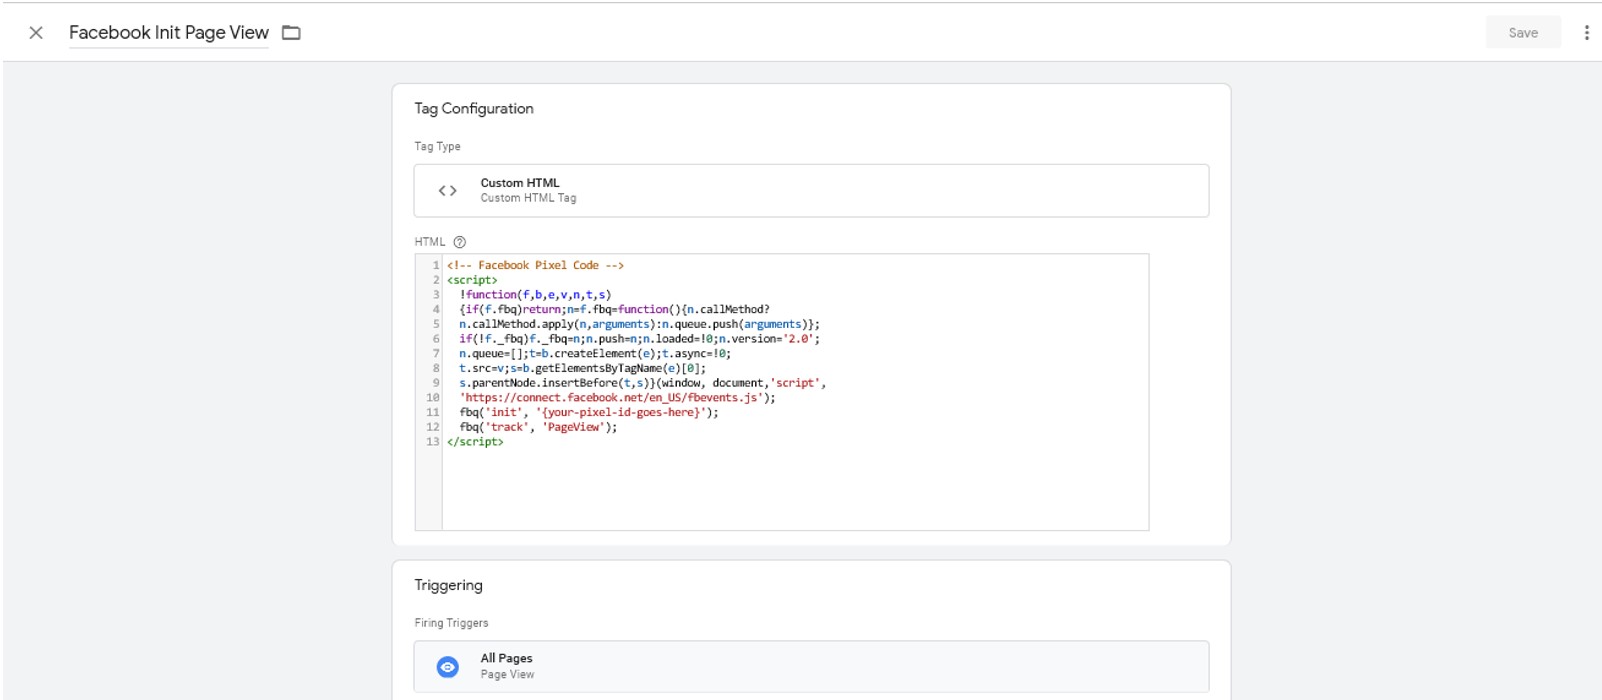
Create this tag if you don’t already have a Facebook Pixel tag on your website that fires on all pages where you have the Google Tag Manager code.
- Click to create a new tag.
-
As Tag Type select Custom HTML. In the script below, under '{your-pixel-id-goes-here}' type your Facebook pixel ID. The script below is the Pixel Base Code and can be found in the Facebook/Meta Pixel documentation.
<!-- Facebook Pixel Code --> <script> !function(f,b,e,v,n,t,s) {if(f.fbq)return;n=f.fbq=function(){n.callMethod? n.callMethod.apply(n,arguments):n.queue.push(arguments)}; if(!f._fbq)f._fbq=n;n.push=n;n.loaded=!0;n.version='2.0'; n.queue=[];t=b.createElement(e);t.async=!0; t.src=v;s=b.getElementsByTagName(e)[0]; s.parentNode.insertBefore(t,s)}(window, document,'script', 'https://connect.facebook.net/en_US/fbevents.js'); fbq('init', '{your-pixel-id-goes-here}'); fbq('track', 'PageView'); </script> - As Triggering select All Pages.
B. Configure dataLayer variables in Google Tag Manager
Configure dataLayer variables in Google Tag Manager to further use them in the Facebook implementation.
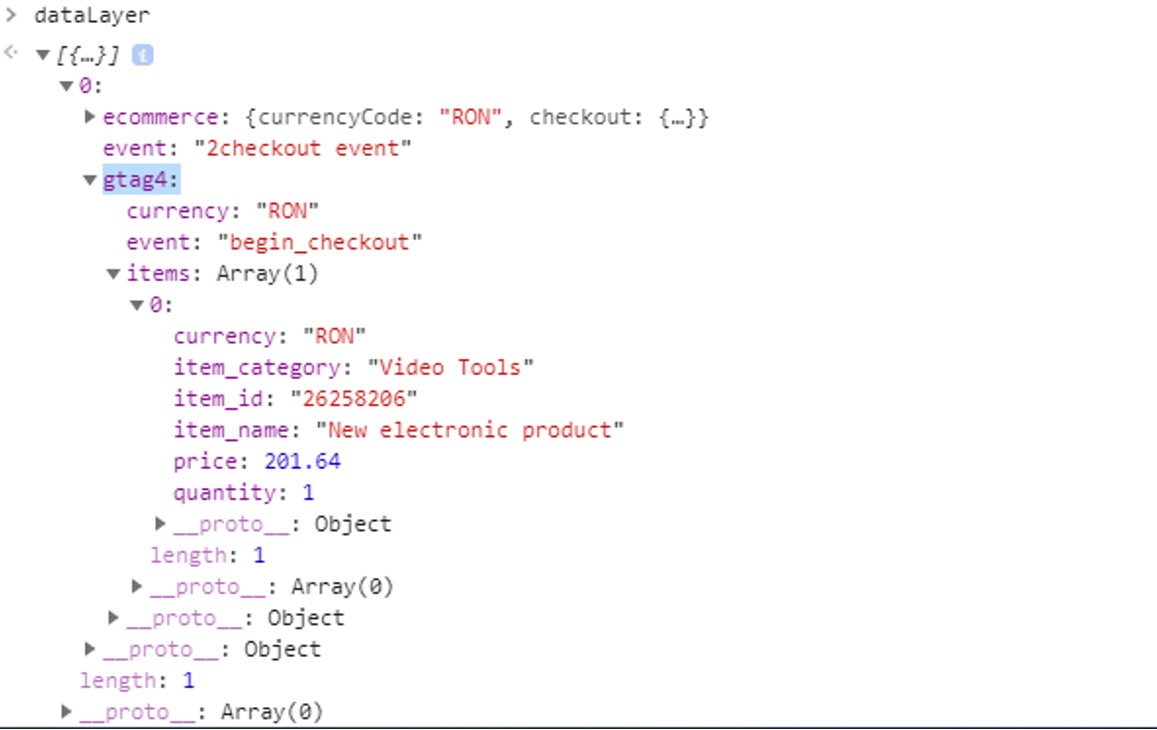
2checkout shopping carts contain a dataLayer with eCommerce information on the Google Analytics 4 structure. You can view this by typing dataLayer into the browser console and under gtag4, you can see the eCommerce information on Google Analytics 4 structure both at checkout and at purchase on the order Finish page.
- Configurate variables in Google Tag Manager
To capture the eCommerce information from the dataLayer, you will first need to configurate certain data layer variables in Google Tag Manager. You can then use those variables in the script for the Facebook Pixel tracking.- Create a variable called gtag4.event in Google Tag Manager
Click to create a new User-Defined Variable in Google Tag Manager. Name you variable “gtag4.event” to keep track of it easier.
As Variable Type select Data Layer Variable from the options provided by Google.
Under Data Layer Variable Name type gtag4.event.
Under Data Layer Version select Version 2.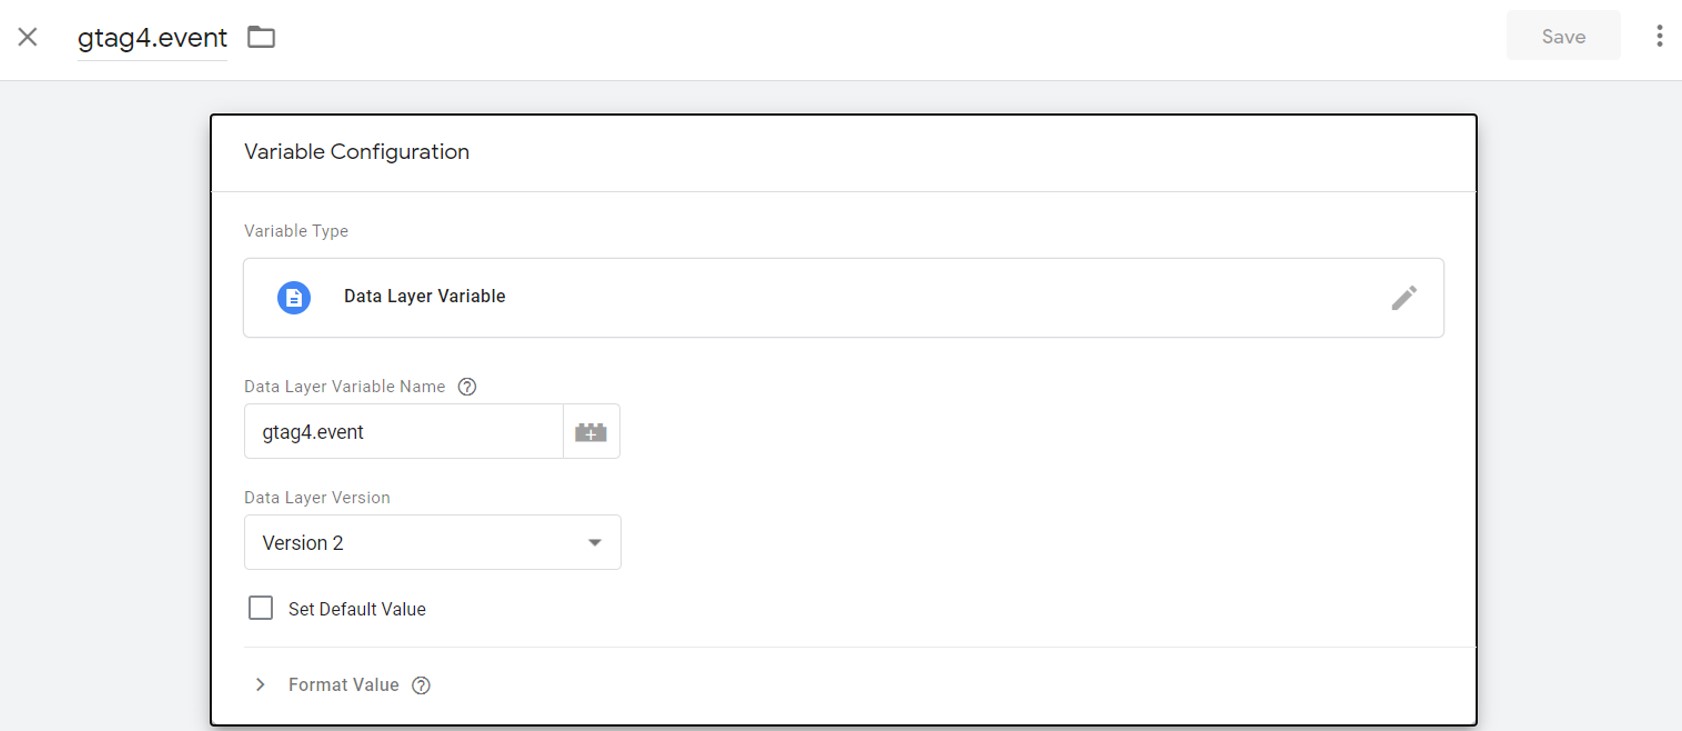
- Create a variable called gtag4.currency in Google Tag Manager
Click to create a new User-Defined Variable in Google Tag Manager. Name your variable “gtag4.currency” to keep track of it easier.
As Variable Type select Data Layer Variable from the options provided by Google.
Under Data Layer Variable Name type gtag4.currency.
Under Data Layer Version select Version 2.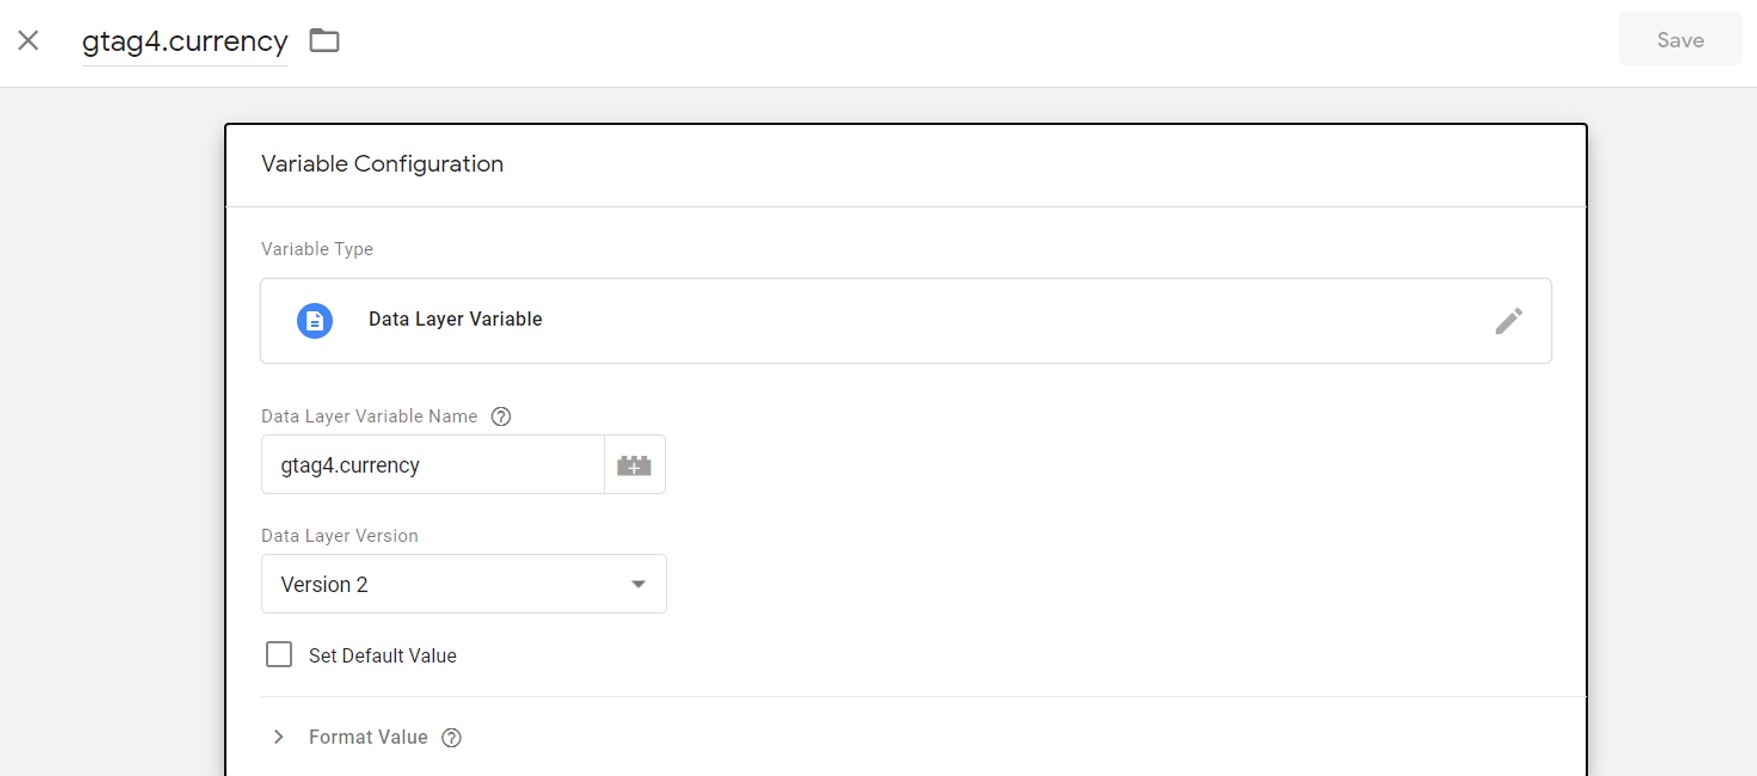
- Create a variable called gtag4.items in Google Tag Manager
Click to create a new User-Defined Variable in Google Tag Manager. Name your variable “gtag4.items” to keep track of it easier.
As Variable Type select Data Layer Variable from the options provided by Google.
Under Data Layer Variable Name type gtag4.items.
Under Data Layer Version select Version 2.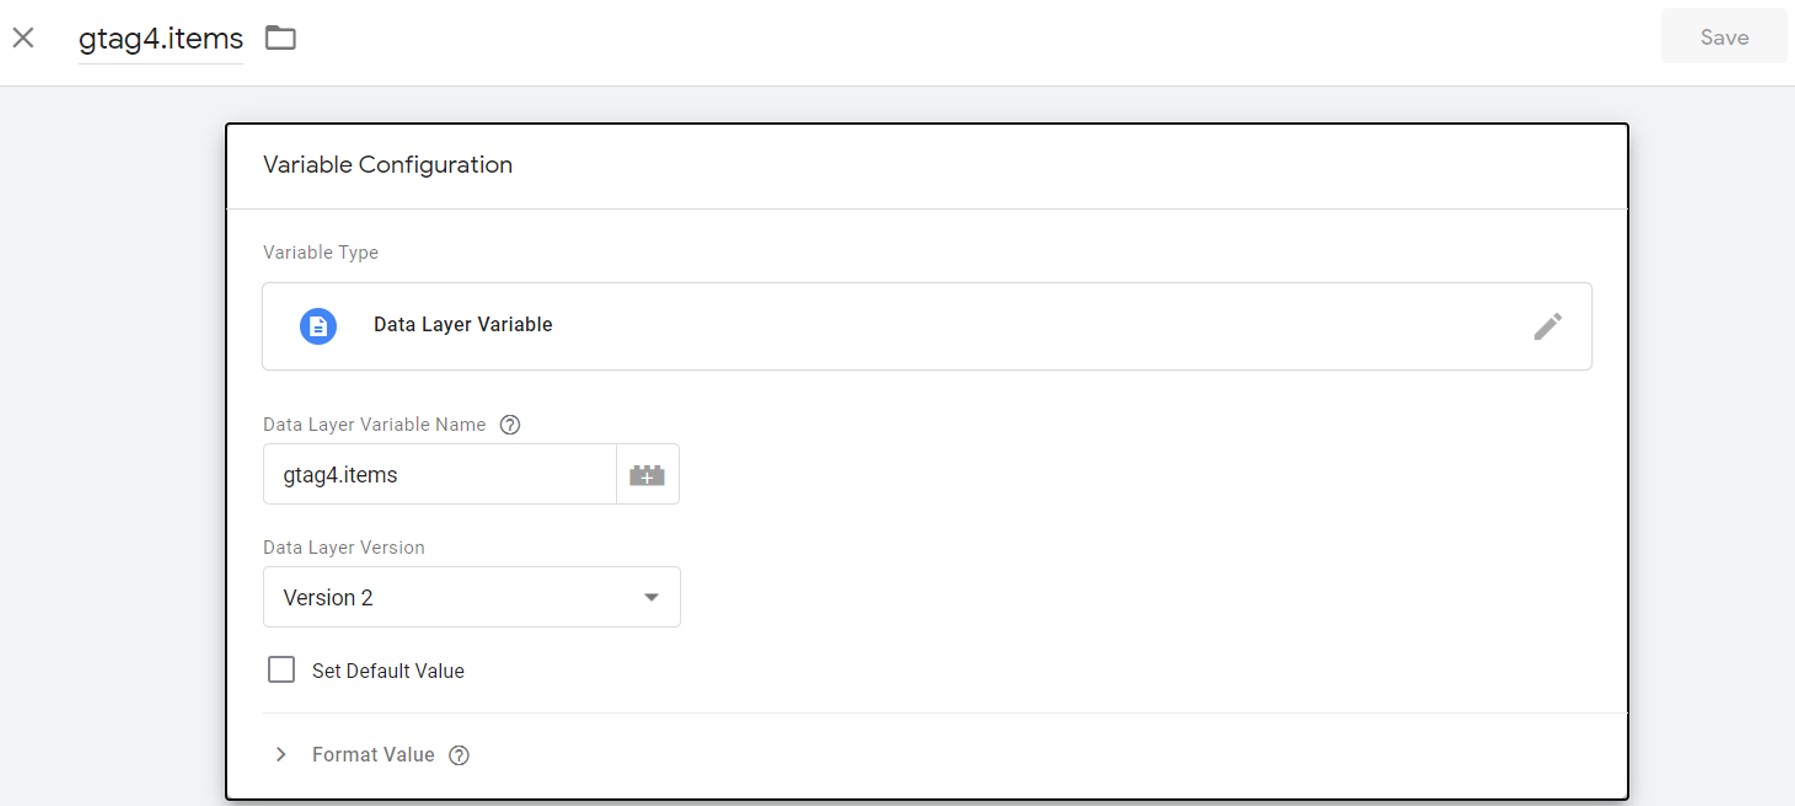
- Create a variable called gtag4.tax in Google Tag Manager
Click to create a new User-Defined Variable in Google Tag Manager. Name your variable “gtag4.tax” to keep track of it easier.
As Variable Type select Data Layer Variable from the options provided by Google.
Under Data Layer Variable Name type gtag4.tax.
Under Data Layer Version select Version 2.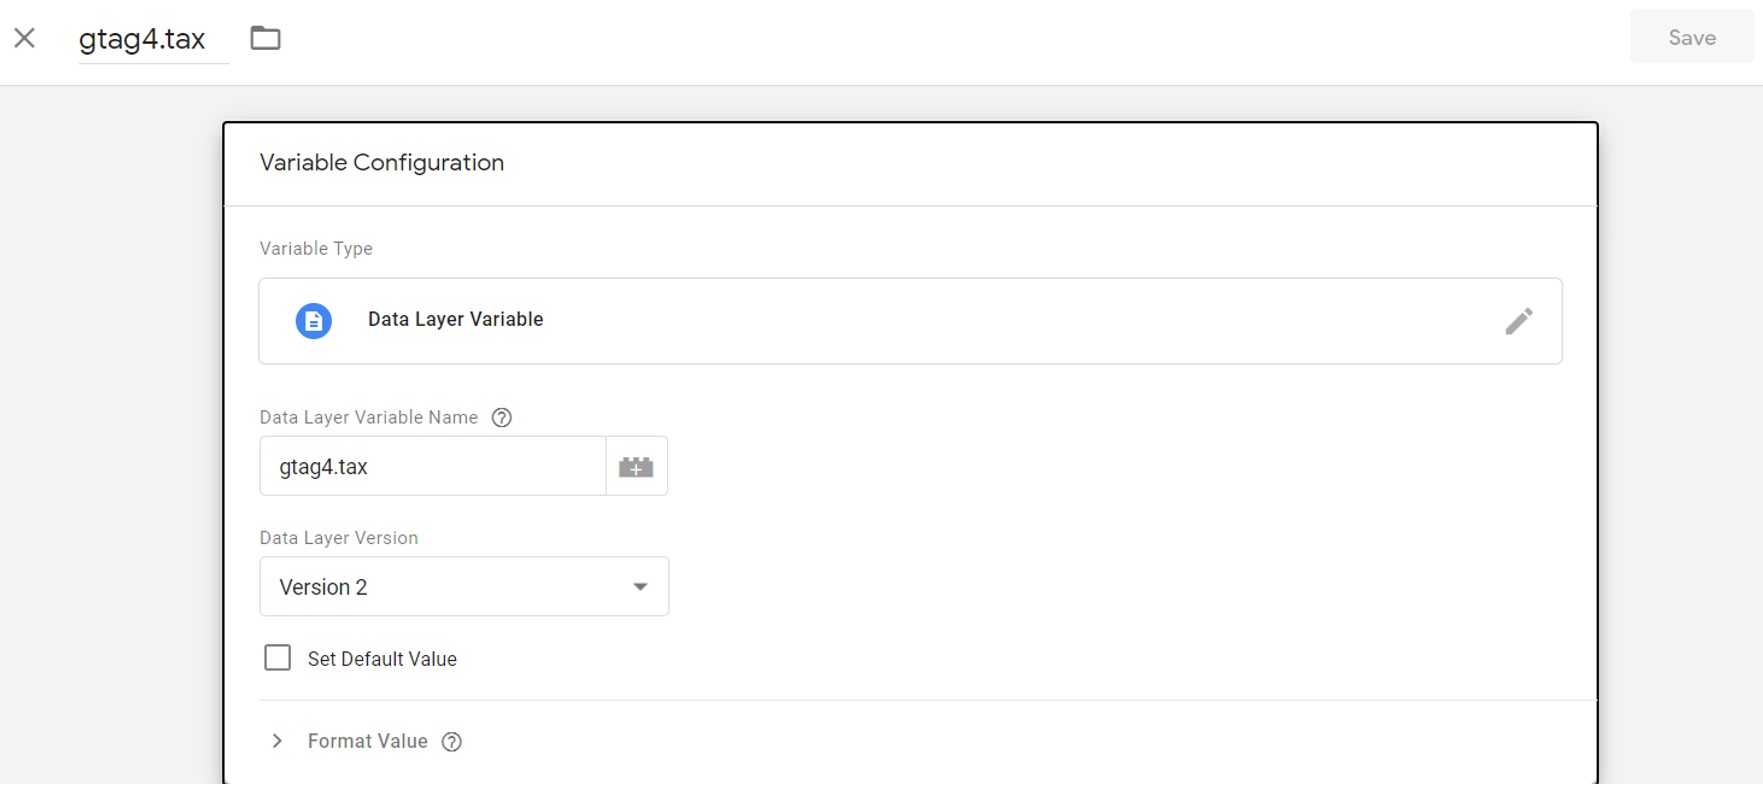
- Create a variable called gtag4.transaction_id in Google Tag Manager
Click to create a new User-Defined Variable in Google Tag Manager. Name your variable “gtag4.transaction_id” to keep track of it easier.
As Variable Type select Data Layer Variable from the options provided by Google.
Under Data Layer Variable Name type gtag4.transaction_id.
Under Data Layer Version select Version 2.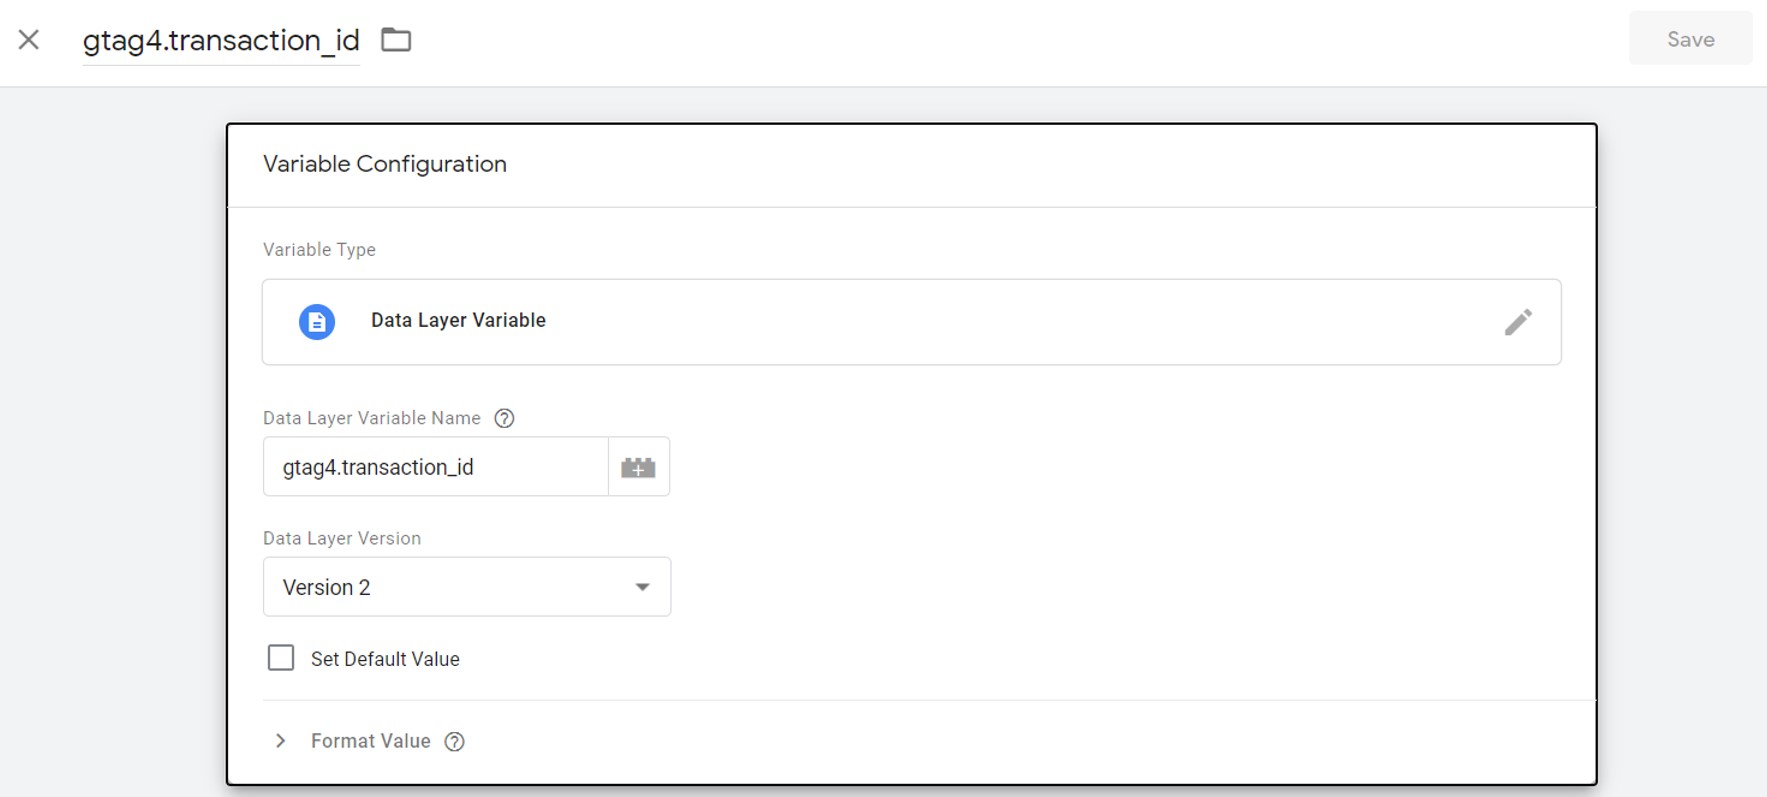
- Create a variable called gtag4.value in Google Tag Manager to capture the total value of the order, including tax
Click to create a new User-Defined Variable in Google Tag Manager. Name your variable “gtag4.value” to keep track of it easier.
As Variable Type select Data Layer Variable from the options provided by Google.
Under Data Layer Variable Name type gtag4.value.
Under Data Layer Version select Version 2.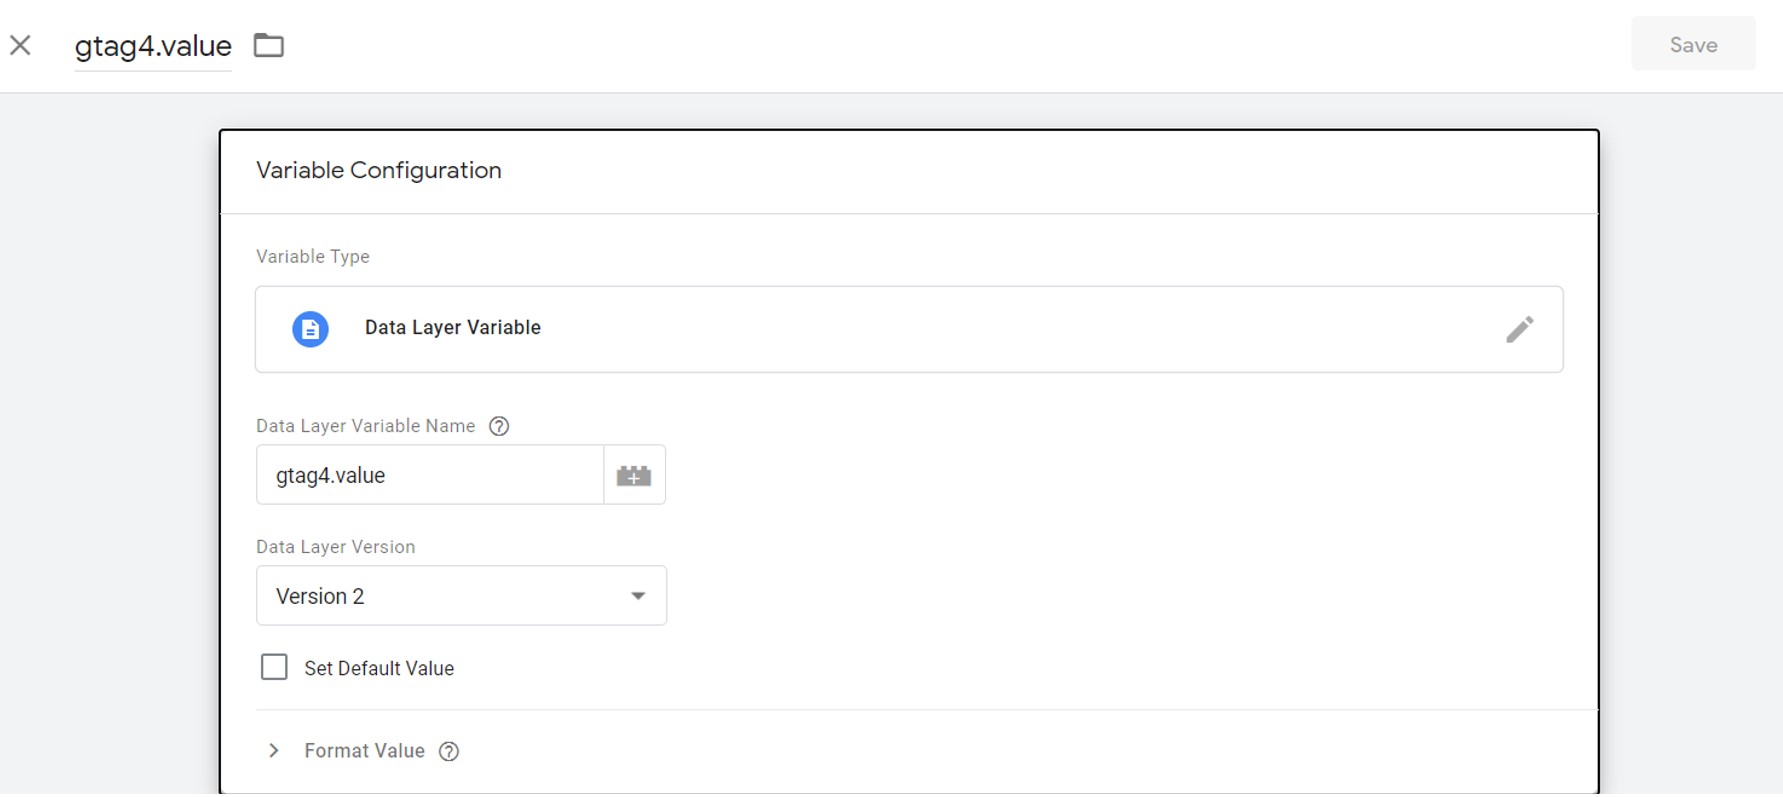
- Create a variable called gtag4.event in Google Tag Manager
C. Create a User-defined variable in Google Tag Manager for Facebook called FacebookEventsScript
- Click on New to create a new user-defined-variable.

- As Variable Type select Custom JavaScript.
-
In the Custom JavaScript section paste the below code. This code will capture product, transaction id and transaction value data, using the dataLayer variables previously created.
function(){
  var attr = {};
  attr.currency = {{gtag4.currency}};
  attr.content_type = "product";
  var fbContents = [];
  var fbIds = [];
  var fbNames = [];
//function fbData
var fbData = function() {
    attr.num_items = {{gtag4.items}}.length;
    for(var i=0;i<{{gtag4.items}}.length;i++){
      fbContents.push({
       'id':{{gtag4.items}}[i].item_id,
       'name':{{gtag4.items}}[i].item_name,
       'quantity':{{gtag4.items}}[i].quantity
      });
     	fbIds.push({{gtag4.items}}[i].item_id);
      fbNames.push({{gtag4.items}}[i].item_name);
   	 }
    attr.contents = fbContents;
    attr.content_ids = fbIds;
    attr.content_name = fbNames;
	};
if ({{gtag4.event}} === 'begin_checkout' && window.omniture_vars && window.omniture_vars.CART_PRODUCTS){
	var checkoutValue=0;
	var checkoutCartProducts = omniture_vars.CART_PRODUCTS;
	for (var i=0; i<checkoutCartProducts.length;i++){
	checkoutValue += Number(checkoutCartProducts[i].ProductTotalPriceWithTaxAndDiscount * checkoutCartProducts[i].ProductQuantity);
	}
    checkoutValue = parseFloat(checkoutValue.toFixed(2))
    attr.value=checkoutValue;
	fbData();
}
  if({{gtag4.event}} === 'purchase'){
   attr.value = {{gtag4.value}};
    fbData();
  }
  return attr;
}
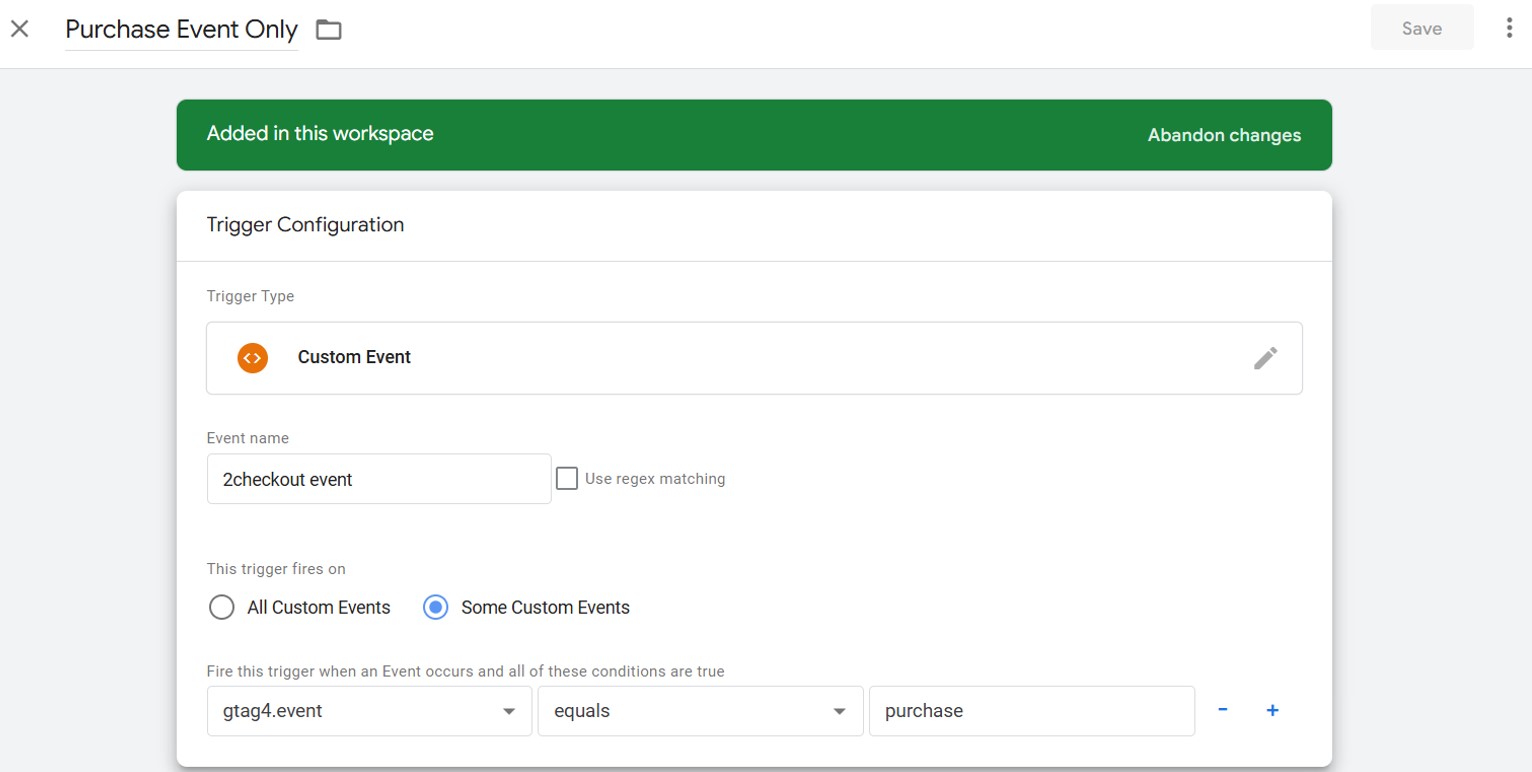
D. Create a trigger specifically for the purchase event
Create a new trigger which is restricted only to the purchase event and name it Purchase Event Only.
- As Trigger Type, select Custom Event.
- As Event name, type 2checkout event.
- For this trigger fires on, select Some Custom Events.
- Add the condition that variable gtag4.event equals purchase.
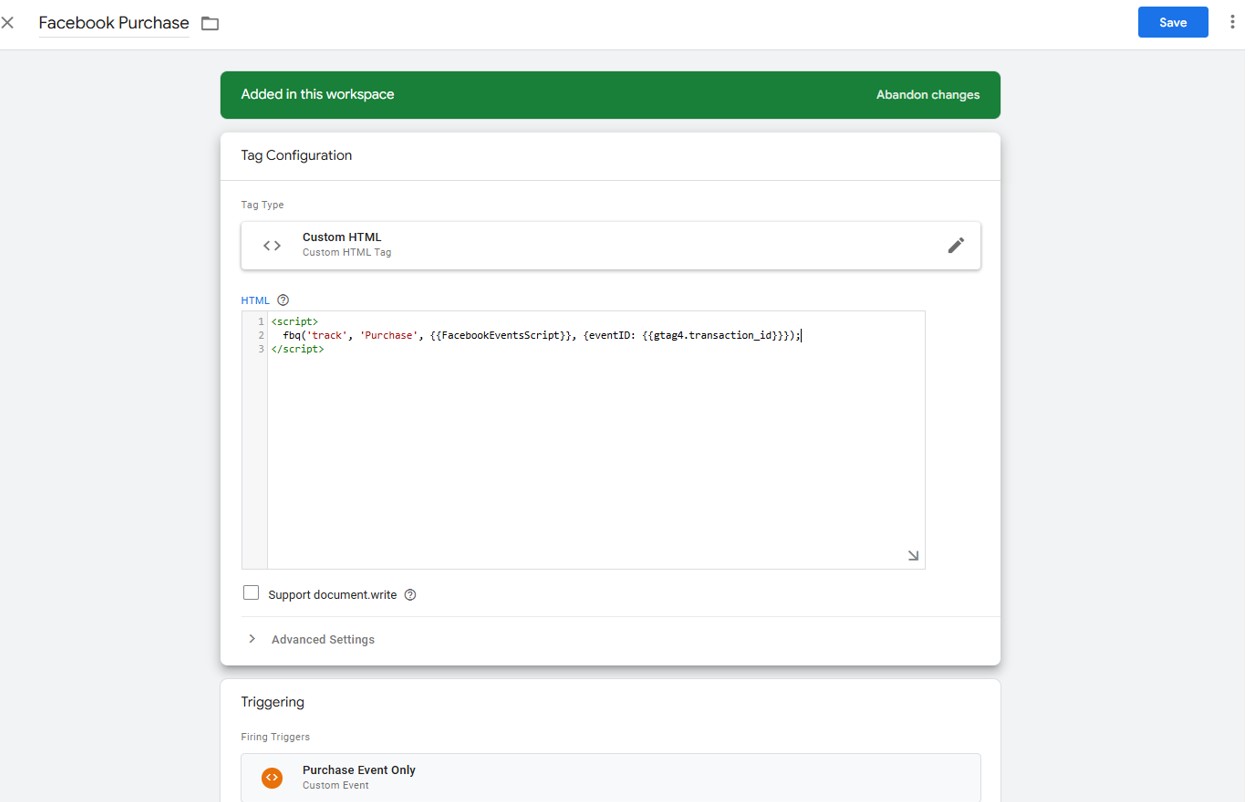
E. Create a tag for the Facebook Pixel for the purchase event
- Create a new tag, named, for example Facebook Purchase.
- As Tag Type select Custom HTML.
-
In the HTML section, paste the following code (this code will send product, transaction id and transaction value data to Meta when a purchase takes place).
<script> fbq('track', 'Purchase', {{FacebookEventsScript}}, {eventID: {{gtag4.transaction_id}}}); </script> - For Triggering, select the Trigger for Event Ecommerce Purchase only, the trigger that is only restricted to the purchase event.
Optional! – send information with the Facebook Pixel at checkout if needed
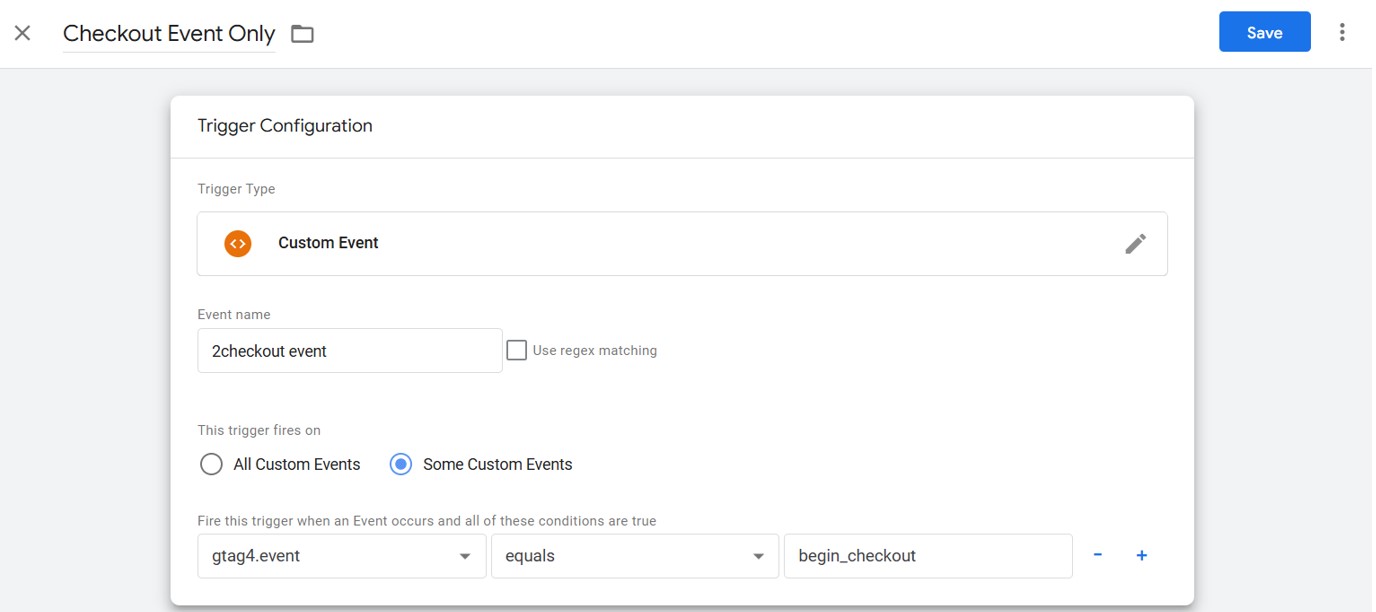
Create a trigger specifically for the checkout event
Create a new trigger which is restricted only to the checkout event and name it Checkout Event Only.
- As Trigger Type, select Custom Event.
- As Event name, type 2checkout event.
- For this trigger to fire on, select Some Custom Events.
- Add the condition that variable gtag4.event equals checkout.
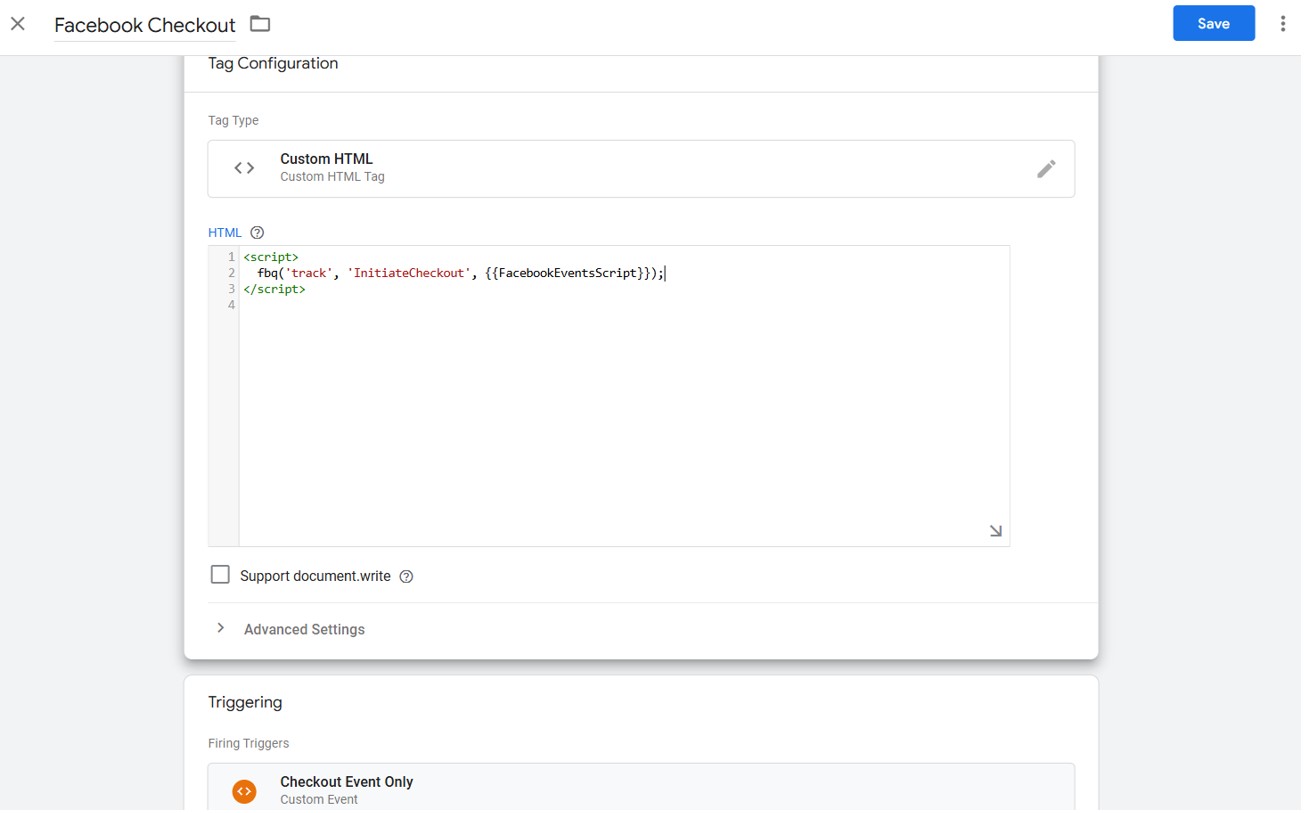
Create a tag for the Facebook Pixel for the checkout event
- Create a new tag, named, for example Facebook Checkout.
- As Tag Type select Custom HTML.
-
In the HTML section, paste the following code:
<script> fbq('track', 'InitiateCheckout', {{FacebookEventsScript}}); </script> - For Triggering, select the Trigger for Event Ecommerce Checkout only, the trigger that is only restricted to the checkout event.