Download Insurance Service (DIS) Guide
Overview
Offer your customers the opportunity to purchase Download Insurance Service (DIS) during the ordering process, and enable them to download a file assigned to your products for an extended period of time, either by accessing a link sent via email or by logging in to 2Checkout myAccount. 2Checkout will store and serve all insured product files.
Availability
All 2Checkout accounts.
Benefits
- Product file availability extended to 24 months – Download Insurance Service overrides the default product file download settings and offers shoppers that purchased your offerings unrestricted access to product files for as much as two (2) years.
- Unlimited number of downloads – DIS also contributes to removing any download restrictions, ensuring that files can be downloaded as many times as needed for the entire 24 months after purchases are made.
If the customer does not purchase DIS, by default, product file downloads are available only for a limited period of time, namely a maximum of two (2) weeks. In addition, the number of times that the product files can be accessed and downloaded is also limited to just 3 (three) tries.
Global Download Insurance Service (DIS)
Global DIS settings can be configured from the Merchant Control Panel.
- Log in to your Merchant Control Panel.
- Navigate to Setup → Fulfillment.
- Click on the Download Insurance tab.
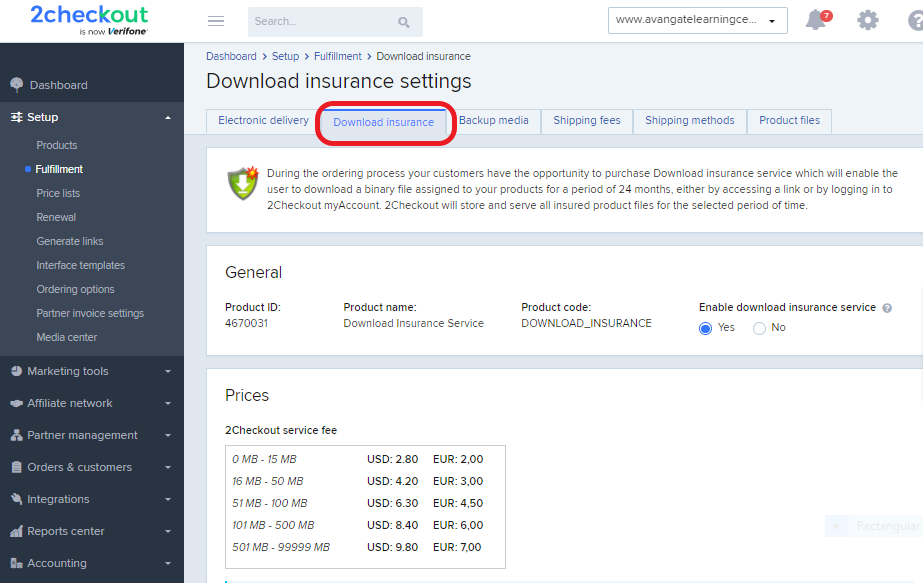
As it's treated the same as any additional product when added to the cart, the Download Insurance feature has a unique product ID, product name (Download Insurance Service), and product code (DOWNLOAD_INSURANCE), although some functionalities, including quantity, won't be available to your shoppers.
Price Settings and Fees
2Checkout charges you a service fee when you offer DIS to customers, based on the size of the file stored on the 2Checkout servers that shoppers are offered for download. The fees are clearly displayed in the Merchant Control Panel, on the Download Insurance Service page, in the Prices section (see the image above).
The 2Checkout commission is applied to the entire transactional value of orders including the DIS costs, even if the DIS service fee is also paid.
You can set up your own pricing for DIS for all transactional currencies activated for your account, also in accordance with the size of the file offered to your shoppers. The prices you define here are those that your customers will see in the cart and ultimately pay when ordering DIS.
You can define DIS prices in a single transactional currency activated for your account and the 2Checkout system will convert them into all other currencies available to shoppers. The prices set up for the active currency will be converted automatically into currencies that do not feature pricing details.
Since you have complete control over all of the prices, regardless of transactional currency, you can configure specific prices as a part of your localization currency. This way, customers in specific markets worldwide will see the prices you defined for their local currency.
The total price of this service is calculated based on the total size in MB of the DIS product files in the shopping cart. For example, if product A has assigned a file of 10MB and product B has a file of 13MB, the total price will be calculated from the range of 16MB – 50MB for the total of 25MB per order. Purchased individually, the total price will be calculated from the range of 0MB - 15MB.
- Net price – VAT is added to this price where VAT is applicable. Customers liable to VAT will pay the net price + VAT and customers exempt from VAT will pay the net price.
- Gross prices – Final price paid by the customer, regardless of VAT applicability. Where VAT is applicable, 2Checkout deducts VAT from the gross price so the final product price (including VAT) remains unchanged. Customers liable to VAT and customers exempt from VAT will pay the same price. In cases where VAT is applied, you will receive less for the sale.
Set up product files
To upload product files, follow these steps:
- Log in to your Merchant Control Panel.
- Navigate to Setup → Fulfillment.
- Click on the Product Files tab.
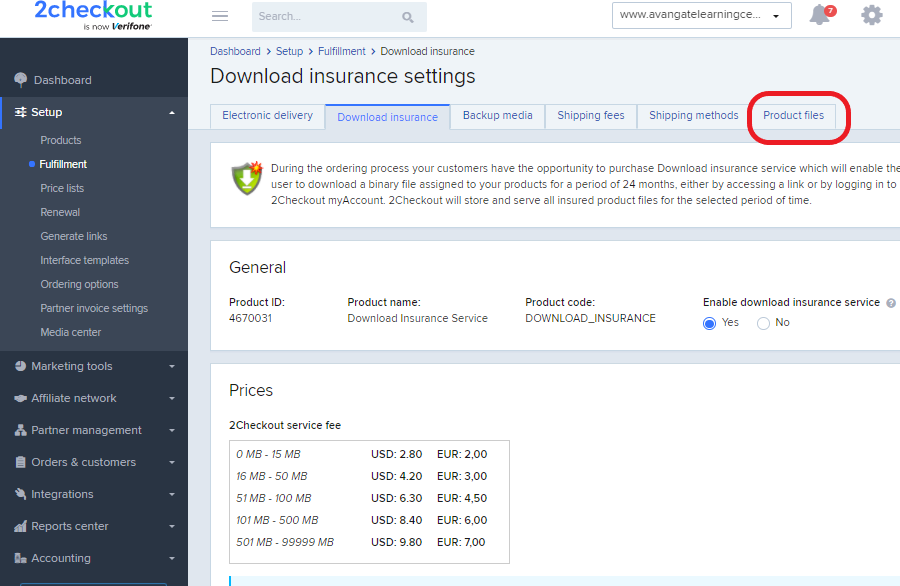
4. On the Product files page, you can use the file manager to:
- Specify a display name
- Specify a file version
- Upload files
- Delete files
- Replace files
- Edit files
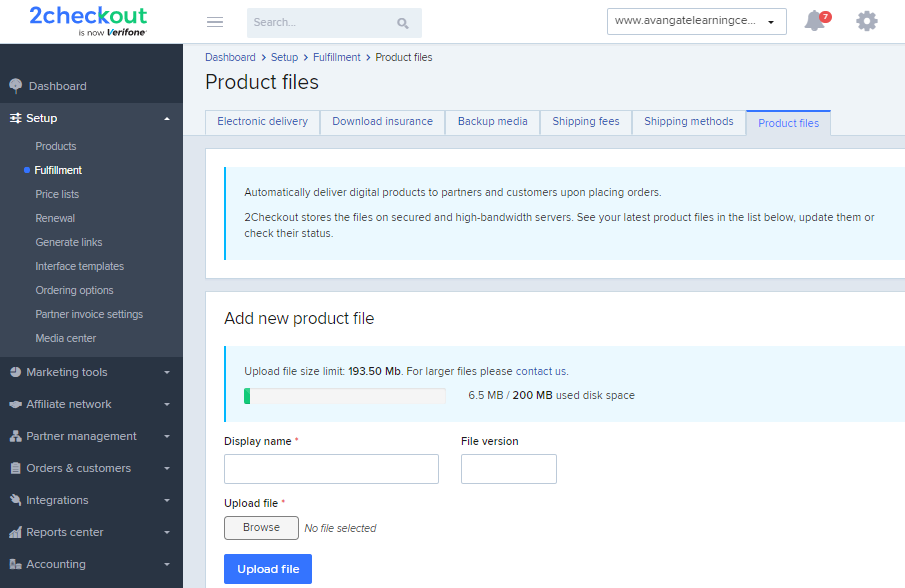
The default disk space available is 200 MB, a number that coincides with the size of the upload file. For more space and for the ability to upload larger files, contact 2Checkout directly.
When editing uploaded product files you can:
- Change display name
- Change file version
- Delete file. Delete files option is only available when no active download links exist for product files. You won't be allowed to remove a product file for two years from the moment one of your shoppers acquired the product it was assigned to as well as the DIS option.
- Replace file. Please note that if this file has Download Insurance Service enabled, all users who have purchased this service will have the latest file available for download and not the original file. If this is not the default behavior for major updates of an already existing product, you can leave this file as is and add a separate one. The old file will be available for previous version purchases while the new file will be available for purchases for the new version.
Assign products to files
To assign products to files, follow the steps below:
- Log in to your Merchant Control Panel.
- Navigate to Setup → Fulfillment.
- Click on the Product Files tab.
- Click to edit a product file.
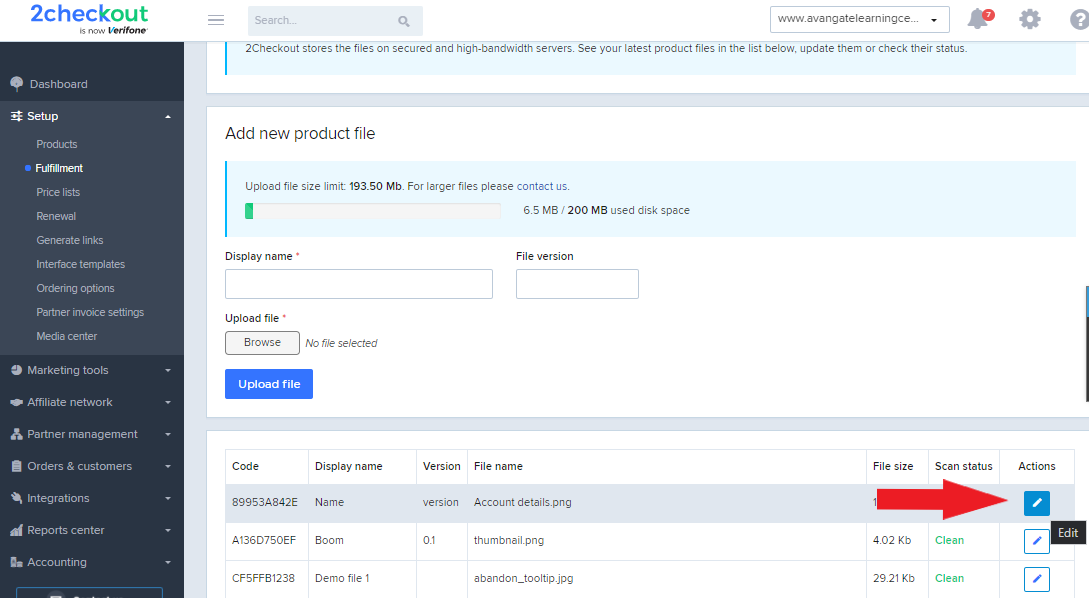
5. On the next page, scroll down to the bottom. In the Assign products area, you'll be able to select one or multiple offerings configured in the 2Checkout platform and associate them simultaneously with the product file you're editing. When assigning the product file, you can opt to make it available for:
- Download
- Download Insurance Service (DIS)
- Partner (in their Partner Control Panel)
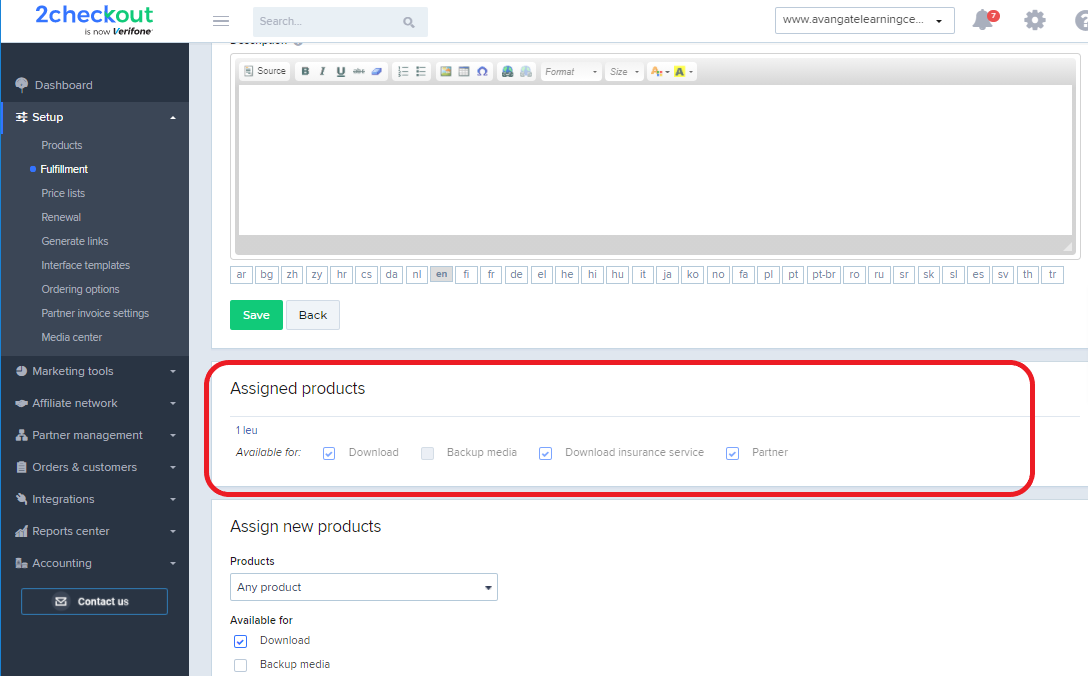
You can also assign files to products.
Configure the Download Insurance Service (DIS)
The DIS is considered an extra delivery 2Checkout service. DIS is offered to your shoppers only when you select the Electronic delivery type under the Fulfillment tab for your offering as:
- 2Checkout delivery (binary keys, activation codes, product file, DIS), or
- Delivery made by you (you need to confirm order fulfillment in 2Checkout through IDN or manually to complete orders).
When selecting the No delivery needed (subscription-based applications, access to services, etc.) option for a specific product, 2Checkout won't offer shoppers DIS.
When editing a product, make sure that the DIS (Download insurance service) option is checked under the Delivery content & methods section. Once checked, this option will display the Product file area, enabling you to select a product file from a list of item you uploaded. Check the box next to the Display to partners in their Partner Control Panel if you want the file to be shared with your partners.
Include the pre-checked DIS option when generating buy-links
When generating buy-links for your products you can opt to:
- Display Download Insurance Service in the shopping cart and leave it up to shoppers to decide if they acquire it or not
- Have DIS auto-selected in the shopping cart in addition to being displayed, but leave shoppers the possibility to opt-out and not acquire it they so prefer.
To include the pre-checked DIS option when you generate buy-links, follow the steps below:
- Log in to your Merchant Control Panel.
- Go to Setup → Generate Links.
- Expand the advance options drop-down.
- Scroll down to the Overwrite extra options in the shopping cart section and check the Auto-select download insurance option box. Checking this box will automatically display the option as pre-selected in the shopping cart for shoppers.
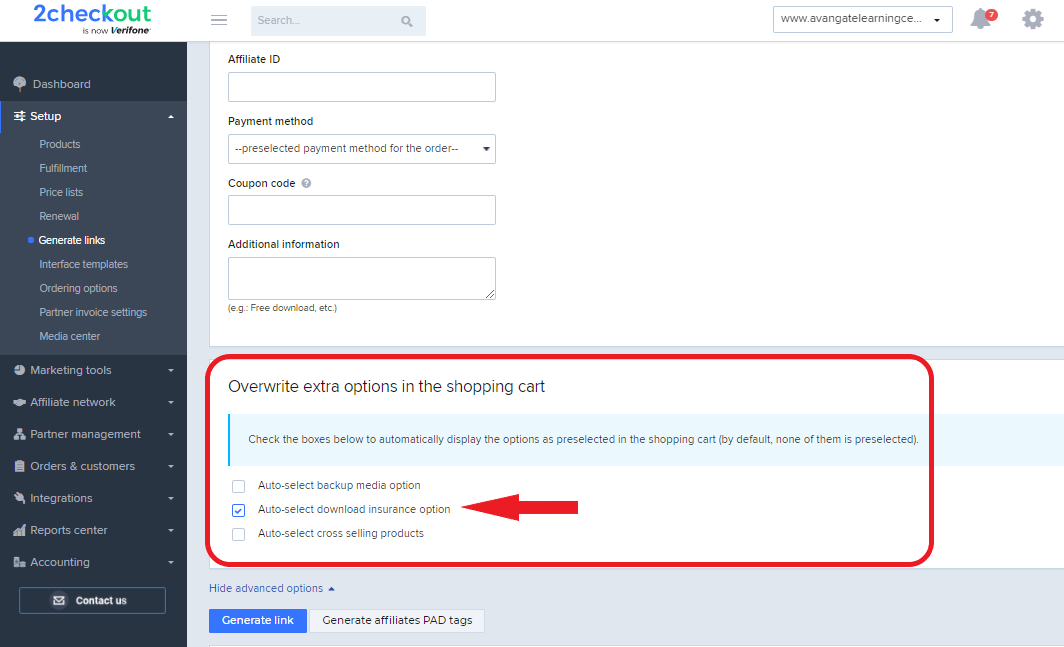
When you generate a URL to sell products with the DIS option automatically selected in the cart, the &CHK_DIS parameter is added to the created buy-link, as in the example below.
This is a standard buy-link that will let shoppers opt-in to purchase DIS in addition to your product:
https://secure.2checkout.com/order/cart.php?PRODS=1234567&QTY=1The following is a buy-link that will display the DIS option as pre-checked in the cart and allow shoppers to opt-out of acquiring the extra service if they so choose. Note that the &CHK_DIS parameter was added at the end.
https://secure.2checkout.com/order/cart.php?PRODS=1234567&QTY=1&CHK_DIS
The links displayed above are offered only for demo purposes and are not functional, hence the use of the 1234567 dummy product ID.
Use the A/B testing capabilities of the 2Checkout platform in order to try out different scenarios which increase the level of control over how DIS is offered to shoppers.
Add the DIS option directly to the shopping cart when generating buy-links
When building buy-links you have the option to not only include the pre-checked DIS option but also to add it to the cart. Note that shoppers will still have the option to remove DIS.
1. Let's assume that the following is the standard buy-link generated by the 2Checkout system:
https://secure.2checkout.com/order/checkout.php?PRODS=1234567&QTY=12. And let's also assume that the product ID for your DIS option is 667788.
3. To create a buy-link that will have DIS automatically pre-checked and added to cart, treat DIS as another product:
https://secure.2checkout.com/order/checkout.php?PRODS=1234567,667788&QTY=1Use the A/B testing capabilities of the 2Checkout platform in order to try out different scenarios which increase the level of control over how DIS is offered to shoppers.
A/B Testing DIS
When configuring an A/B test for Download Insurance Service options, the following options are available:
- Display Download Insurance Service in shopping cart
- Force Download Insurance Service into the shopping cart
- Download Insurance Service checkbox will be pre-checked
- Download Insurance Service will be added automatically in the shopping cart
Read the 2Checkout A/B testing guide for details on how to use 2Checkout's A/B testing technology to see how your customers will respond to various scenarios involving DIS.
Disable Download Insurance Service (DIS)
You can disable DIS by following these steps:
- Log in to your Merchant Control Panel.
- Navigate to Setup → Fulfillment.
- Click on the Download Insurance tab.
- Select No for the Enable download insurance service option.
- Scroll down to the bottom of the page, and hit the Save settings button.

You can re-enable DIS at any time, and the 2Checkout system will begin adding Download Insurance Service to the shopping cart once again.
Reporting
The following reports are also designed to centralize and display data on Download Insurance Service:
F.A.Q.
1. Why isn't DIS displayed multiple times in the shopping cart when shoppers order multiple products, each with its own Download Insurance Service option?
DIS is displayed only as a standalone product in the shopping cart even when multiple products, each with its own DIS settings, are purchased simultaneously. The 2Checkout system is designed to calculate the total price of DIS based on the size of the downloadable product file and the price details you configured.
