Adobe Analytics with Datastreams
Overview
The newly developed “alloy.js” library from Adobe is a JavaScript library that helps merchants measure how users interact with their website.
The new approach of the current “alloy.js” is that it improves:
- Page performance by loading a smaller tracking library.
- Use the same visitor identifier across different solutions from Adobe platform.
- On client-side data, it minimizes the transmissions from website to Adobe platform.
Implementing Adobe Analytics using the Adobe Experience Platform Web SDK (alloy.js) probably will charge fees, so be in touch with your Adobe provider. For more information on the Adobe Experience Platform Web SDK and how to install it, click here.
Setting the Adobe Analytics configuration
To implement Adobe Analytics on your website, follow these steps:
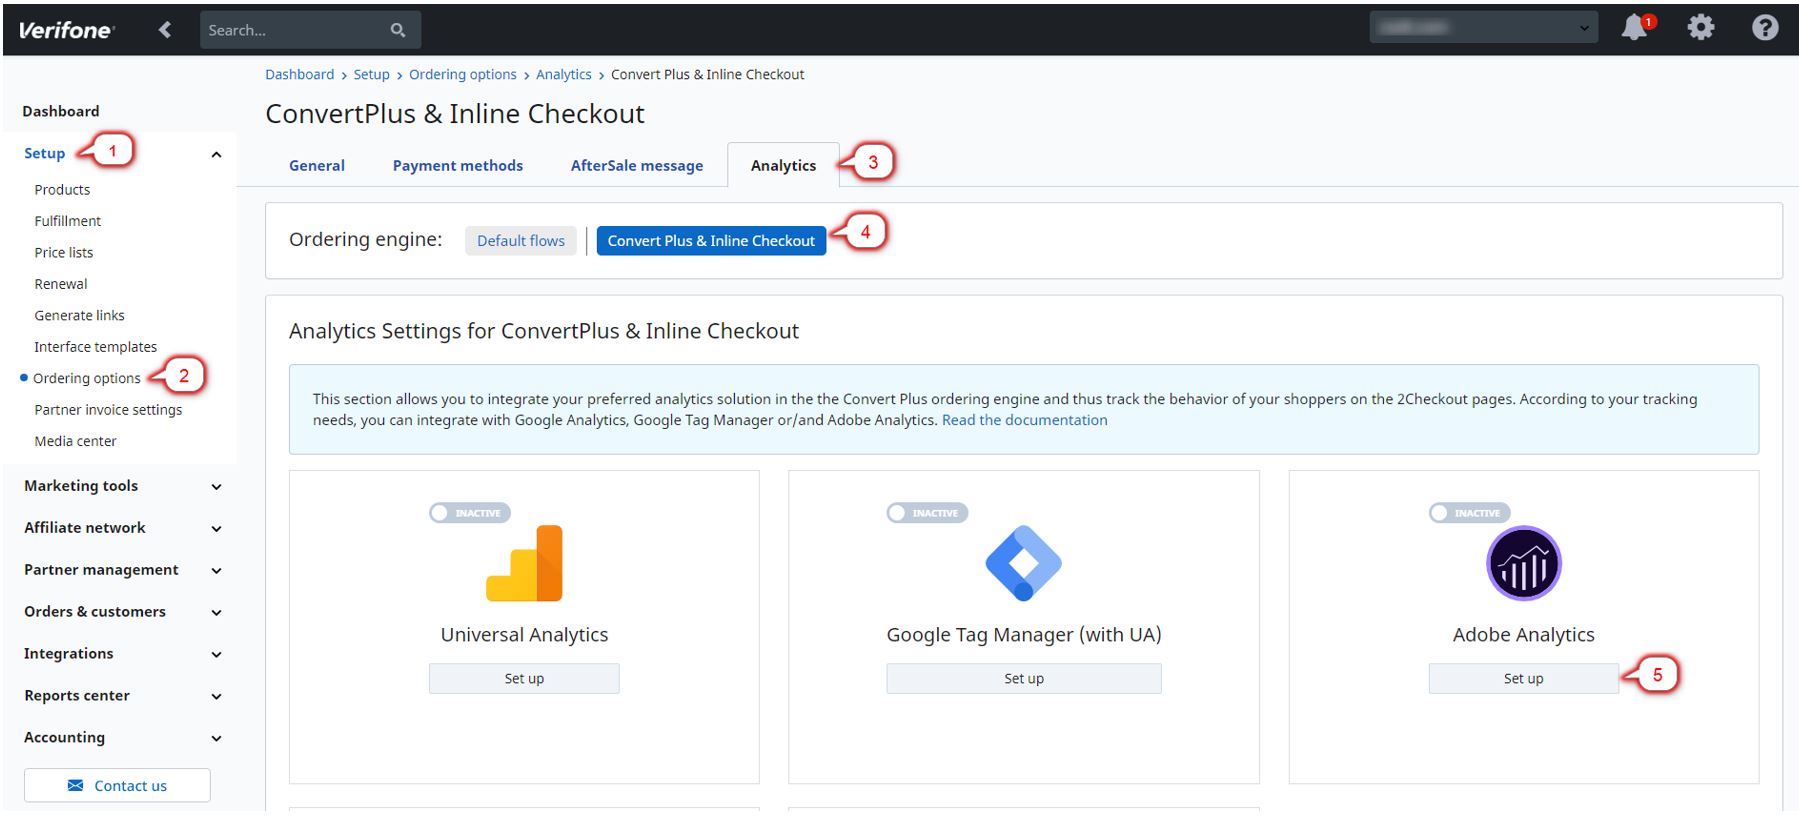
- Log into your 2Checkout (now Verifone) Merchant Control Panel and navigate to Setup.
- Select Ordering Options.
- Click on the Analytics tab.
- Click on the Convert Plus & Inline Checkout button.
- In the Adobe Analytics panel click on Setup.
- Fill in the two fields. The information can be extracted from the datastream creation in the Adobe platform.
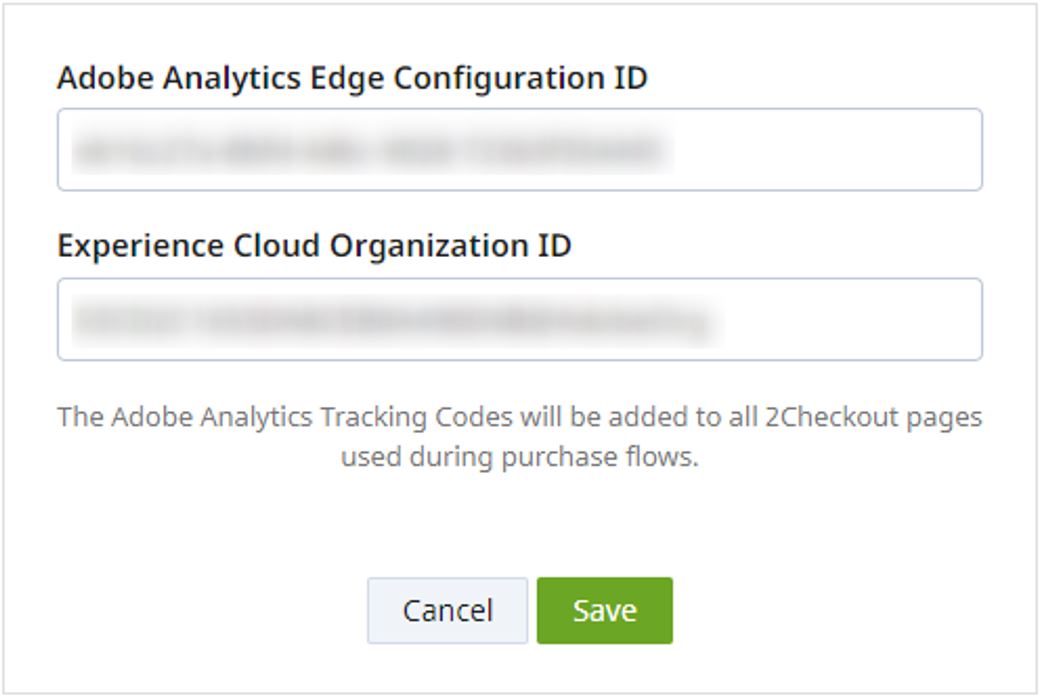
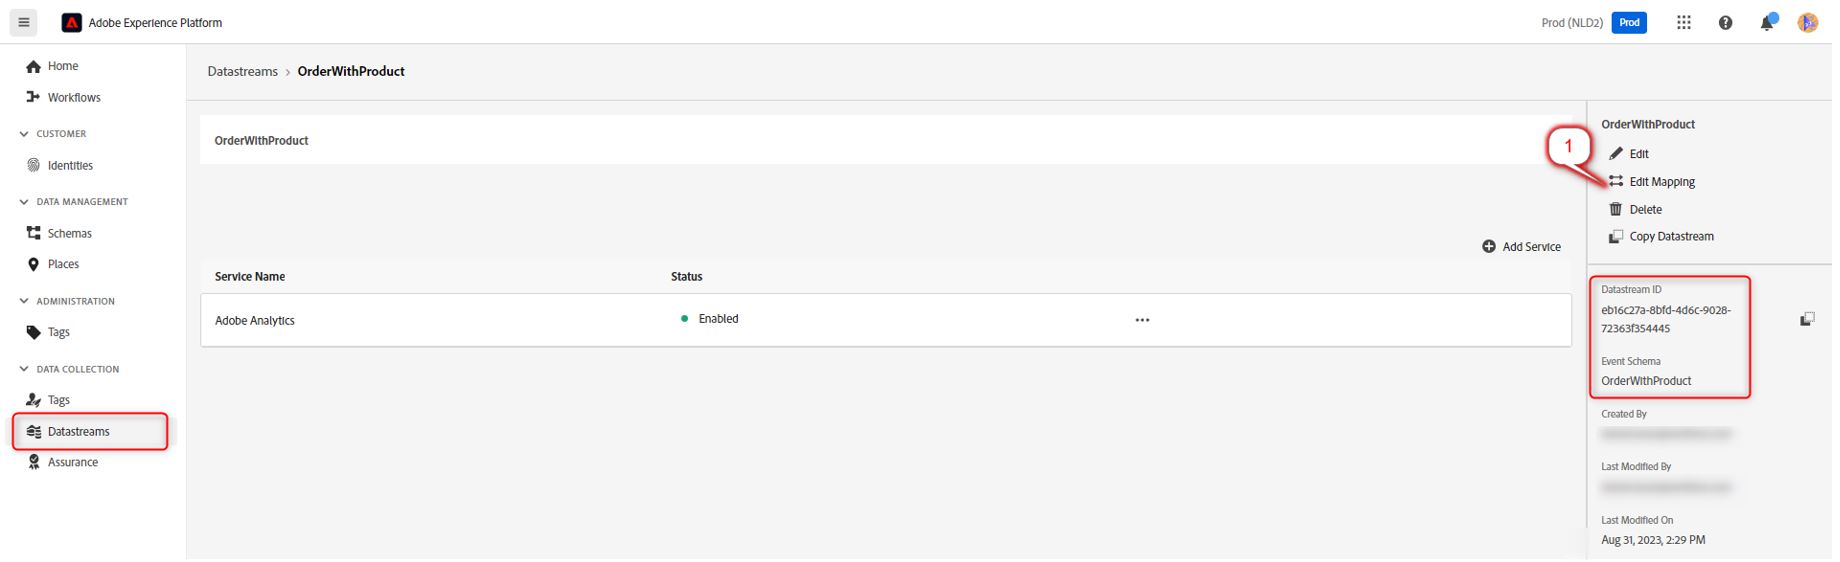
The Adobe Analytics Edge Configuration ID and Experience Cloud Organization ID can be found in Adobe Experience Platform.- The Edge Configuration ID means Datastream ID and represents the ID of the configuration that is set on the datastream created for transferring data to the Adobe Analytics module.
- The Organization ID means the ID that Adobe is creating for a user and helps the Adobe Platform to recognize the user between the changes from different module/applications.
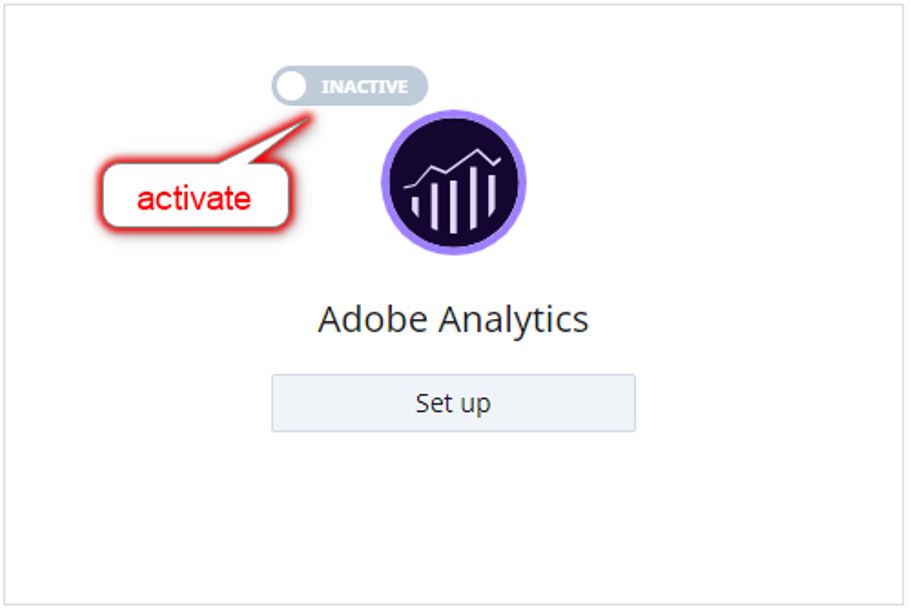
- Click on the Inactive button to activate the configuration credentials for Adobe Analytics.
Setting the Adobe Experience Platform for using Adobe Analytics
To implement a report in Adobe Analytics from the data sent in the shopping cart, first you need to create a datastream and a schema to set the logic data into the datastream.
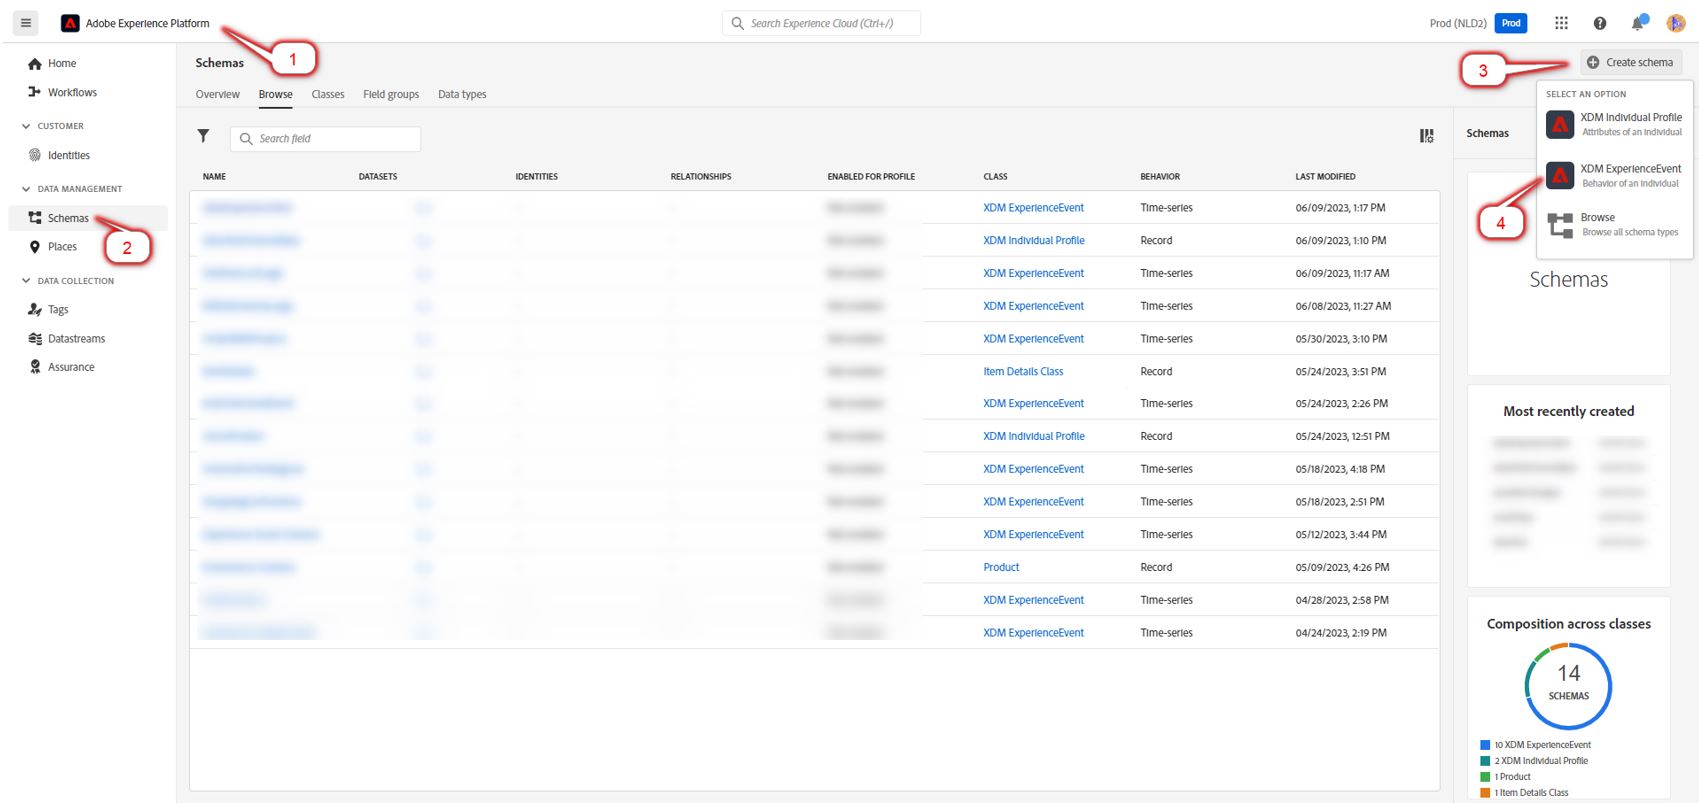
- Go to Adobe Experience Platform and click on the Schemas option from the left side panel. Then, click on the Create schema button. This schema should use the XDM Adobe pre-build schemas in order for the data to be recognized in the Adobe Analytics report.
The XDM ExperienceEvent is used as the primary selection for the Adobe pre-build class because this is the way that Adobe Analytics service can recognize the schema in the datastream.
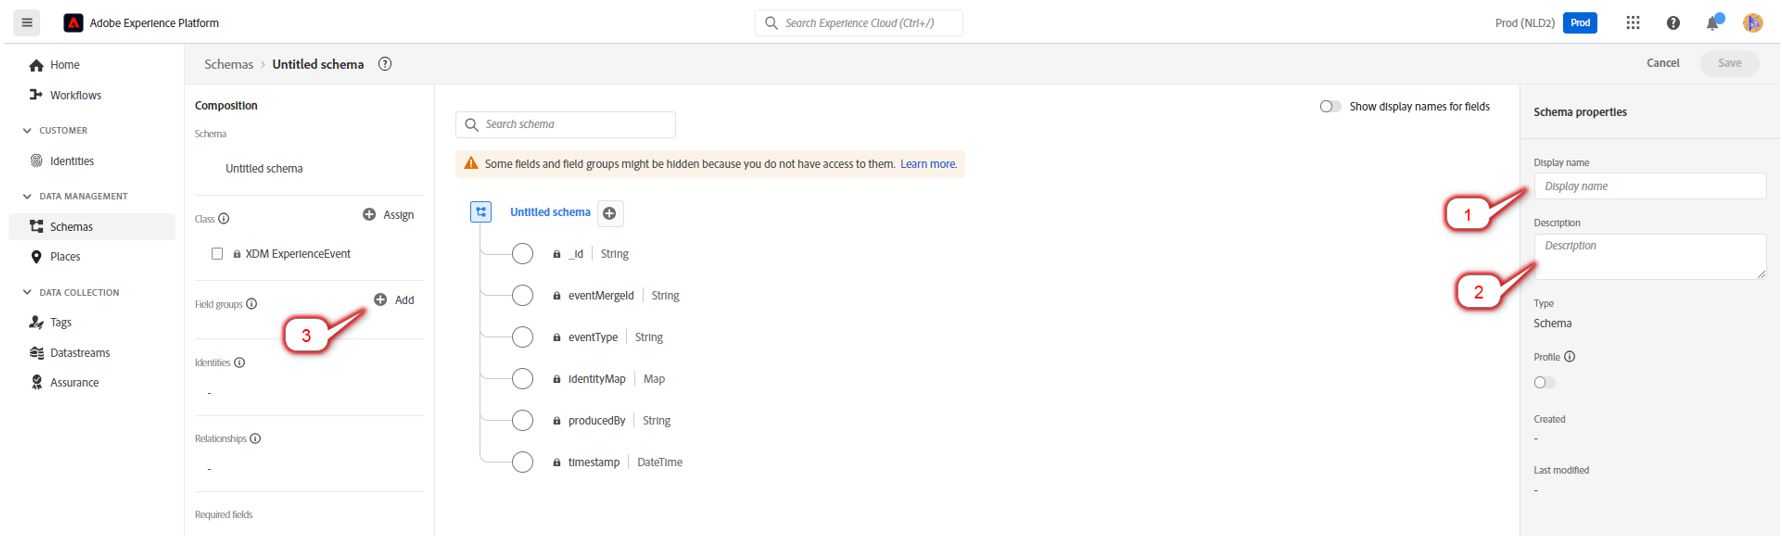
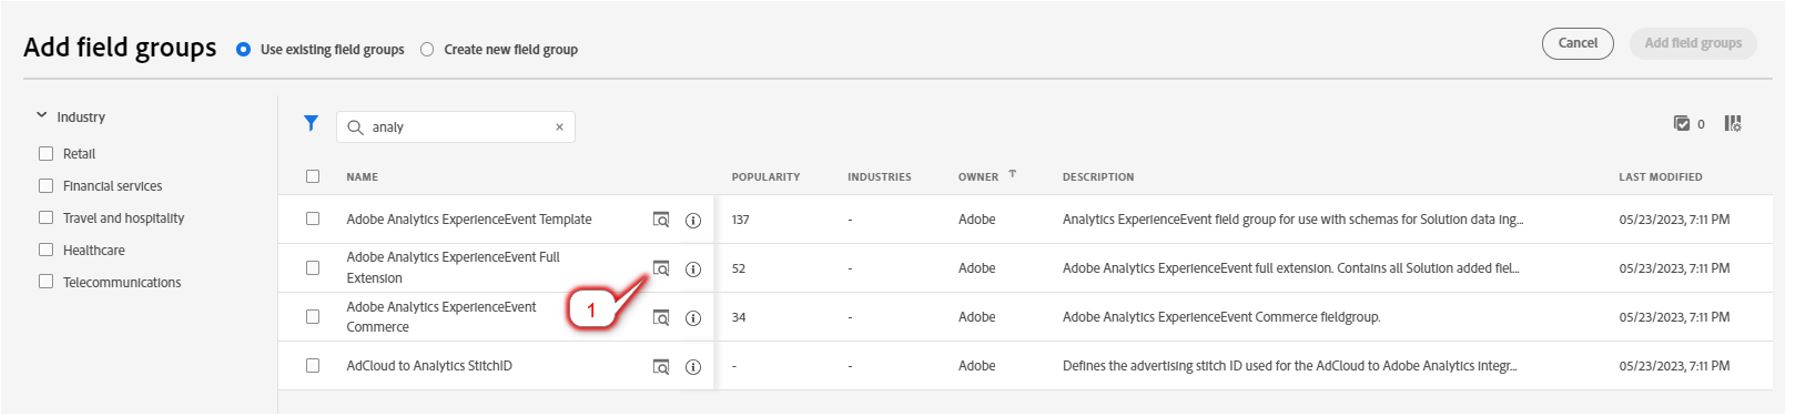
- In the new schema, go to Scheme properties and enter the Display name and Description. In the left-side panel, go to the Fields group and click on Add; this will open the pre-built schema for Adobe Analytics to be selected.
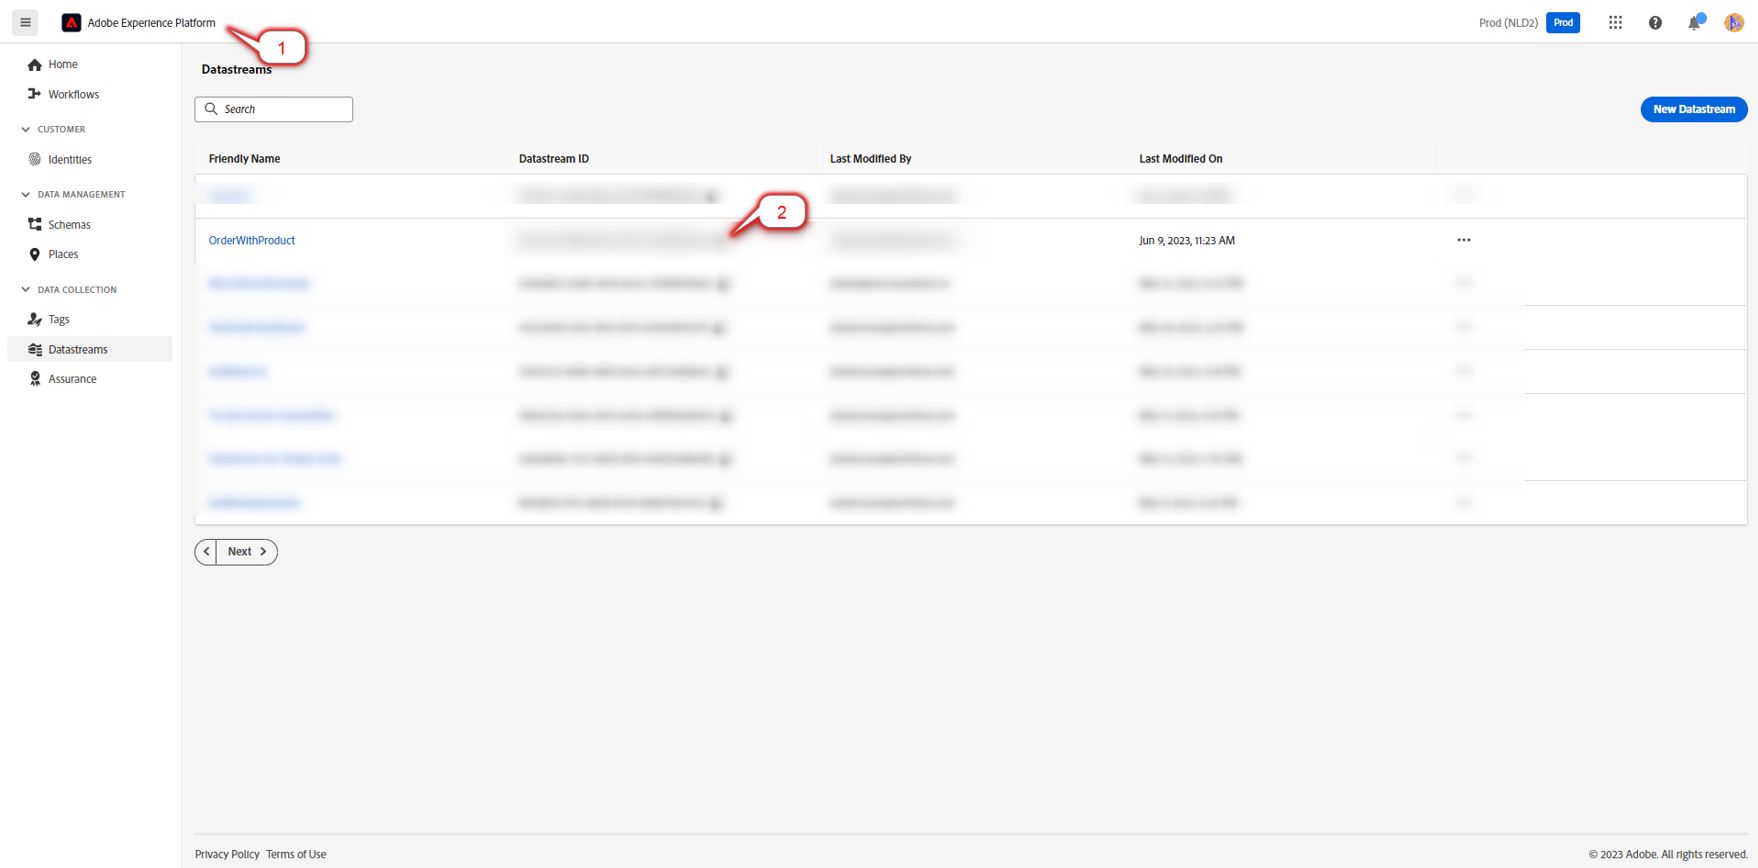
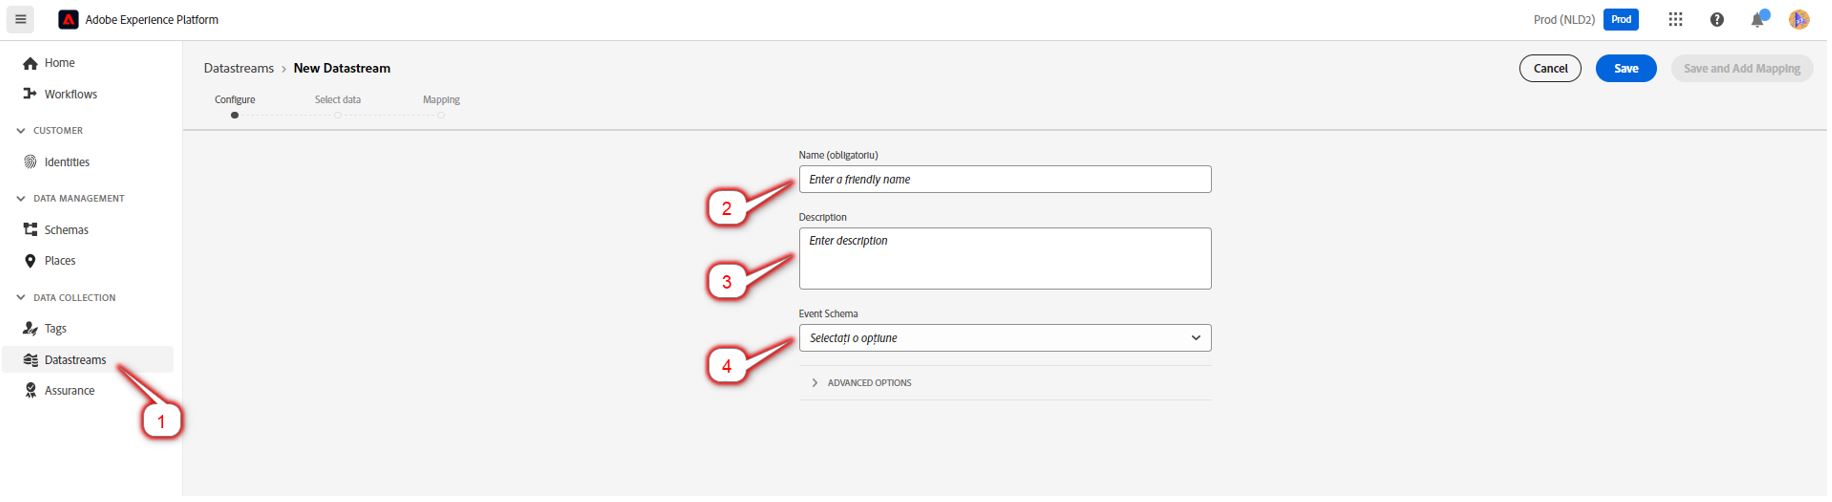
- After saving the schema, go back to the Datastreams section, and create a New Datastream, selecting the already created schema from the Event schema drop-down option.
The steps on how to map the data will be treated in the section Mapping the data to Adobe Analytic context.
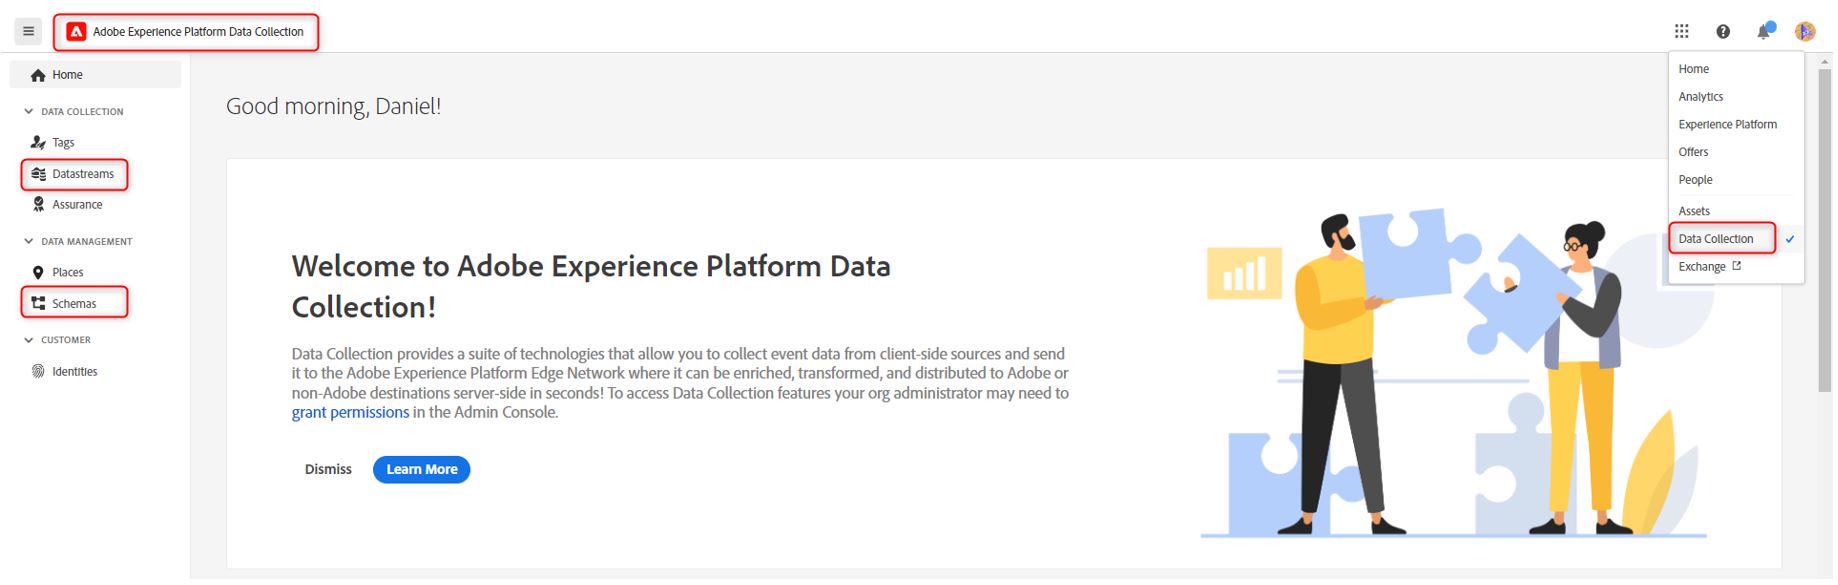
All of these 3 steps can be reproduced in the Adobe Experience Platform Data Collection module from the same Adobe Experience Cloud environment.
Mapping the data to Adobe Analytics context
For mapping the correct data into Adobe Analytics module, the 2Checkout comes with the schema that is sent from the shopping cart. For mapping the data, you need to know two aspects, one of the data that is sent from 2Checkout, and secondly, the data recognized (or created as new evar/events) in the Adobe Experience Platform.
Data sent from 2Checkout
A general overview of this data is presented in the code snippet below:
{
  "event": "checkout",
  "ecommerce": {
    "currencyCode": "string required",
    "sessionId": "string required",
    "checkout": {
      "actionField": {"<< ActionField object >>"},
      "products": ["<< List of product object >>"]
    },
    "purchase": {
      "actionField": {"<< ActionField object >>"}
    },
    "products": ["<< List of product object >>"],
    "add": {
      "products": ["<< List of product object >>"]
    },
    "remove": {
      "products": ["<< List of product object >>"]
    },
    "impressions": ["<< List of impression object >>"]
  },
  "PAGE_NAME": "string => string",
  "VENDOR_CODE": "string => string",
  "ONESTEPCART": "true => bool",
  "SHORT_FORM": "true => bool",
  "PURCHASE_COMPLETE": "bool",
  "TEST_ORDER": "bool => bool",
  "PRODUCT_SOURCE": "string",
  "CART_LOCK": "bool => bool",
  "DISCOUNT_COUPON_STATUS": "string",
  "AUTO_RENEWAL": "string => string",
  "PURCHASE_TYPE": "string => string",
  "LANGUAGE": "string => string",
  "BILLING_COUNTRY": "string",
  "VISITOR_COUNTRY": "string",
  "BILLING_CURRENCY": "string",
  "COMPANY_NAME": "string",
  "ORDER_EXT_REF": "string",
  "CUSTOMER_EXT_REF": "string",
  "TEMPLATE_LAST_MODIFIED_DATE": "string",
  "TEMPLATE_CREATION_DATE": "string",
  "PAGE_STYLE_NAME": "string",
  "ADDITIONAL_HIDDEN_FIELDS": "array",
  "SELLER_TYPE": "string",
  "PAYMENT_METHOD": "string",
  "PAYMENT_METHOD_TYPE": "string",
  "QUANTITY_CHANGED": "string",
  "CART_STEP": "string",
  "ADDITIONAL_FIELDS_COUNT": "number",
  "SOURCE": "string",
  "PURCHASE_FLOW": "string",
  "CREDIT_CARD_INSTALLMENTS": "string",
  "LEAD_MANAGEMENT": "string",
  "PAYMENT_CATEGORY": "string",
  "time": "number"
}
In the next tables, each event is described in detail:
| Object ecommerce (key "ecommerce" on the event name "checkout") | ||
|---|---|---|
| Key | Content | |
currencyCode |
String (required) | |
| The currency code | ||
sessionId |
String (required) | |
| The session ID | ||
checkout |
Object (required) | |
| The object that will implement the checkout event. Will have two keys: “actionField” and “products” | ||
actionField |
Object (required) | |
products |
Array of objects (required) | |
coupon |
String | |
| If there is a promotion, a coupon will be needed | ||
orderDiscountCoupon |
String | |
| The discount from the added coupon | ||
| Object actionField (key “actionField” on the event name “checkout”) | |
|---|---|
| Key | Content |
step |
Integer (required) |
| The step | |
checkout_revenue |
String (required) |
| Checkout revenue | |
checkout_revenueUSD |
String (required) |
| Checkout revenue USD | |
checkout_tax |
String (required) |
| Checkout tax | |
checkout_taxUSD |
String (required) |
| Checkout tax USD | |
checkout_shipping |
String (required) |
| Checkout shipping | |
checkout_shippingUSD |
String (required) |
| Checkout shipping USD | |
| Object product (key “products”, array of product) | |
|---|---|
| Key | Content |
name |
String (required) |
| The name of the product | |
id |
String (required) |
| The ID of the product | |
price |
String (required) |
| The price | |
discountAmount |
String (required) |
| The amount of the discount | |
quantity |
Number (required) |
| The quantity | |
type |
String (required) |
| The type of the product | |
group |
String (required) |
| The group | |
tax |
Number (required) |
| The tax amount | |
format |
String (required) |
| The format | |
coupon |
String |
| If there is a promotion, a coupon will be needed | |
discountCoupon |
String |
| The discount from the added coupon | |
itemExtRef |
String |
| The product external reference | |
isDynamic |
Boolean |
| The product is dynamic | |
dynamicType |
String |
| The type of dynamic product | |
dynamicRecurrence |
String |
| The recurrence of dynamic product | |
dynamicDuration |
Number |
| The duration of a dynamic product | |
dynamicRenewalPrice |
Number |
| The renewal price for a dynamic product | |
options |
Array of strings |
| Extra option for the product | |
hiddenAdditionalFields |
Array of strings |
| Additional hidden fields that are set by the merchant in the Control Panel application | |
| Object ecommerce (key “ecommerce” on the event name “purchase”) | ||
|---|---|---|
| Key | Content | |
currencyCode |
String (required) | |
| The currency code | ||
sessionId |
String (required) | |
| The session ID | ||
purchase |
Object (required) | |
| The object that will implement the purchase event will have one key: “actionField” | ||
actionField |
Object (required) | |
orderTimestamp |
String (required) | |
| The timestamp of the place order | ||
products |
Array of objects (required) | |
| The product object | ||
| Event name “cartUpdate” | |
|---|---|
| Key | Content |
PAGE_NAME |
String |
| The name of the page | |
VENDOR_CODE |
String |
| Vendor code | |
ONESTEPCART |
Boolean |
| One step cart value | |
SHORT_FORM |
Boolean |
| Short form value | |
PURCHASE_COMPLETE |
Boolean |
| The purchase is completed | |
TEST_ORDER |
Boolean |
| The order is for testing purpose | |
PRODUCT_SOURCE |
String |
| The product source | |
CART_LOCK |
Boolean |
| The cart is locked | |
DISCOUNT_COUPON_STATUS |
String |
| The status for the discount coupon | |
AUTO_RENEWAL |
String |
| Auto renewal value | |
PURCHASE_TYPE |
String |
| The type of the purchase | |
LANGUAGE |
String |
| The language code | |
BILLING_COUNTRY |
String |
| The billing country | |
VISITOR_COUNTRY |
String |
| The visitor country | |
BILLING_CURRENCY |
String |
| The billing currency | |
COMPANY_NAME |
String |
| The company name | |
ORDER_EXT_REF |
String |
| The order external reference | |
CUSTOMER_EXT_REF |
String |
| The customer external reference value | |
TEMPLATE_LAST_MODIFIED_DATE |
String |
| Template last modified date | |
TEMPLATE_CREATION_DATE |
String |
| Template creation date | |
PROFESSIONAL_SERVICES |
String |
| Professional services value | |
PAGE_STYLE_NAME |
String |
| Page style name | |
ADDITIONAL_HIDDEN_FIELDS |
Array of strings |
| Additional hidden fields that are set by the merchant in the Control Panel application | |
SELLER_TYPE |
String |
| Seller type value | |
PAYMENT_METHOD |
String |
| Payment method value | |
PAYMENT_METHOD_TYPE |
String |
| Payment method type value | |
QUANTITY_CHANGED |
Number |
| The new quantity of the cart updated event | |
CART_STEP |
String |
| The step of the cart | |
ADDITIONAL_FIELDS_COUNT |
Number |
| The count of the additional fields | |
SOURCE |
String |
| The source value | |
PURCHASE_FLOW |
String |
| The purchase flow value | |
CREDIT_CARD_INSTALLMENTS |
String |
| The credit card installments | |
LEAD_MANAGEMENT |
String |
| The lead management value | |
PAYMENT_CATEGORY |
String |
| The payment category | |
time |
Number |
| The timestamp on which the event is created | |
REVIEW_FLOW |
String |
| The review flow value | |
| Event name “addToCart” | |||
|---|---|---|---|
| Key | Content | ||
currencyCode |
String (required) | ||
| The currency code value | |||
ecommerce |
Object (required) | ||
| Ecommerce object that will have a key named “add” | |||
add |
Object (required) | ||
products |
Array of objects (required) | ||
| The product object | |||
| Event name “removeFromCart” | |||
|---|---|---|---|
| Key | Content | ||
ecommerce |
Object (required) | ||
| Ecommerce object | |||
currencyCode |
String (required) | ||
| The currency code value | |||
sessionId |
String (required) | ||
| The session ID value | |||
remove |
Object (required) | ||
products |
Array of objects (required) | ||
| The product object | |||
coupon |
String | ||
| If there is a promotion, a coupon will be needed | |||
orderDiscountCoupon |
String | ||
| The discount from the added coupon | |||
| Event name “productImpression” | ||
|---|---|---|
| Key | Content | |
ecommerce |
Object (required) | |
| Ecommerce object that will have a key named “impressions” | ||
impressions |
Array of objects (required) | |
| The impression object | ||
| Object impression (key “impressions”, array of impression) | |
|---|---|
| Key | Content |
name |
String (required) |
| The name of the product | |
id |
String (required) |
| The ID of the product | |
price |
String (required) |
| The price | |
discountAmount |
String |
| The amount of the discount | |
type |
String |
| The type of the product | |
group |
String (required) |
| The group value | |
format |
String (required) |
| The format | |
isDynamic |
Boolean |
| The product is dynamic | |
dynamicType |
String |
| The type of dynamic product | |
hiddenAdditionalFields |
Array of strings |
| Additional hidden fields that are set by the vendor in the cPanel application | |
position |
Number |
| The position of the impression | |
Data needed from Adobe Experience Platform
Go back to the new created datastream from Adobe Platfom, and click on the Edit Mapping section.
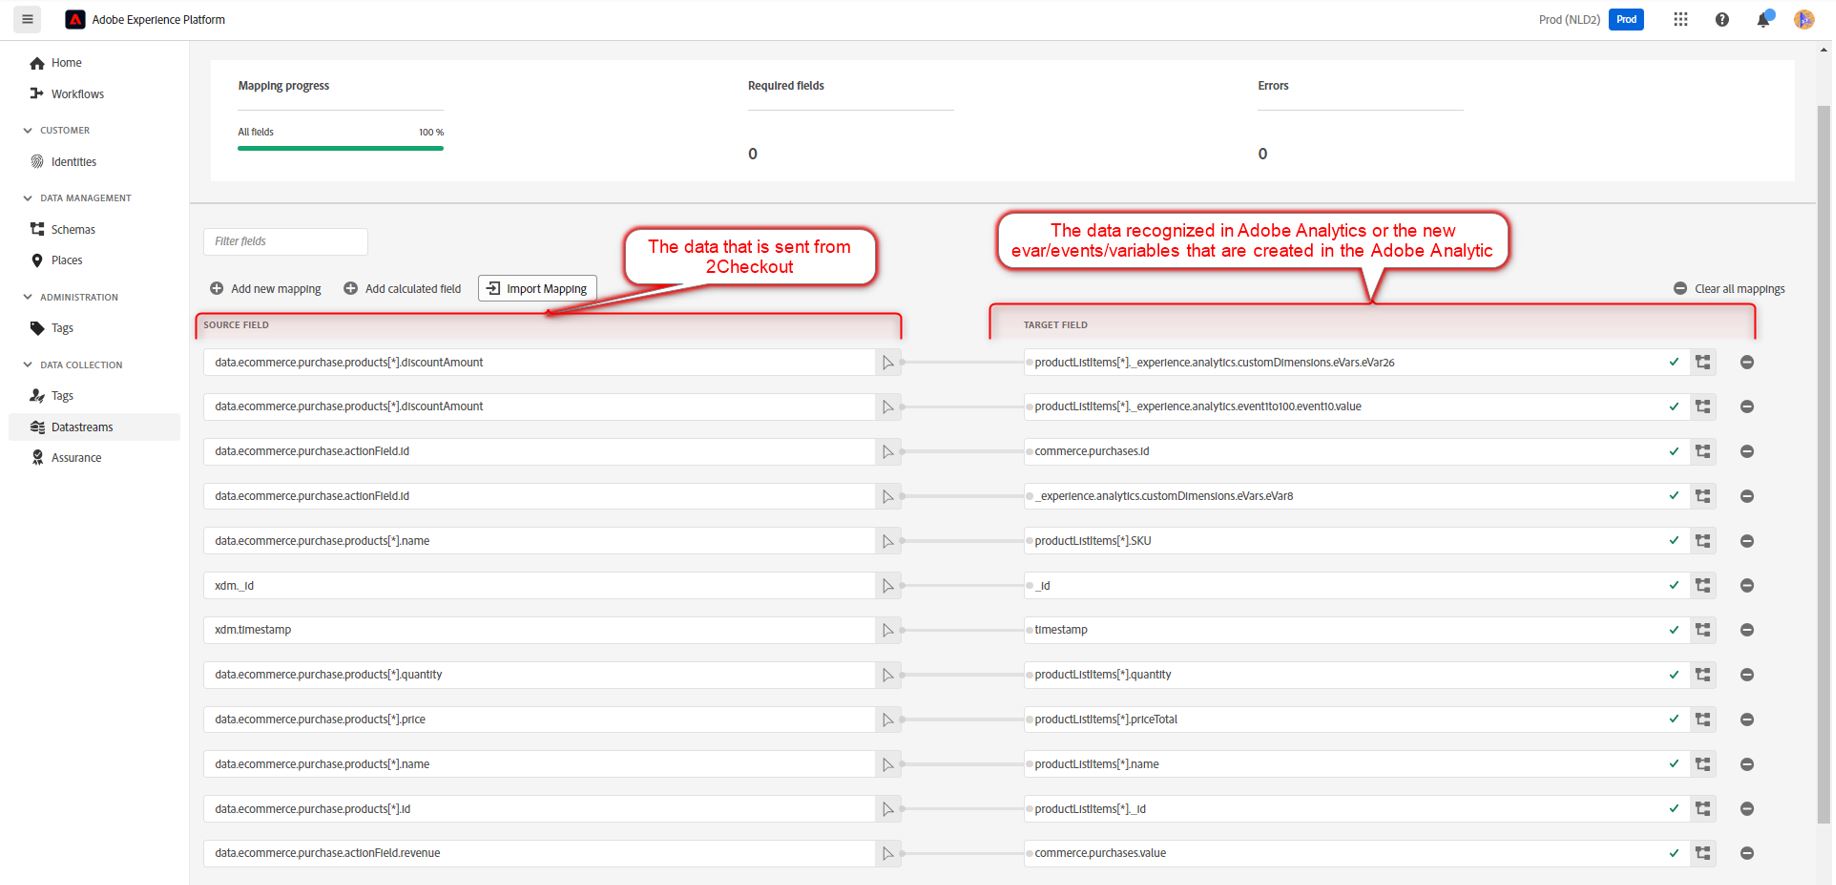
Here is an example of a partial mapped scheme:
How to create Events and Variables in the Adobe Analytics application
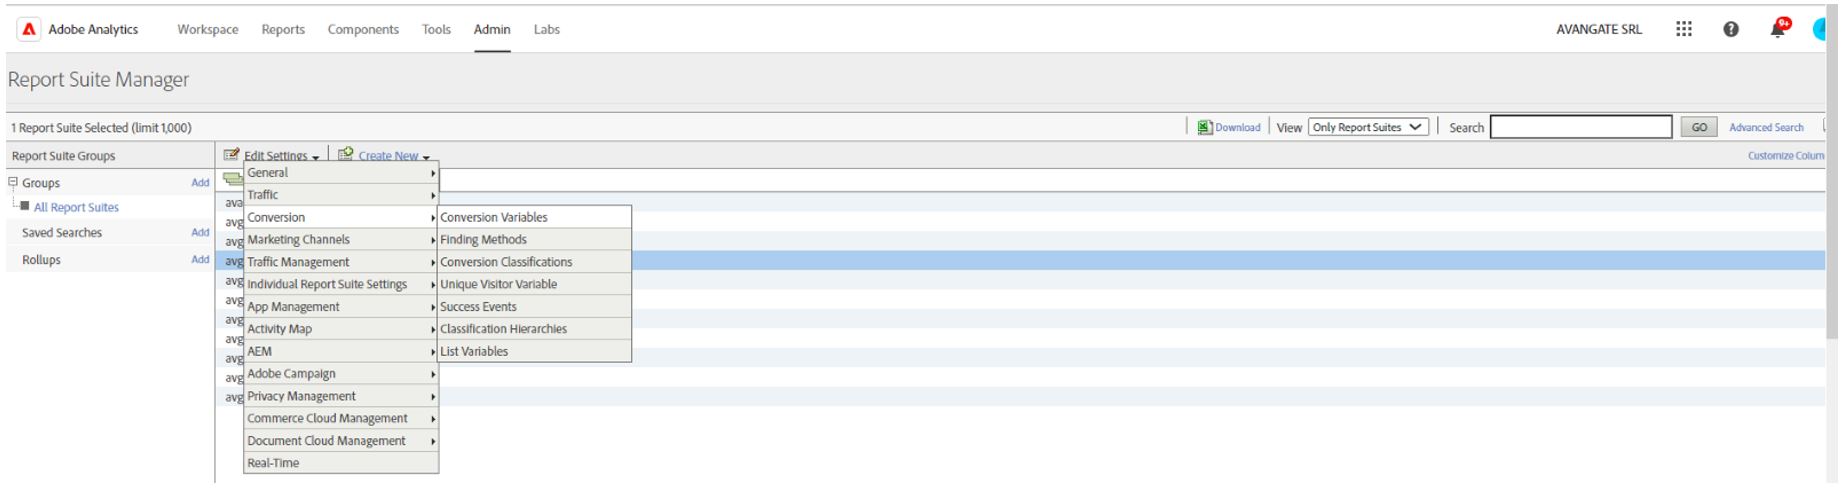
- Log into Adobe Analytics.
- Go to Admin > Report Suites.

- Click on the Report suites for which you want to build variables or events.

Example on how to build a custom event in Adobe Analytics:
- Click on Edit Settings > Conversion > Success Events to build custom events.
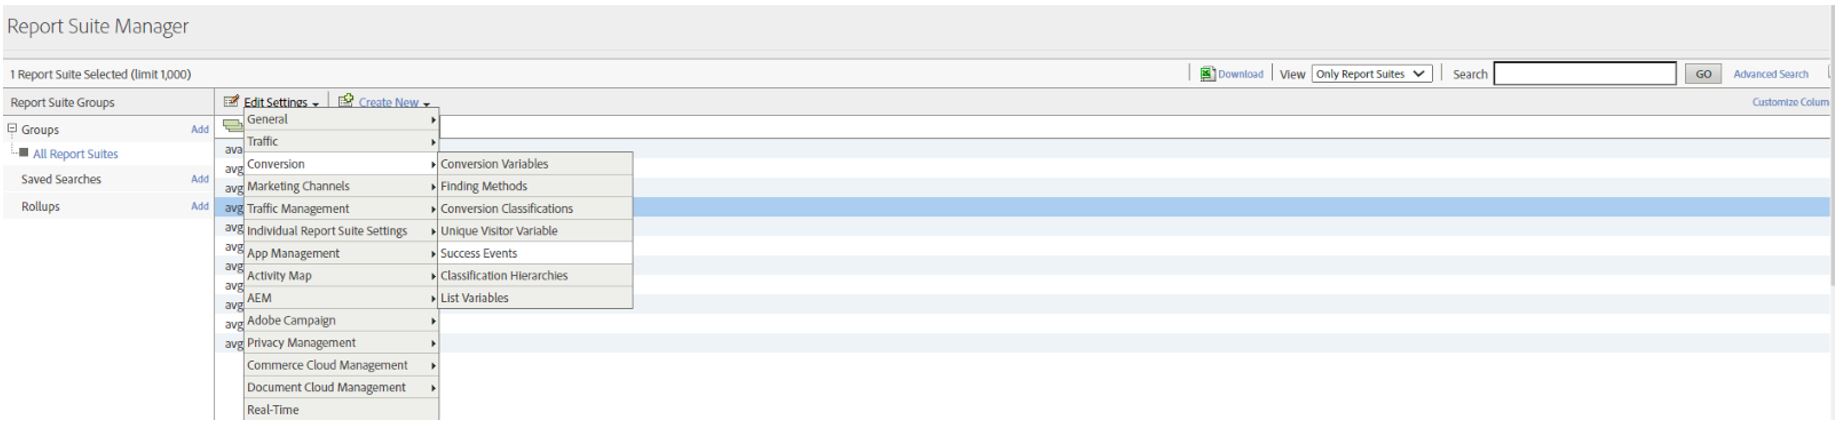
- Click on Add New and then define the new event, for example event10: write a name for the event (ex: “Product Discount Value”).
- Under the Type column, select Currency if a monetary value is sent under this event, as in the example below. The other fields should be left as preselected by Adobe in this example.
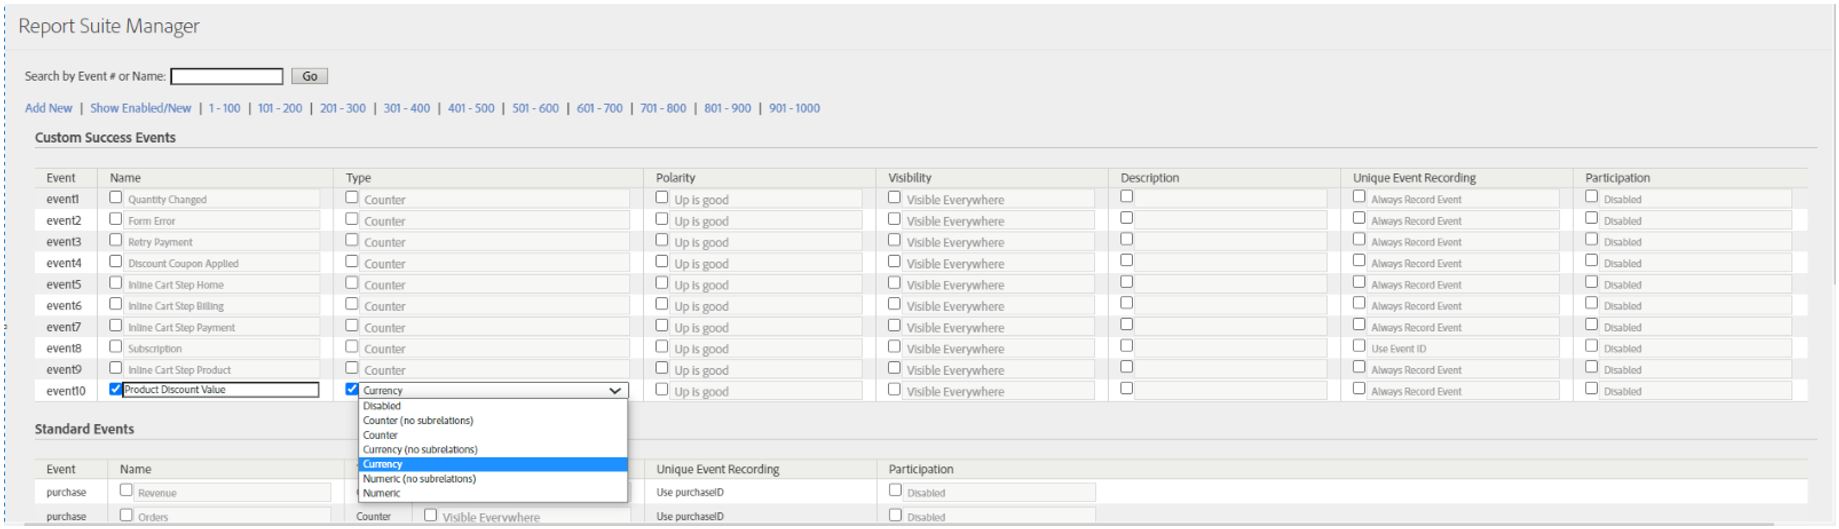
- Click the Save button at the bottom of the page.
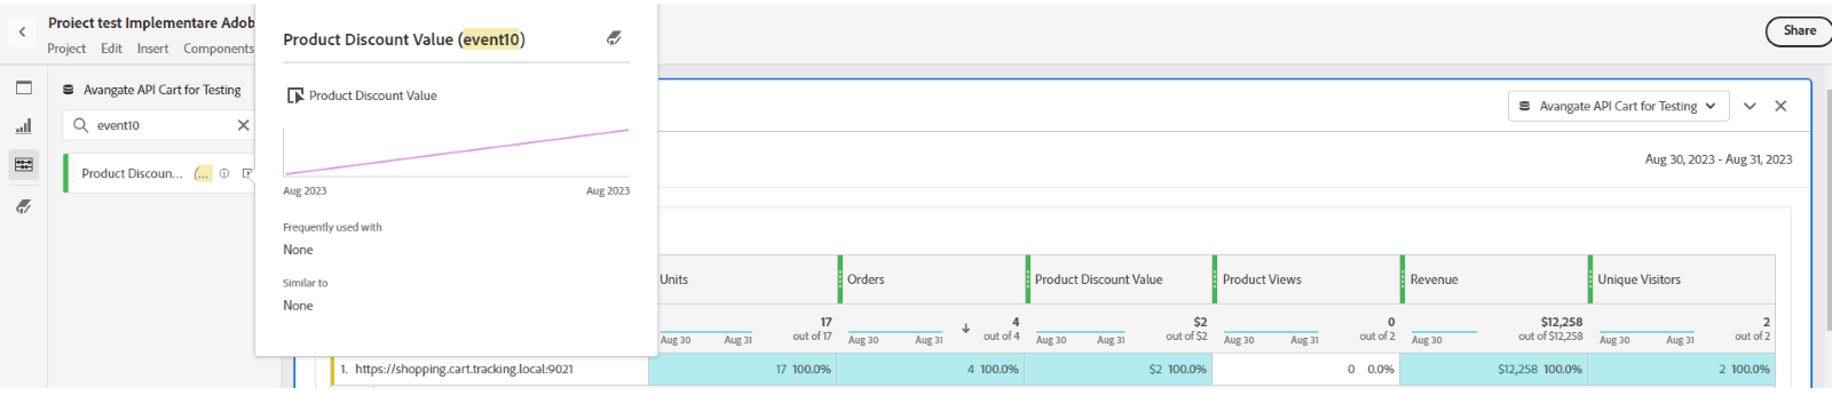
- After the event was created, it will appear in Adobe Analytics Workspaces, if you search for “event10” in the left-side panel.
Example on how to build a custom variable in Adobe Analytics
A. Session level variable – example evar8 Order ID (order ID/ purchase ID is not captured automatically by Adobe; if we want to capture this value, then it needs to be captured under a custom evar)
- Click on Edit Settings > Conversion > Conversion Variables to build custom variables.
- Click on Add New and define the new variable, for example evar8, add as name Order ID. Select Linear as allocation for order ID.
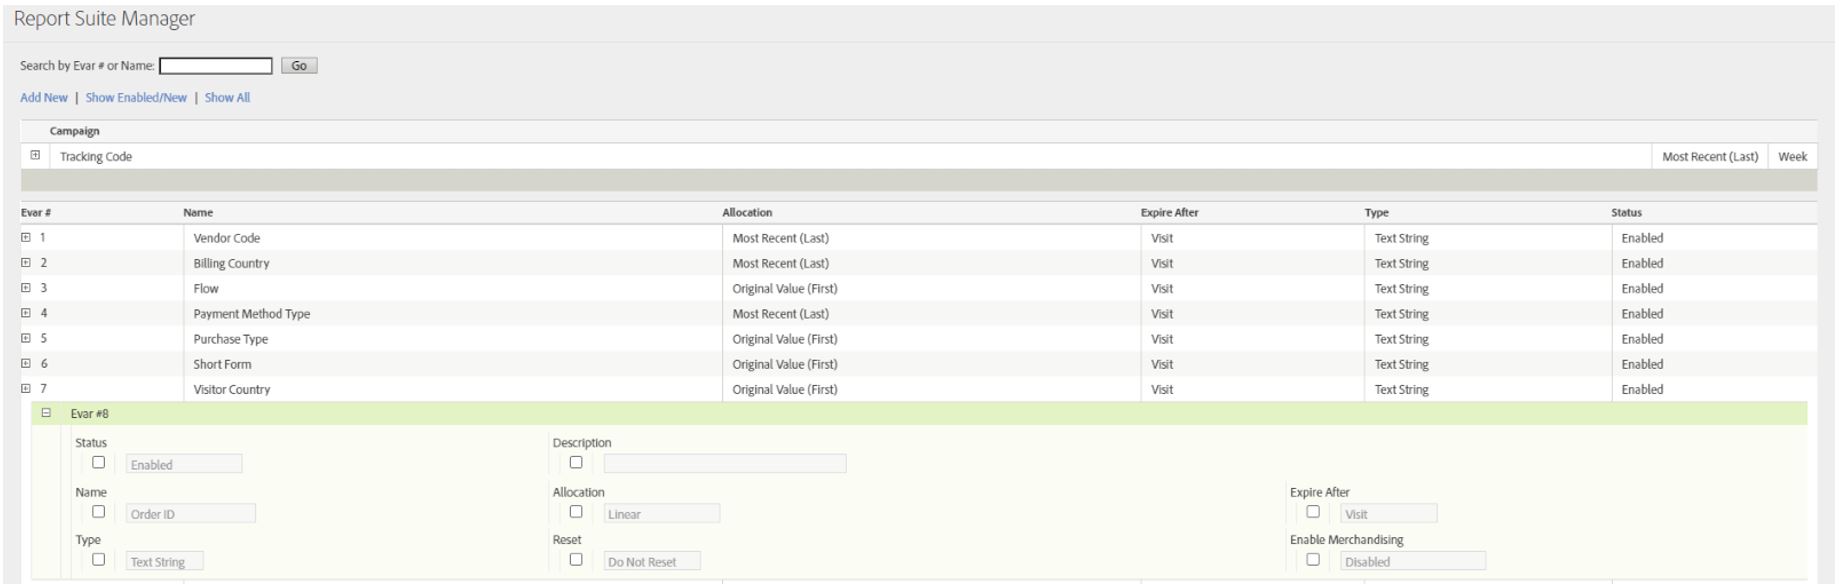
- Click Save at the bottom of the page.
- After the evar was created, it will appear in Adobe Analytics Workspaces, if you search for evar8 in the left-side panel.

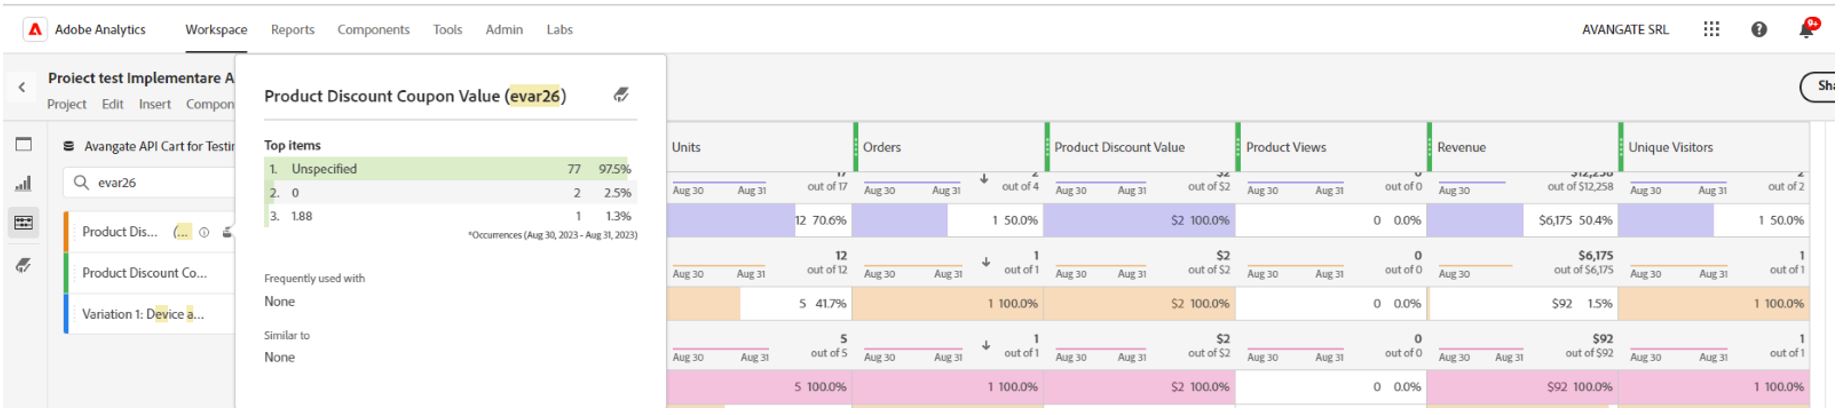
B. Merchandising variable (this is a product level variable) – example evar26 Product Discount Coupon Value
- Click Add New and define the new variable with Product Name “Product Discount Coupon Value”
- Click Enable merchandising (this is only applicable for merchandising evars – evars that send information specific for certain products, e.g., certain products in an order can have different coupon discounts).
- For Merchandising click Product Syntax from the drop-down list and Allocation Most Recent (Last).

- Click Save at the bottom of the page.
- After the evar was created, it will appear in Adobe Analytics Workspaces, if you search for evar26 in the left-side panel.