Google Universal Analytics Integration for Default Flows (without GTM)
Overview
analytics.js library is a JavaScript library that helps the vendor measure how users interact with their website. This guide explains how to add analytics.js to your website.
If you don’t have experience with code, you might want to seek assistance from a developer for the following steps.
Add the Google Universal Analytics code to the 2Checkout template
Integrate the code below (also called JavaScript tracking snippet) into your website's templates to enable analytics.js. The code snippet contains the data layer and must be added to the template file in the JavaScript code section. Depending on your having a custom domain or not, the appropriate code must be added.
Add the JavaScript tracking snippet code near the top of the <head> tag and before any other script or CSS tags. Also, the ‘UA-123156882-1’ highlighted string below needs to be replaced with your Google Universal Analytics property ID (or tracking ID).
If you don’t know the Google Universal Analytics property ID, you can find it here.
The JavaScript tracking snippet code can be pasted after the existing code, as shown in the image of the JavaScript code section of the Control Panel template files below.

Implementation with a custom domain
If you have a custom domain, the below JavaScript tracking code will be added in the JavaScript code section of your Merchant Control Panel template files:
<script>
(function(i,s,o,g,r,a,m){i['GoogleAnalyticsObject']=r;i[r]=i[r]||function(){
(i[r].q=i[r].q||[]).push(arguments)},i[r].l=1*new Date();a=s.createElement(o),
m=s.getElementsByTagName(o)[0];a.async=1;a.src=g;m.parentNode.insertBefore(a,m)
})(window,document,'script','https://www.google-analytics.com/analytics.js','ga');
ga('create', 'UA-123156882-1', 'auto');
ga('require', 'ec');
  if (omniture_vars.BILLING_CURRENCY) {ga('set', 'currencyCode', omniture_vars.BILLING_CURRENCY)};
if (omniture_vars.PAGE_NAME == "product"){
 for (var i=0;i<omniture_vars.CART_PRODUCTS.length;i++)
 {
    ga('ec:addProduct', {
     'id': omniture_vars.CART_PRODUCTS[i].ProductCode,
     'name': omniture_vars.CART_PRODUCTS[i].ProductName,
     'category': omniture_vars.CART_PRODUCTS[i].ProductCategory,
     'brand': omniture_vars.CART_PRODUCTS[i].ProductGroup
    });
   }
   ga('ec:setAction', 'detail');
}
 else if (omniture_vars.PAGE_NAME == "cart")
 {
  for (var i=0;i<omniture_vars.PRODUCT_ADDED_DETAILS.length;i++)
  {
    ga('ec:addProduct', {
     'id': omniture_vars.PRODUCT_ADDED_DETAILS[i].ProductCode,
     'name': omniture_vars.PRODUCT_ADDED_DETAILS[i].ProductName,
     'category': omniture_vars.PRODUCT_ADDED_DETAILS[i].ProductCategory,
     'brand': omniture_vars.PRODUCT_ADDED_DETAILS[i].ProductGroup
    });
   }
     ga('ec:setAction', 'add');
}
 else if (omniture_vars.PAGE_NAME == "checkout" || omniture_vars.PAGE_NAME == "checkcart")
 {
  for (var i=0;i<omniture_vars.CART_PRODUCTS.length;i++)
{
    ga('ec:addProduct', {
     'id': omniture_vars.CART_PRODUCTS[i].ProductCode,
     'name': omniture_vars.CART_PRODUCTS[i].ProductName,
     'category': omniture_vars.CART_PRODUCTS[i].ProductCategory,
     'brand': omniture_vars.CART_PRODUCTS[i].ProductGroup,
     'quantity': omniture_vars.CART_PRODUCTS[i].ProductQuantity
    });
   }
    ga('ec:setAction', 'checkout',{'step': 1});
}
 else if (omniture_vars.PAGE_NAME == "verify")
 {
  for (var i=0;i<omniture_vars.CART_PRODUCTS.length;i++)
  {
    ga('ec:addProduct', {
        'id': omniture_vars.CART_PRODUCTS[i].ProductCode,
        'name': omniture_vars.CART_PRODUCTS[i].ProductName,
        'category':omniture_vars.CART_PRODUCTS[i].ProductCategory,
        'brand': omniture_vars.CART_PRODUCTS[i].ProductGroup,
        'quantity': omniture_vars.CART_PRODUCTS[i].ProductQuantity
    });
   }
    ga('ec:setAction', 'checkout',{'step': 2});
}
else if (omniture_vars.PAGE_NAME == "finish" && omniture_vars.PURCHASE_COMPLETE === true)
{
  if (typeof myOrder != "undefined" && typeof myOrder.productsPrices != "undefined")
  {
    for (var k=0;k<myOrder.productsIds.length;k++)
    {
      ga('ec:addProduct', {
        'name': myOrder.productsNames[k],         // Name or ID is required.
        'id': myOrder.productsIds[k],
        'price': myOrder.productsPrices[k],
        'category': "",
        'quantity': myOrder.productsQuantities[k]
      });
    }
  }
ga('ec:setAction', 'purchase', {
   'id': omniture_vars.ORDER_REFNO,
      'revenue': myOrder.totalPrice,
            'tax': myOrder.tax
   });
}
ga('send', 'pageview');</script>
Implementation without a custom domain
If you are using the secure.2checkout.com domain, the additional JavaScript code below must be added to the second paragraph of the Google Universal Analytics code shown above, after the snippet ga('create', 'UA-123156882-1', 'auto'); and before the snippet ga('require', 'ec');.
Thus, the second paragraph will have the following form: the first yellow highlighted field needs to be replaced with your Google Universal Analytics property ID (or tracking ID), and the second highlighted field needs to be updated with your own website domain.
ga('create', 'UA-123156882-1', 'auto', {'allowLinker': true});
ga('require', 'linker');
ga('linker:autoLink', ['mywebsite.com'] );
ga('require', 'ec');
This additional code above is required for cross-domain tracking so that the visitor on your own website is recognized as the same visitor when entering the 2Checkout template.
Step 2: Set the Google Universal Analytics JavaScript code on your own website
Implementation with a custom domain
You should use the default Google Universal Analytics tracking script for analytics.js provided by Google, which has the following form (the string highlighted in yellow must be updated with the property ID of the vendor):
<script>
(function(i,s,o,g,r,a,m){i['GoogleAnalyticsObject']=r;i[r]=i[r]||function(){
(i[r].q=i[r].q||[]).push(arguments)},i[r].l=1*new Date();a=s.createElement(o),
m=s.getElementsByTagName(o)[0];a.async=1;a.src=g;m.parentNode.insertBefore(a,m)
})(window,document,'script','https://www.google-analytics.com/analytics.js','ga');

ga('create', 'UA-XXXXX-Y', 'auto');
ga('send', 'pageview');
</script>
Implementation without a custom domain
If you are using the secure.2checkout.com domain, the following settings must be applied: the Google Universal Analytics JavaScript tracking code on your own website must be updated and have the following form (highlighted in yellow is the Google Analytics property ID that needs to be replaced with your own GA property ID code).
<script>
(function(i,s,o,g,r,a,m){i['GoogleAn alyticsObject']=r;i[r]=i[r]||function(){
(i[r].q=i[r].q||[]).push(arguments)},i[r].l=1*new Date();a=s.createElement(o),
m=s.getElementsByTagName(o)[0];a.async=1;a.src=g;m.parentNode.insertBefore(a,m)
})(window,document,'script','https://www.google-analytics.com/analytics.js','ga');
ga('create', 'UA-123156882-1', 'auto', {'allowLinker': true});
ga('require', 'linker');
ga('linker:autoLink', ['secure.2checkout.com'] );
ga('send', 'pageview');
</script>
Below are the elements that are different from the default Google Universal Analytics analytics.js tracking code and that enable cross-domain tracking. This code snippet is integrated into the rest of the code provided in the Google documentation here:
{'allowLinker': true});
ga('require', 'linker');
ga('linker:autoLink', ['secure.2checkout.com'] );
Sending MyOrder Data to Google Universal Analytics
By default, the myOrder object is displayed only for orders with payments authorized instantly (this includes usually credit cards and PayPal), after the payment is complete (transaction needs to be authorized successfully). To have the myOrder object available for all placed orders regardless of the payment status (to send revenue to Google Universal Analytics based on myOrder.TotalPrice, or more offline payment methods orders), follow the steps below.
- Log in to your Merchant Control Panel account.
- Go to Setup → Ordering Options.
- Scroll down to the After sale message area and check the checkbox for the Show message for all placed orders option.
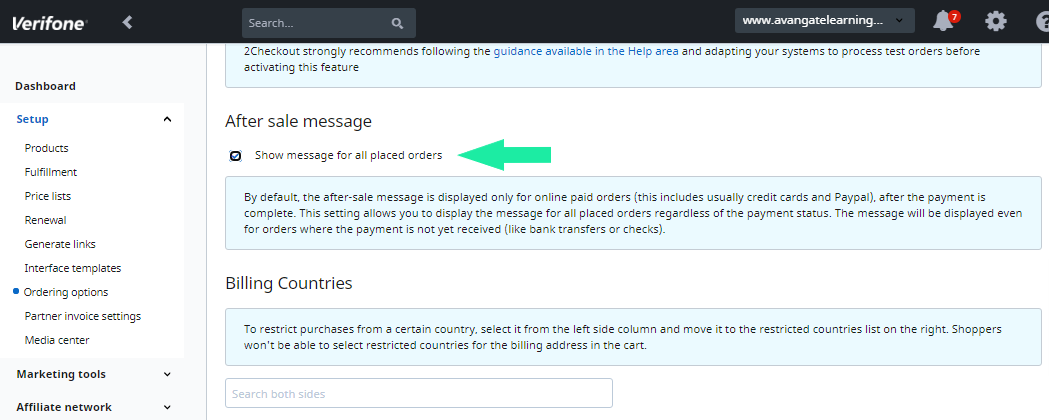
3. Click Save settings at the bottom of the page.
A JavaScript object called myOrder is available on the ‘Thank you’ page providing information about the purchased products including ID, quantity, name, price, etc.
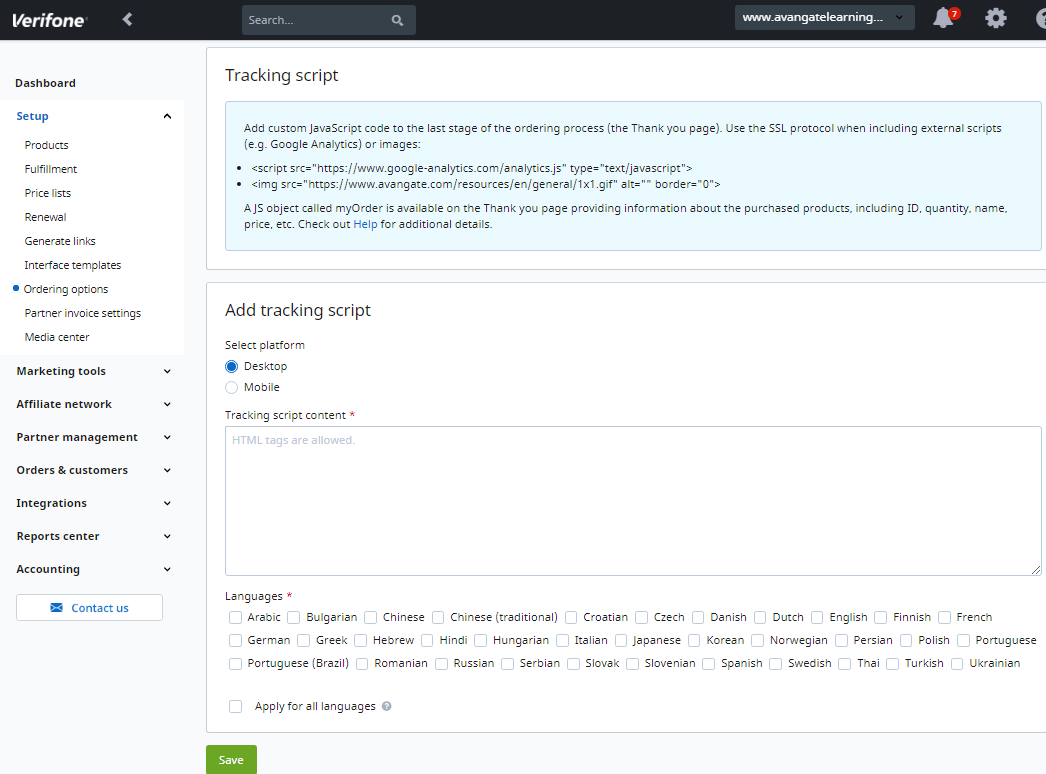
To see information about orders in Google Universal Analytics, follow these steps:
- Log in to your Merchant Control Panel account.
- Navigate to Setup → Ordering Options and click on the Analytics tab.

3. Scroll down to the Tracking script section and add a code snippet (for example add <div></div>).
4. Apply the code to all languages or to the languages for which you want your template to be tracked.
5. Click Save at the bottom of the page.
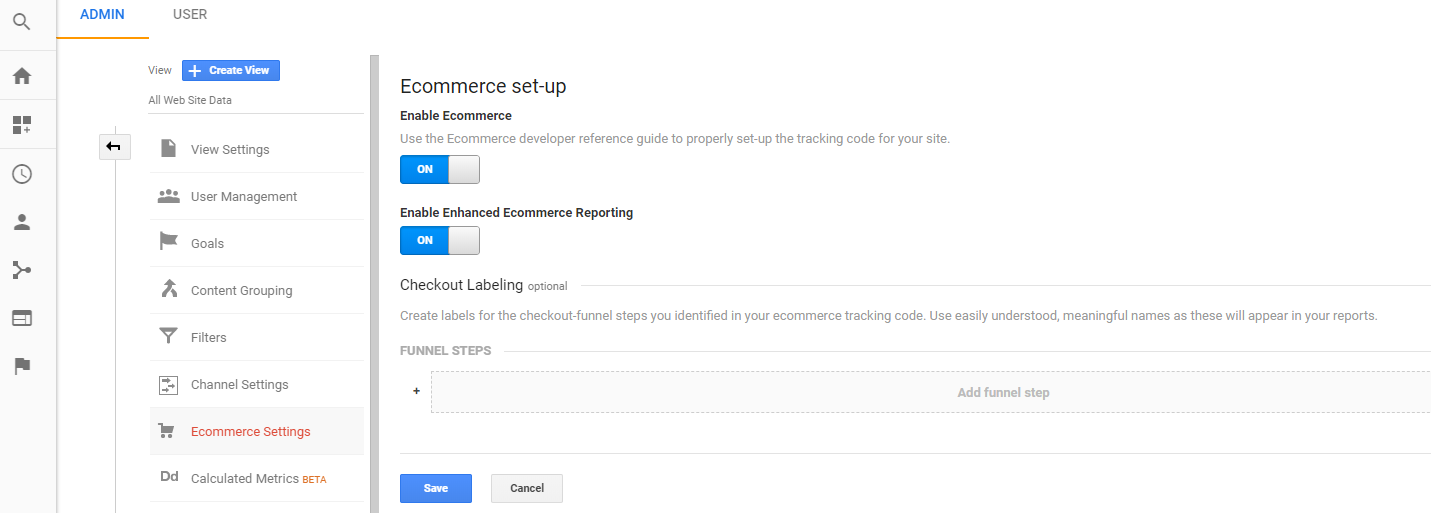
Enable Enhanced E-commerce tracking in Google Universal Analytics
In your Google Universal Analytics Control Panel, go to Admin → All Web Site Data → Ecommerce Settings and enable both the Enable Ecommerce and the Enable Enhanced Ecommerce Reporting buttons, as shown in the image below.